1. Inleiding
Thank you for choosing the Crivit Auriol Radio-Controlled Projection Alarm Clock. This device combines a precise radio-controlled clock with a clear LCD display, dual alarms, and a convenient projection feature. This manual will guide you through the setup, operation, and maintenance of your new alarm clock.

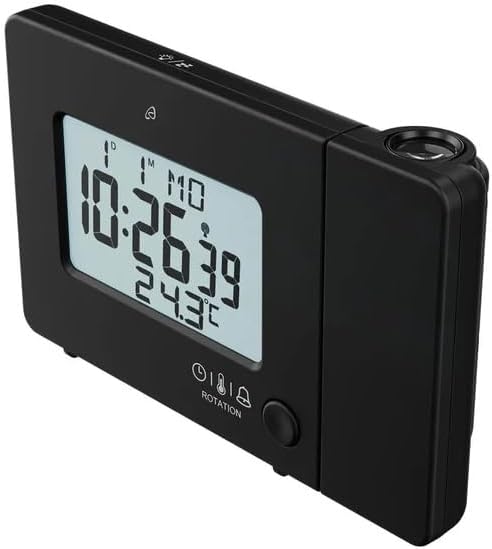
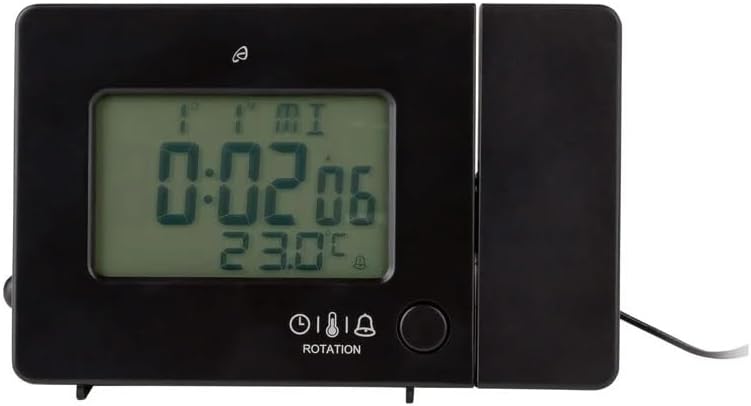
Voorkant view of the alarm clock displaying time, date, and temperature.
2. Veiligheidsinstruksies
- Lees alle instruksies sorgvuldig voor gebruik en bewaar dit vir toekomstige verwysing.
- Moenie die toestel blootstel aan uiterste temperature, direkte sonlig of hoë humiditeit nie.
- Vermy om die toestel te laat val of aan sterk impakte te onderwerp.
- Moenie probeer om die toestel self uitmekaar te haal of te herstel nie. Kontak gekwalifiseerde dienspersoneel.
- Hou batterye buite bereik van kinders. Gooi gebruikte batterye weg volgens plaaslike regulasies.
- Use only the provided AC adapter or one with identical specifications.
3. Pakketinhoud
Kontroleer asseblief die pakket vir die volgende items:
- Crivit Auriol Radio-Controlled Projection Alarm Clock (Model 373928)
- Wisselstroomadapter
- Batteries (pre-installed or separate)
- Gebruikershandleiding (hierdie dokument)

Included AC power adapter.
4. Produkkenmerke
- Radiobeheerde Tyd: Automatic time synchronization for precise timekeeping.
- Projeksie funksie: Projects time, alarm times, or ambient temperature onto a wall or ceiling.
- Pivoting Projection Arm: Adjustable projection angle with easy focus adjustment.
- LCD-skerm: Clear screen showing time, day, month, week number/day of the week, and indoor temperature.
- Dubbele alarms: Two independent alarm settings with snooze function.
- Raaksensor: Activates short-term projection and screen backlight.
- Kragopsies: Operates via AC adapter or batteries.
- USB-A-laaipoort: Convenient 5V, 800mA output for charging external devices.
- Verstelbare helderheid: Customizable display brightness.
5. Komponentidentifikasie
Voorkant View:
Voorkant view with LCD display.
- LCD-skerm: Shows time, date, temperature, alarm status, and radio control signal.
- Touch Sensor Area: Located above the display, for temporary backlight and projection.
- Projection Indicator: Icon indicating projection is active.
- Alarm aanwysers: Icons for Alarm 1 and Alarm 2.
- Rotasie knoppie: Adjusts projection orientation.
Kant View (Projection Arm):
Kant view with projection arm extended.
- Projeksiearm: Pivots to direct the projection.
- Fokuswiel: Pas die helderheid van die geprojekteerde beeld aan.
- Projeksie lens: Emits the time/temperature display.
Agter View:

Agter view with control buttons and ports.
- -/WEEK Button: Decreases values, sets week display.
- +/ZONE Button: Increases values, sets time zone.
- °C/°F-knoppie: Toggles temperature unit.
- LANG Button: Selects display language for day of the week.
- 12/24-knoppie: Toggles 12/24 hour format.
- MODUS-knoppie: Cycles through settings modes (Time, Alarm 1, Alarm 2).
- SET -knoppie: Enters setting mode for current display.
- RESET-knoppie: Resets the device to factory defaults (use a pointed object).
- Battery kompartement: For backup batteries.
- DC IN-poort: Vir die koppeling van die wisselstroomadapter.
- USB-A-uitsetpoort: Vir die laai van eksterne toestelle.
6. Opstelling
6.1. Aanskakel
The alarm clock can be powered by either the included AC adapter or batteries for backup.
- Battery installasie: Open the battery compartment on the rear of the unit. Insert the included batteries, observing the correct polarity (+/-). Batteries primarily serve as backup in case of power outage.
- AC-adapterverbinding: Connect the small plug of the AC adapter into the DC IN port on the back of the alarm clock. Plug the AC adapter into a standard wall outlet. The display will light up.
Alarm clock connected to power.
6.2. Initial Setup and Radio Control Synchronization
Upon first power-up or after a reset, the clock will automatically attempt to synchronize with the radio-controlled time signal (DCF77). This process can take several minutes to an hour, depending on your location and signal strength. During synchronization, a radio tower icon will flash on the display.
- Plaas die horlosie naby 'n venster vir beter seinontvangs.
- Vermy die plasing daarvan naby elektroniese toestelle wat steuring kan veroorsaak.
- Once synchronized, the radio tower icon will appear solid on the display.
If the radio signal is not received, you may need to set the time manually (see Section 7.1).
6.3. Basic Settings (if not automatically set or for adjustment)
Druk die STEL button to enter setting mode. Use the -/WEEK en +/ZONE buttons to adjust values, and STEL om te bevestig en na die volgende instelling te gaan.
- Tydsone: Adjust if you are not in the standard time zone for the radio signal.
- 12/24-uur-formaat: Druk die 12/24 knoppie om te wissel tussen 12-uur (met AM/PM) en 24-uur formate.
- Temperatuur-eenheid: Druk die ° C / ° F. knoppie om tussen Celsius en Fahrenheit te wissel.
- Vertoontaal: Druk die LANG button to select the language for the day of the week display (5 languages available).
7. Bedryfsinstruksies
7.1. Stel tyd handmatig in
If the radio-controlled time signal is weak or unavailable, you can set the time manually:
- Druk en hou die STEL knoppie totdat die uursyfers flikker.
- Gebruik die -/WEEK en +/ZONE knoppies om die uur aan te pas.
- Druk STEL to confirm and move to minutes, then year, month, and day.
- Druk STEL again to exit manual time setting.
7.2. Alarms instel (Alarm 1 en Alarm 2)
Die horlosie beskik oor twee onafhanklike alarms.
- Druk die MODUS button once to display Alarm 1 time, or twice for Alarm 2 time. The corresponding alarm icon (e.g., A1) will flash.
- Terwyl die alarmtyd vertoon word, druk en hou die STEL knoppie totdat die uursyfers flikker.
- Gebruik die -/WEEK en +/ZONE knoppies om die uur aan te pas.
- Druk STEL to confirm and move to minutes. Adjust minutes using -/WEEK en +/ZONE.
- Druk STEL again to confirm and exit alarm setting.
- Om 'n alarm te aktiveer/deaktiveer, druk die MODUS button to display the desired alarm, then press the +/ZONE button. The alarm icon (bell) will appear/disappear on the display.
7.3. Sluimerfunksie
When an alarm sounds, touch the Raak Sensor Area of druk die SNOOZE / LIG button (if available, otherwise use the touch sensor) to activate the snooze function. The alarm will pause for approximately 5 minutes and then sound again. To stop the alarm completely, press any other button.
7.4. Projection Function
The alarm clock can project the time, alarm times, or ambient temperature onto a wall or ceiling.
- Aktiveer Projeksie: The projection is continuously active when powered by the AC adapter. If running on batteries, touch the Raak Sensor Area for short-term projection.
- Pas projeksiehoek aan: Pivot the projection arm to direct the image to your desired location.
- Pas fokus aan: Gebruik die Fokuswiel on the projection arm to sharpen the projected image.
- Change Projected Content: Druk die MODUS button repeatedly to cycle through projecting Time, Alarm 1, Alarm 2, or Temperature.
- Roteer projeksie: Druk die ROTASIE button to rotate the projected image by 90-degree increments (4 orientations available).

Time projected onto a surface.
7.5. Vertoon Agterlig
When powered by the AC adapter, the display backlight is continuously on. When running on batteries, touch the Raak Sensor Area to activate the backlight for a few seconds.
7.6. USB Charging Output
The USB-A port on the back of the unit provides a 5V, 800mA output for charging small electronic devices like smartphones or tablets. Connect your device's USB charging cable to this port.
8. Onderhoud
- Skoonmaak: Vee die toestel af met 'n sagte, droë lap. Moenie skuurmiddels of oplosmiddels gebruik nie.
- Battery vervanging: If using batteries for backup, replace them annually or when the display becomes dim during power outages. Ensure correct polarity.
- Berging: Indien die toestel vir 'n lang tydperk gestoor word, verwyder die batterye om lekkasie te voorkom.
9. Probleemoplossing
| Probleem | Moontlike oorsaak | Oplossing |
|---|---|---|
| Die skerm is leeg of dof. | No power, dead batteries, or AC adapter not connected. | Ensure AC adapter is securely connected. Replace batteries if using for backup. |
| Radio-controlled time not synchronizing. | Weak signal, interference, or incorrect time zone. | Move the clock to a window or open area. Avoid electronic devices. Manually set time if necessary. Check time zone setting. |
| Projeksie is vaag. | Fokus nie aangepas nie. | Pas die Fokuswiel on the projection arm. |
| Die alarm lui nie. | Alarm nie geaktiveer of verkeerd gestel. | Ensure the alarm icon is visible on the display. Recheck alarm time settings. |
| USB-laai werk nie. | Device not properly connected, or device requires more power than 800mA. | Ensure the USB cable is securely connected. Check if your device's charging requirements exceed 5V/800mA. |
10. Spesifikasies

Produk afmetings.
- Modelnommer: 373928
- Afmetings (L x B x H): 15 x 3.81 x 9.5 cm (approx. 15l x 9.5H centimeters)
- Materiaal: Plastiek
- Vertoon tipe: Digitale LCD
- Kragbron: AC Adapter (included) or Batteries (included)
- USB-uitset: 5V, 800mA
- Spesiale kenmerke: Adjustable brightness, Snooze, Projection, Radio-controlled time
- Beweging tipe: Kwarts
- Montage tipe: Tafelblad
- Binne/buite gebruik: Binneshuise
11. Waarborg en Ondersteuning
This Crivit Auriol Projection Alarm Clock comes with a standard manufacturer's warranty. Please refer to the warranty card included in your package or contact your retailer for specific warranty terms and conditions.
For technical support or inquiries, please contact the customer service department of your retailer or the Crivit support line as indicated on the product packaging or official webwebwerf.