1. Inleiding
The Waveshare UGV02 is a versatile 6-wheel drive (6x4WD) mobile robot chassis designed for off-road applications. It features robust construction, excellent shock absorption, and an open-source architecture for extensive secondary development. This manual provides essential information for setting up, operating, and maintaining your UGV02 chassis.

Image: The Waveshare UGV02 6x4 Off-Road Mobile Robot Chassis, showcasing its robust design and wheels.
2. Pakketinhoud
Verify that all items listed below are present in your package. If any components are missing or damaged, please contact customer support.

Beeld: Oorview of the UGV02 package contents, including the assembled UGV02 kit, accessories pack, power supply, USB cable, Picatinny rail, mounting plate, and camera holder.
- UGV02 Kit (assembled chassis)
- Toebehore pak
- 12.6V 2A kragbron
- USB kabel
- Picatinny spoor
- Montageplaat
- Kamerahouer
- Extension rails and ESP32 slave computer (as part of the kit)
3. Sleutel kenmerke
- 6 Wheels x 4WD Design: Provides strong power and increased ground contact for stability and load capacity.
- Veldpad vermoë: Flexible rubber tires and shock absorption system for complex terrains.
- High-Strength Aluminum Body: Constructed from 2mm thick 5052 Aluminum Alloy for durability and protection.
- Multiple Host Computer Support: Compatible with Raspberry Pi, Jetson Nano, Jetson Orin Nano, etc., communicating via serial port with the ESP32 slave computer.
- ESP32 Slave Computer: Built-in multi-functional robot driver board with Wi-Fi and Bluetooth, supporting serial bus servos, PWM signal output, and TF card expansion.
- 3S UPS Power Supply Module: Supports 3 x 18650 Li batteries (not included) for uninterruptible power, charging, and simultaneous power output.
- Extension Rails: Includes 2 x 10²⁰ European standard profile rails for installing additional peripherals.
- Open-Source Demos & Web Aansoek: Facilitates secondary development and remote control.
- Multi-functional Mounting Plate: Allows installation of various peripherals like LIDAR, cameras, and other modules.

Image: Visual representation of the UGV02's key features, including full metal body, extension rails, 6 wheels x 4WD, ESP32 slave computer, 0.91" OLED, UART/I2C communication, open source, web app, 9-axis IMU, shock-absorbing tires, multi-host support, and multi-functional driver board.
4. Opstelgids
4.1 Kragtoevoerinstallasie
The UGV02 requires three 18650 Li-ion batteries (not included) for operation. These batteries are installed in the 3S UPS power supply module.
- Ensure the UGV02 is powered off.
- Vind die batterykompartement op die onderstel.
- Insert three 18650 Li-ion batteries into the 3S UPS power supply module, ensuring correct polarity.
- Maak die batteryklepdeksel vas.
- Connect the power supply module to the UGV02's charging port.

Image: Illustration of the 3S Lithium battery UPS power supply module, showing where three 18650 batteries (not included) are inserted. This module provides uninterruptible power and supports charging.
4.2 Host Computer Connection (Optional)
The UGV02 supports various host computers like Raspberry Pi, Jetson Nano, or Jetson Orin Nano. The host computer communicates with the onboard ESP32 slave computer via a serial port.
- Choose your desired host computer.
- Mount the host computer onto the UGV02 chassis using the provided mounting plate or extension rails.
- Connect the host computer to the ESP32 slave computer via the serial communication interface. Refer to the host computer's documentation for specific serial port configuration.
- If using Wi-Fi, connect the Wi-Fi antenna to the reserved interface on the UGV02.

Image: Depicts the UGV02 chassis with a multi-functional mounting plate, showing how various host computers like Jetson Orin Nano, Raspberry Pi 4B, and Raspberry Pi Zero can be connected. It also illustrates the mounting plate's design for peripherals like LIDAR and cameras.
4.3 Peripheral Installation (Optional)
The UGV02 comes with extension rails and a multi-functional mounting plate for adding peripherals.
- Extension Rails: Use the 1020 European standard profile rails to install additional modules. Boat nuts and M4 screws are included for secure attachment.
- Monteerplaat: The multi-functional mounting plate allows for the installation of LIDAR (e.g., LD19, STL 27L), cameras, or other custom modules. Open-source DXF drawings and 3D models are available for secondary development.
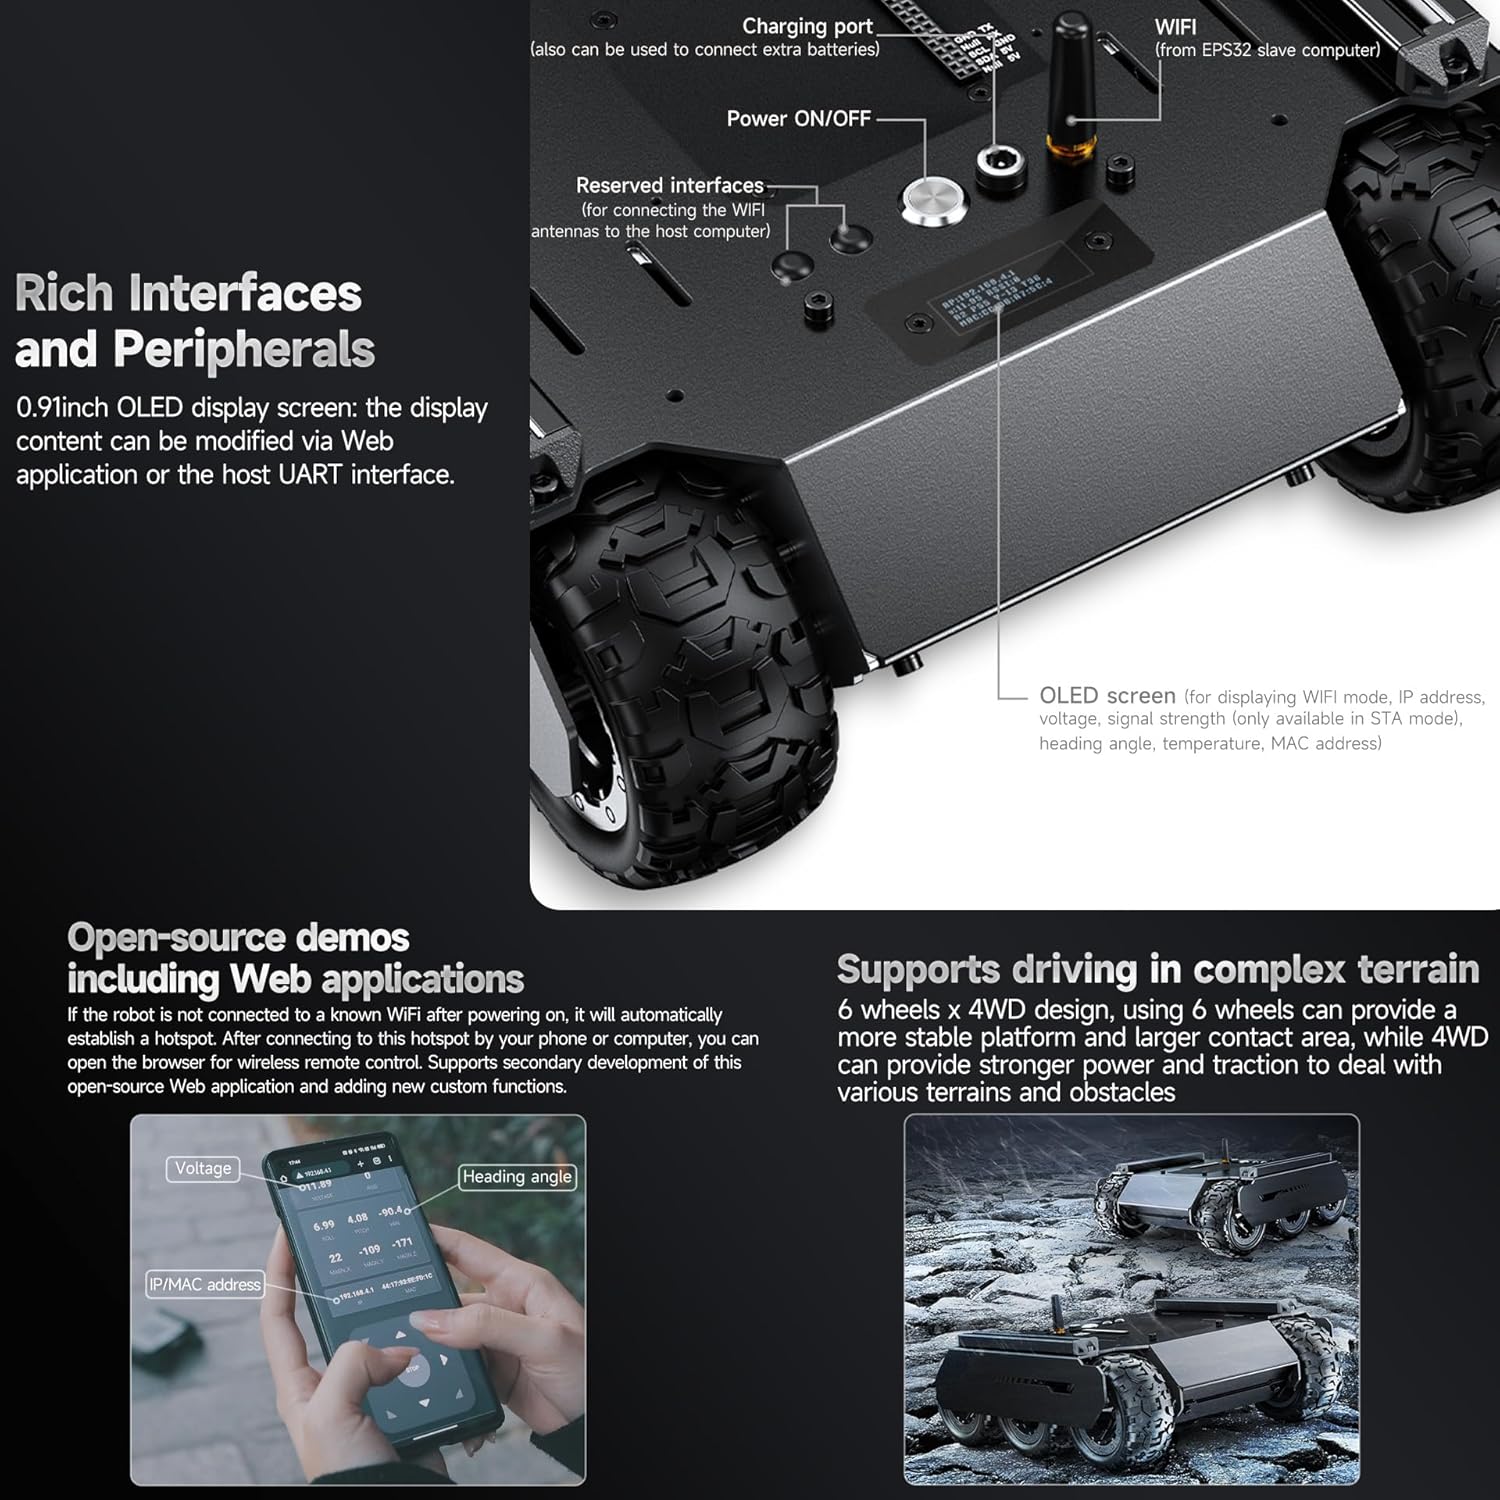
Image: Shows the aluminum extension rails on the UGV02 and how additional peripherals can be mounted using boat nuts. It also highlights the Picatinny rail and M4 screws for accessory attachment.
5. Bedryfsinstruksies
5.1 Aan-/afskakel
Locate the Power ON/OFF switch on the UGV02 chassis. Press the switch to power on or power off the robot.
5.2 Basic Control via Web Toepassing
The UGV02 features an open-source web application for remote control and monitoring.
- Power on the UGV02. If it is not connected to a known Wi-Fi network, it will automatically establish a hotspot.
- Connect your smartphone or computer to the UGV02's Wi-Fi hotspot.
- Maak oop a web browser and navigate to the IP address provided by the UGV02 (usually displayed on the 0.91-inch OLED screen or found in the hotspot details).
- Die web application interface will allow you to control the robot's movement, monitor voltage, heading angle, and other parameters.

Image: A smartphone screen displaying the UGV02's web application interface, showing controls for voltage, heading angle, and IP/MAC address. This interface allows for remote control and monitoring of the robot.
5.3 Advanced Control and Secondary Development
For advanced users, the UGV02's open-source nature allows for extensive customization and development.
- UART-kommunikasie: Send JSON commands via the web application or UART communication to control peripherals, configure serial bus servos, obtain servo feedback, and IMU information.
- PWM Signal Output: Control the angle of PWM servos.
- OLED -skerm: Modify the content displayed on the 0.91-inch OLED screen.
- Multi-functional Driver Board: The ESP32-based driver board can be used as a sub-controller, handling low-level computations, PID control for wheel speed, inverse kinematics for robotic arm linkages, and position interpolation. It also reads sensor data (9-axis IMU, INA219 battery voltage detection) and can independently stabilize camera vertical movement.

Image: Illustrates the UGV02 with a robotic arm and pan-tilt camera attached, demonstrating the use of serial bus servos and PWM servos. It also shows the slave computer driver board, highlighting its role in controlling various peripherals.
6. Onderhoud
- Skoonmaak: Regularly clean the chassis and wheels to remove dirt, dust, and debris, especially after off-road use. Use a soft, dry cloth. Avoid using harsh chemicals or excessive moisture.
- Batterysorg:
- Ensure 18650 batteries are charged using the provided power supply.
- Moenie batterye oorlaai of diep ontlaai nie.
- Store the UGV02 with partially charged batteries if not in use for extended periods.
- Band inspeksie: Periodically check the flexible rubber tires for wear, tears, or damage. Replace if necessary to maintain optimal traction and shock absorption.
- Komponentkontrole: Inspect all connections, screws, and mounted peripherals regularly to ensure they are secure.
- Sagteware-opdaterings: Check the Waveshare official website or community forums for any available firmware or software updates for the ESP32 slave computer or host computer.
7. Probleemoplossing
| Probleem | Moontlike oorsaak | Oplossing |
|---|---|---|
| UGV does not power on. |
|
|
| Cannot connect to UGV via Wi-Fi. |
|
|
| Robot movement is erratic or unresponsive. |
|
|
8. Spesifikasies
| Kenmerk | Detail |
|---|---|
| Model | UGV02 |
| Omlyn afmetings | 252 x 230 x 94 mm |
| Onderstel Hoogte | 25 mm |
| Bandwydte | 42 mm |
| Banddiameter | 80 mm |
| Aantal wiele | 6 |
| Gewig | 2 kg (chassis only) |
| Driving Payload | 4 kg |
| Battery Ondersteuning | 3 x 18650 Lithium batteries (in series, NOT included) |
| Laai tyd | 1.5 uur |
| Motor Krag | 5W x 4 |
| Upper Surface Area | 37864 mm² |
| Bande-materiaal | Nylon wheel hub, rubber tire |
| Rail Center Distance | 203 mm |
| Loopspoed | 0.05 - 1.3 m/s |
| Number of Driving Wheels | 4 |
| Liggaam Materiaal | 2mm (thickness) 5052 Aluminum Alloy |
| Vertical Obstacle Ability | 40 mm |
| Klim vermoë | 22° |
| Minimum draai radius | 0 m (in-situ Rotation) |
| Batterylewe | 45 min (full power continuous output) |
| Afstandbeheer funksie | WIFI AP/STA |
| Kommunikasie-koppelvlak | UART / serial bus servo interface / I2C |

Image: Technical drawing showing the dimensions of the UGV02 chassis in millimeters, including top, side, and front views met sleutelmetings.
9. Waarborg en Ondersteuning
Vir waarborginligting en tegniese ondersteuning, verwys asseblief na die amptelike Waveshare webwebwerf of kontak hul kliëntediens direk. Besonderhede rakende spesifieke waarborgtydperke en ondersteuningskanale word tipies saam met u aankoopdokumentasie of op die vervaardiger se webwebwerf.
Vervaardiger: Golfaandeel
Modelnommer: UGV02
ASIN: B0C9QQQTDP
Vir verdere hulp kan u die Waveshare Winkel op Amazon.


