Inleiding
Thank you for choosing the La Crosse Technology WS6207 Modern Design Weather Station. This device provides accurate indoor and outdoor temperature and humidity readings, a radio-controlled clock, weather forecasts, and other useful meteorological data. This manual will guide you through the setup, operation, and maintenance of your new weather station.
Sleutel kenmerke:
- Radio-controlled time and date (12 or 24-hour format)
- Calendar and day of the week display in 7 languages
- Twee alarms met sluimerfunksie
- Indoor and outdoor temperature and humidity display
- Min/Max records for temperature and humidity
- Outdoor temperature alerts
- Binne-geriefsaanwyser
- Weather forecast with atmospheric pressure detection
- Snow alert and moon phases display
- Window opening/closing advice
- Verstelbare agterlig
- Supports up to 3 outdoor sensors (one included)
- Lae battery aanwyser
- Frekwensie: 433 MHz
Pakketinhoud
Kontroleer asseblief dat alle items teenwoordig en in goeie toestand is:
- 1 x WS6207 Modern Design Weather Station (Main Unit)
- 1 x Draadlose buitesensor
- 1 x Gebruikershandleiding

Prent: The La Crosse Technology WS6207 weather station displayed in a home setting. This image provides an overall view of the product and its modern design with a wooden base.
Opstelling
1. Aanskakeling van die buitesensor
- Maak die batteryklep aan die agterkant van die buitesensor oop.
- Insert 2 x AA batteries (not included) according to the polarity markings (+/-).
- Maak die batterykompartement se deksel stewig toe.
2. Aanskakeling van die hoofeenheid
- Maak die batteryklep aan die agterkant van die hoofeenheid oop.
- Plaas 3 x AAA-batterye (nie ingesluit nie) volgens die polariteitsmerkies (+/-).
- Close the battery compartment cover securely. The display will light up and begin searching for the outdoor sensor and radio-controlled time signal.
3. Sensorplasing
For accurate outdoor readings, place the wireless sensor in a shaded area, away from direct sunlight and sources of heat or moisture. Ensure it is protected from direct rain. The maximum transmission range is approximately 100 meters (330 feet) in open air. Walls and other obstructions may reduce this range.
4. Aanvanklike Sinchronisasie
After inserting batteries into both units, the main unit will automatically attempt to connect with the outdoor sensor. This process may take a few minutes. Once connected, the outdoor temperature and humidity will appear on the main unit's display.
5. Radio-Controlled Time Setup
The weather station will automatically attempt to synchronize with the DCF (or similar regional) radio time signal. This process can take several hours, especially during initial setup. For best reception, place the unit near a window and away from electronic devices that may cause interference. The time will automatically adjust for Daylight Saving Time (DST).
Bedryfsinstruksies
1. Vertoon oorview
The main unit's LCD display is divided into several sections, providing a comprehensive overview of current conditions and time information.

Prent: This image displays the main unit's screen, illustrating the layout of information including the current time, date, day of the week, indoor temperature and humidity, outdoor temperature and humidity, and weather forecast icons.
- Top afdeling: Weather forecast icons (sunny, cloudy, rainy, snowy), atmospheric pressure, and radio-controlled time.
- Middelafdeling: Current time, DST indicator, date, and day of the week.
- Bottom Left Section: Outdoor temperature and humidity, with min/max indicators.
- Bottom Right Section: Indoor temperature and humidity, with comfort indicator (DRY, OK, WET).
2. Setting Time and Date Manually
If the radio-controlled time signal is not available, you can set the time and date manually. Refer to the detailed instructions in the included printed manual for specific button presses.
3. Alarm funksie
The weather station features two independent alarms. To set an alarm, press the 'ALARM' button, then use the '+' and '-' buttons to adjust the hour and minute. Press 'ALARM' again to confirm. The snooze function can be activated by pressing any button (except 'ALARM' or 'SET') when the alarm sounds.
4. Temperatuur en humiditeit vertoon
Press the 'C/F' button to switch between Celsius and Fahrenheit temperature units. The station automatically records minimum and maximum temperature and humidity values for both indoor and outdoor readings. Press the 'MIN/MAX' button to cycle through these records.
5. Weervoorspelling
The weather station predicts weather conditions for the next 12-24 hours based on atmospheric pressure changes. The forecast icons (sunny, partly cloudy, cloudy, rainy, snowy) are indicative and may not always reflect real-time conditions. The atmospheric pressure is displayed in hPa.
6. Window Opening/Closing Advice
This feature provides a recommendation on whether to open or close windows based on the indoor and outdoor temperature and humidity differences, aiming to optimize indoor comfort and energy efficiency.
7. Verstelbare agterlig
The display features an adjustable backlight for improved visibility in various lighting conditions. Press the 'LIGHT' button to cycle through different brightness levels or to turn it off.
Onderhoud
1. Battery vervanging
When the low battery indicator appears on the display for either the main unit or the outdoor sensor, replace the batteries promptly. Use fresh, high-quality batteries of the specified type (AAA for main unit, AA for sensor).
2. Skoonmaak
Clean the weather station and sensor with a soft, damp lap. Moenie skuurmiddels of oplosmiddels gebruik nie, aangesien dit die skerm ofasing. Ensure no moisture enters the battery compartments.
3. Berging
If the weather station will not be used for an extended period, remove all batteries from both units to prevent leakage and corrosion. Store the units in a cool, dry place.
Probleemoplossing
- No display on main unit: Check if batteries are inserted correctly with correct polarity. Replace with fresh batteries.
- Outdoor sensor not connecting: Ensure the sensor is within range of the main unit. Check and replace sensor batteries. Press the 'SEARCH' button on the main unit (if available) to manually initiate a search for the sensor. Avoid major metal objects or electronic interference between units.
- Inaccurate temperature/humidity readings: Ensure the outdoor sensor is placed in a shaded, well-ventilated area, away from direct sunlight, heat sources, or excessive moisture. Allow time for readings to stabilize after initial setup or battery replacement.
- Time not synchronizing (radio-controlled clock): Place the main unit near a window, away from electronic devices that may cause interference. Allow up to 24 hours for the initial synchronization. Manual time setting is an alternative if the signal is consistently weak.
- Weather forecast seems incorrect: The weather forecast is a prediction based on atmospheric pressure trends and may not always match local conditions perfectly. It is an indication for the next 12-24 hours, not a real-time observation.
Spesifikasies
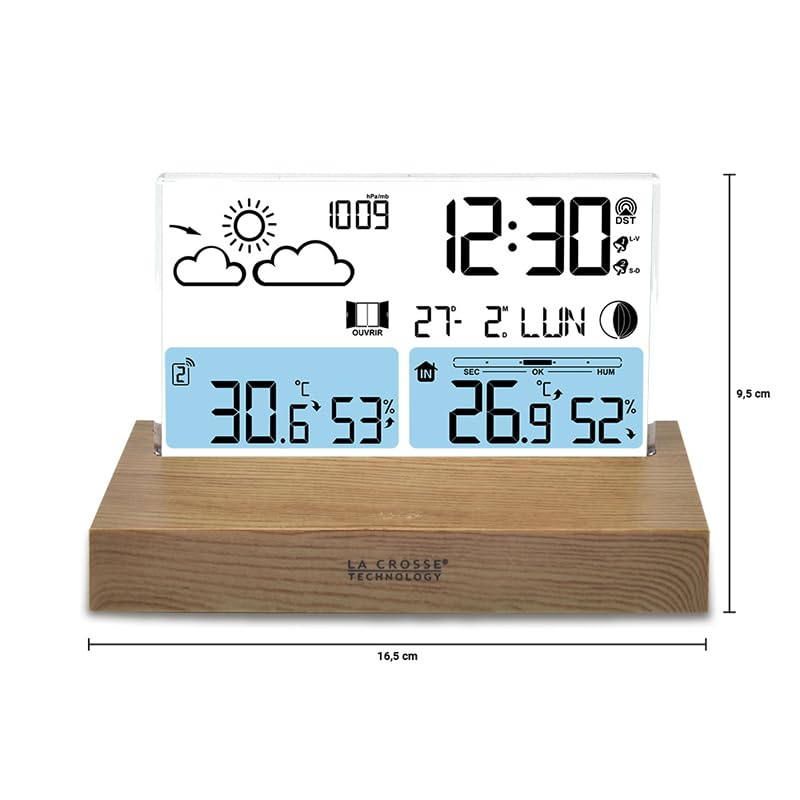
Prent: This diagram illustrates the physical dimensions of the weather station's main unit, indicating a width of 16.5 cm and a height of 9.5 cm, useful for placement considerations.
| Kenmerk | Detail |
|---|---|
| Modelnommer | WS6207 |
| Afmetings (hoofeenheid) | 16 x 4 x 9 cm (L x B x H) |
| Gewig | 350 gram |
| Kragbron (Hoofeenheid) | Battery powered (3 x AAA, not included) |
| Kragbron (Buitesensor) | Battery-aangedrewe (2 x AA, nie ingesluit nie) |
| Verbindingstegnologie | Draadloos, 433 MHz |
| Spesiale kenmerk | Draadlose sensor |
| Materiaal | Wood (base) |
| Tipe vertoon | LCD |
| Temperatuur akkuraatheid | 1 tot 2 grade Celsius |
| Temperature Reading Accuracy | ±0.5 grade Celsius |
| Boonste gegradeerde temperatuur | 35 grade Celsius |
| sensor Tegnologie | Radiofrekwensie (RF) |
Waarborg en Ondersteuning
La Crosse Technology products are manufactured to high-quality standards. For specific warranty information, please refer to the warranty card included in your product packaging or visit the official La Crosse Technology webwebwerf. Bewaar u aankoopbewys as bewys van aankoop.
If you encounter any issues or have questions not covered in this manual, please contact La Crosse Technology customer support. Contact details can typically be found on the product packaging or the official brand webwebwerf.