1. Inleiding
This manual provides instructions for the safe and effective operation of your PREXISO 3-in-1 Digital Angle Gauge. This device combines the functions of a digital level, angle meter, and laser line projector, designed for precision measurements in various applications such as woodworking, construction, and home renovation. Please read this manual thoroughly before use and retain it for future reference.
2. Veiligheidsinligting
WARNING: This product contains a Class II laser. Avoid direct eye exposure to the laser beam. Maximum laser output is < 1 mW.
- Moenie direk in die laserstraal staar nie.
- Moenie die laserstraal op mense of diere rig nie.
- Do not disassemble the device; laser radiation can be hazardous.
- Hou die toestel buite bereik van kinders.
- Gebruik slegs soos aangedui in hierdie handleiding.
3. Produk verbyview
The PREXISO Digital Angle Gauge is a compact and versatile tool. It features a large, backlit LCD display for clear readings and a magnetic base for secure attachment to metallic surfaces.

Beeld 3.1: Voorkant view of the PREXISO Digital Angle Gauge with display elements and control buttons labeled. Key components include the ZERO indicator, Data Hold, IN/FT / mm/m Unit, Measured Value, Low Battery Indicator, Angle Position Indicators, Laser Apertures, Power/ZERO Function button, Laser ON/OFF button, MODE Setting button, Data HOLD & Audible Buzzer ON/OFF button, and Magnetic V-groove Base & Backside.
Komponente:
- LCD-skerm: Shows angle measurements, units, battery status, and mode indicators.
- Power/ZERO Button: Turns the device on/off and sets the zero reference in relative measurement mode.
- Laser AAN/AF-knoppie: Activates and deactivates the laser lines.
- MODUS-knoppie: Switches between measurement units (degrees, %, mm/m, IN/FT) and angle ranges (0-90°, 0-180°).
- HOLD/Buzzer Button: Freezes the current measurement on the display and toggles the audible buzzer.
- Laser-openinge: Emitters for horizontal, vertical, and cross laser lines.
- Magnetiese basis: Allows for secure attachment to metal surfaces.
- USB-C-laaipoort: Vir die herlaai van die interne battery.
4. Opstelling
4.1 Laai die toestel
The device is equipped with a rechargeable Lithium Polymer battery. Before first use, or when the low battery indicator appears on the display, charge the device using the provided USB-C cable.
- Connect the USB-C end of the cable to the charging port on the device.
- Connect the USB-A end to a standard USB power adapter (not included) or a computer USB port.
- The charging indicator on the display will show charging status.
- Sodra dit ten volle gelaai is, ontkoppel die kabel.

Image 4.1: The PREXISO Digital Angle Gauge demonstrating its compact size fitting into a pocket and highlighting the USB-C charging port on the side.
4.2 Krag aan/af
- Om aan te skakel, druk die Power/ZERO knoppie.
- Druk en hou die. In om uit te skakel Power/ZERO knoppie vir ongeveer 3 sekondes.
5. Bedryfsinstruksies
5.1 Measurement Modes (Absolute and Relative)
Die toestel bied twee meetmodusse:
- Absolute Measurement Mode (ABS): This is the default mode upon powering on. It measures the angle relative to a true horizontal surface (0°).
- Relative Measurement Mode (REL): Om hierdie modus te betree, druk die Power/ZERO button briefly while the device is on. The display will show 'ZERO' and then '0.00°', setting the current position as the new 0° reference. This is useful for measuring angles relative to a non-level surface.

Image 5.1: Visual representation of Absolute Angle Measurement (measuring from a true horizontal) and Relative Angle Measurement (setting a new zero reference for differential measurements).
5.2 Changing Measurement Units and Range
Druk die MODUS button to cycle through the available measurement units and angle ranges:
- Grade (°)
- Percenttage (%)
- mm/m
- IN/FT
The device supports two angle ranges: 0-90° (4 x 90°) and 0-180°.
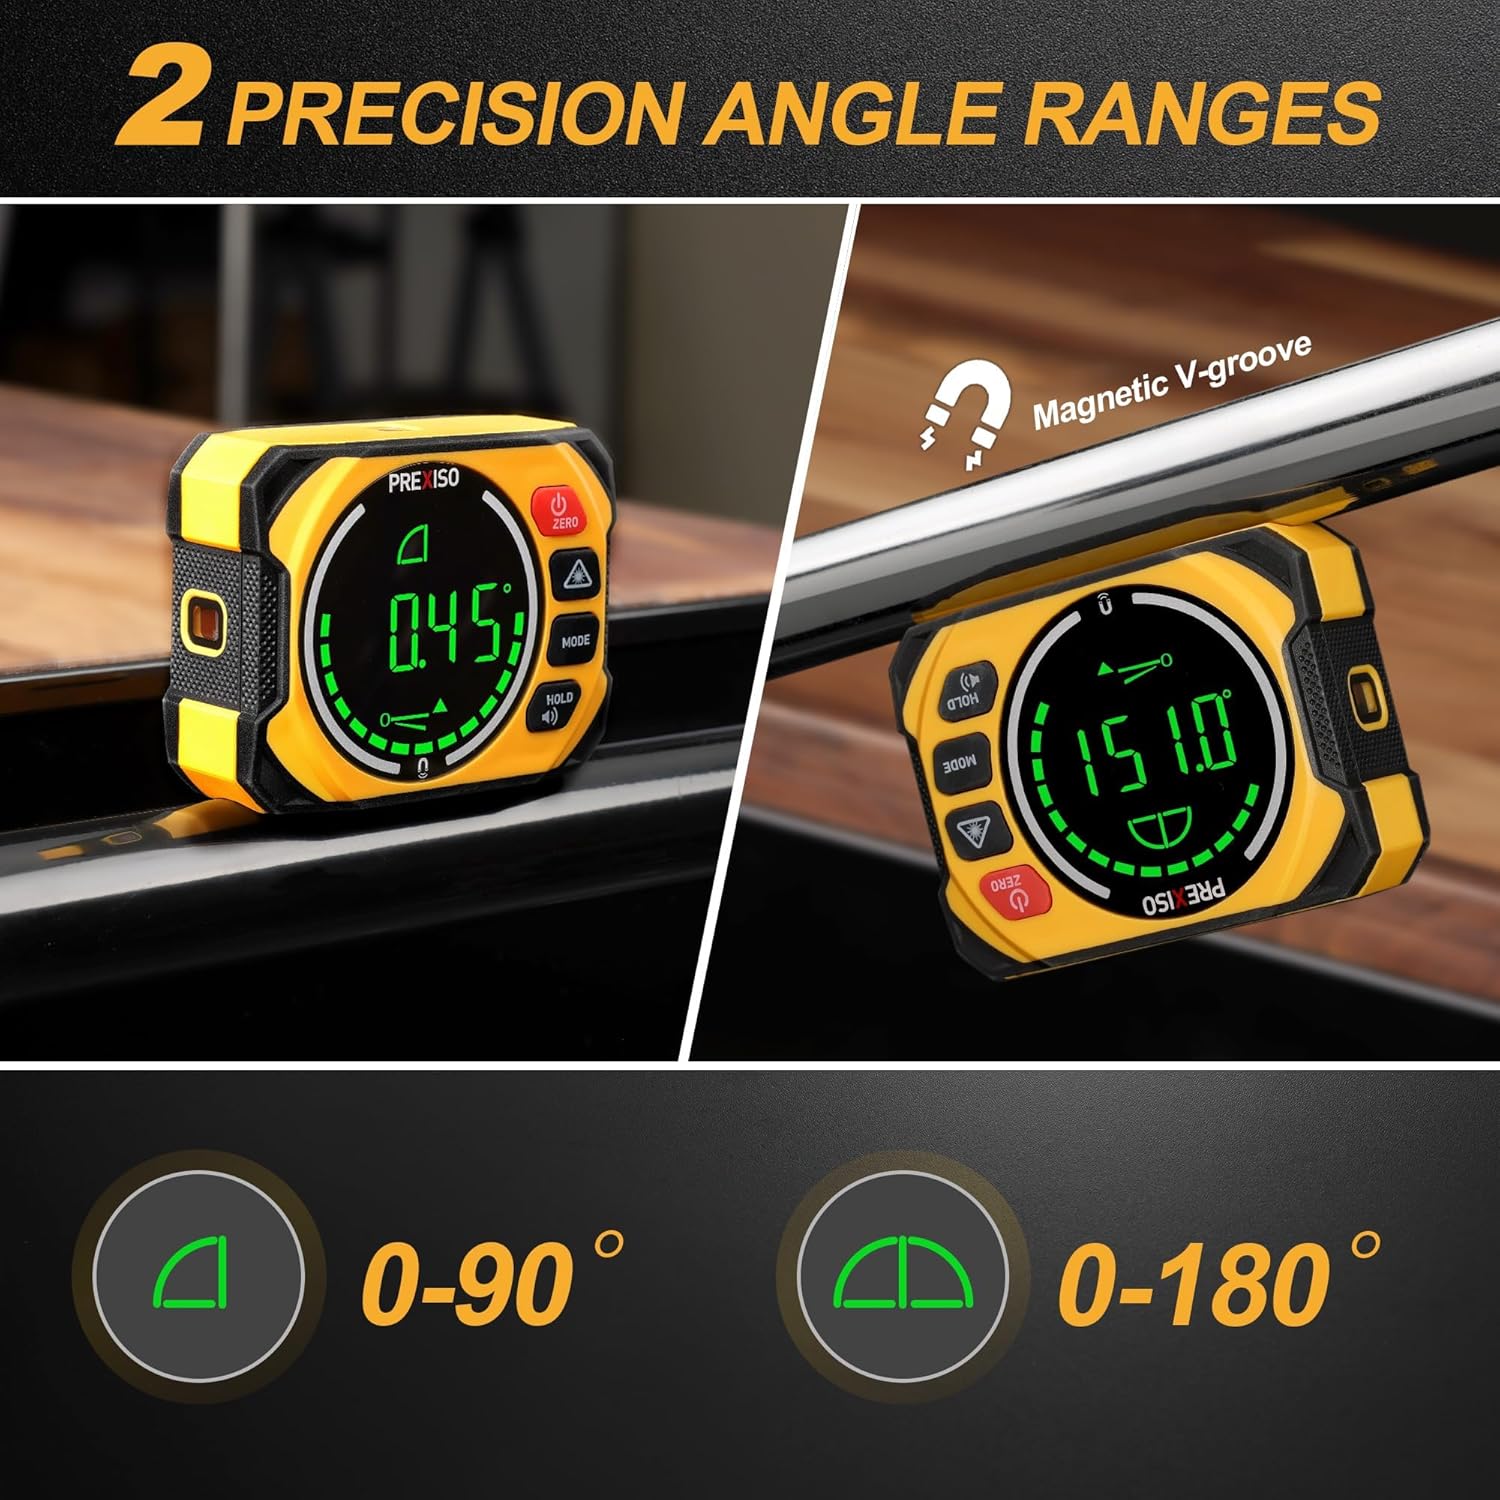
Image 5.2: The device displaying measurements in both 0-90° and 0-180° ranges, highlighting its magnetic V-groove for pipe attachment.
5.3 Laser Line Modes
The integrated laser can project three types of lines:
- Horizontal Line: Projects a level line.
- Vertical Line: Projects a plumb line.
- Cross-Line: Projects both horizontal and vertical lines simultaneously.
Druk die Laser AAN / UIT button to cycle through these modes or turn the laser off.

Beeld 5.3: Voorbeeldamples of the three laser line modes: Horizontal, Vertical, and Cross-line, demonstrating their application for finding desired slope lines.
5.4 Magnetic Base and Auto-Reversible Display
- The strong magnetic base allows the device to be securely attached to ferrous metal surfaces, freeing your hands for other tasks.
- The LCD display automatically rotates when the device is inverted, ensuring readings are always upright and easy to read.
5.5 Data Hold and Audible Buzzer
- Druk die HOLD/Buzzer button briefly to freeze the current measurement on the display. Press again to release.
- Druk en hou die HOLD/Buzzer button to toggle the audible buzzer on or off. The buzzer will alert when the device is within ±1° of the horizontal (0°) or vertical (90°) position.
5.6 Foutaanduiding
If the angle gauge is used in an incorrect position, specifically tilted diagonally over 30 degrees, the screen will display "ERROR" to prompt the user to correct the device's orientation for accurate measurement.

Image 5.4: Illustration of the device displaying an "ERR" message when tilted diagonally beyond 30 degrees, indicating an incorrect measurement position.
6. Kalibrasie
The device is factory-calibrated. However, for lasting accuracy, user calibration is possible. Perform calibration on a flat, smooth surface with a tilt no more than 5°.
- Plaas die toestel op 'n plat, stabiele oppervlak.
- Druk en hou die MODUS knoppie, druk dan kortliks die Power/ZERO button. The display will show "CAL 1".
- Druk die MODUS button again. The display will show "CAL 2".
- Rotate the equipment 180° on the same flat surface.
- Druk die MODUS button. The display will show "CAL 2" again, then briefly show "0.00°" indicating calibration is complete.
Wenk: If the surface tilt exceeds 5° during calibration, the display will read "ERR".

Image 6.1: A visual guide detailing the steps for user calibration of the angle gauge, including placing the device, pressing buttons, and rotating 180 degrees.
7. Onderhoud
- Maak die toestel skoon met 'n sagte, damp lap. Moenie skuur skoonmaakmiddels of oplosmiddels gebruik nie.
- Store the device in its protective pouch in a dry, dust-free environment when not in use.
- Vermy om die toestel vir lang tye aan uiterste temperature of direkte sonlig bloot te stel.
- Ensure the laser apertures are clean and free from obstructions for optimal performance.
8. Probleemoplossing
| Probleem | Moontlike oorsaak | Oplossing |
|---|---|---|
| Toestel skakel nie aan nie | Lae battery | Laai die toestel met die USB-C-kabel. |
| Display shows "ERROR" | Device tilted beyond 30 degrees or calibration surface not flat | Ensure the device is placed on a stable surface within 30 degrees of the intended measurement plane. Re-calibrate on a flat surface. |
| Onakkurate metings | Toestel benodig kalibrasie | Perform user calibration as described in Section 6. |
| Laser beam is dim or not visible | Low battery or obstructed aperture | Charge the device. Clean the laser apertures. |
9. Spesifikasies
| Kenmerk | Detail |
|---|---|
| Handelsmerk | Prexiso |
| Model | B0C4F7DBV1 |
| Materiaal | Metaal |
| Bedryfsmodus | Outomatiese |
| UPC | 840128502389 |
| Item gewig | 9.9 onse |
| Pakket afmetings | 5.71 x 4.88 x 2.4 duim |
| Batterye | 1 Litium Polimeer battery (ingesluit) |
| Laser klas | Class II, < 1 mW |
| Hoekresolusie | 0.05° |
| Hoek akkuraatheid | ±0.1° at 0° and 90°, ±0.2° at other angles |
| Meetreeks | 0 to 360° (4 x 90°) |
| Datum Eerste Beskikbaar | 16 September 2023 |
10. Waarborg en Ondersteuning
For warranty information or technical support, please refer to the documentation included with your purchase or contact PREXISO customer service through their official website or the retailer where the product was purchased. Please have your model number (B0C4F7DBV1) and purchase date available when contacting support.