Yaheetech B0C44VCPCL
Yaheetech Tweelinggrootte Metaalplatform Bedraam Instruksiehandleiding
Handelsmerk: Yaheetech
Inleiding
This manual provides comprehensive instructions for the assembly, use, and maintenance of the Yaheetech Twin Size Metal Platform Bed Frame. It includes detailed steps, safety guidelines, and product specifications to ensure proper setup and long-term durability. Please read all instructions carefully before beginning assembly.
Veiligheidsinligting
- Be cautious when getting in and out of bed due to high ground clearance.
- Moenie die maksimum gewigskapasiteit van 450 lb oorskry nie.
- Be careful around sharp edges on the headboard and footboard during assembly and use.
- Maak seker dat alle boute en skroewe stewig vasgedraai is voor gebruik.
- Hou klein dele weg van kinders tydens montering.
Onderdele lys
Before assembly, verify that all parts and hardware are present and undamaged. Refer to the diagrams below for identification.
Raamkomponente
| Deel No. | Beskrywing | Hoeveelheid |
|---|---|---|
| 1 | Headboard/Footboard Outer Vertical Post | 4 |
| 2 | Headboard/Footboard Inner Vertical Post | 4 |
| 3 | Headboard/Footboard Upper Horizontal Bar | 2 |
| 4 | Sentrumsteunbeen | 2 |
| 5 | Syspoor | 2 |
| 6 | Headboard/Footboard Lower Horizontal Bar | 2 |
| 7 | Headboard/Footboard Decorative Panel | 2 |
| 9 | Bed latte | 12 |
Hardeware
| Deel No. | Beskrywing | Hoeveelheid |
|---|---|---|
| A | M8x50mm-bout | 8 |
| B | M6x30mm-bout | 8 |
| C | M6x15mm-bout | 12 |
| D | M4x10mm Skroef | 24 |
| E | M8 Wasser | 8 |
| F | M6 Wasser | 20 |
| G | Allen Wrench & Small Wrench | 1 |
Detailed diagram of all bed frame components and hardware, including bolts, washers, and tools.
Monteer-instruksies
Follow these steps carefully to assemble your Yaheetech Twin Size Metal Platform Bed Frame. It is recommended to have two people for assembly.
Amptelike Installasievideo
This video provides a visual guide for the complete assembly process of the Yaheetech Metal Platform Bed Frame.
Step 1: Assemble Headboard and Footboard Units
Begin by assembling the headboard and footboard units. Connect the Headboard/Footboard Upper Horizontal Bar (Part 3) and Headboard/Footboard Lower Horizontal Bar (Part 6) between the Headboard/Footboard Outer Vertical Posts (Part 1) and Headboard/Footboard Inner Vertical Posts (Part 2). Secure these connections using M6x30mm Bolts (Hardware B) and M6 Washers (Hardware F). Then, insert the Headboard/Footboard Decorative Panel (Part 7) into the designated slots on the assembled frame. Repeat this process for the second unit.

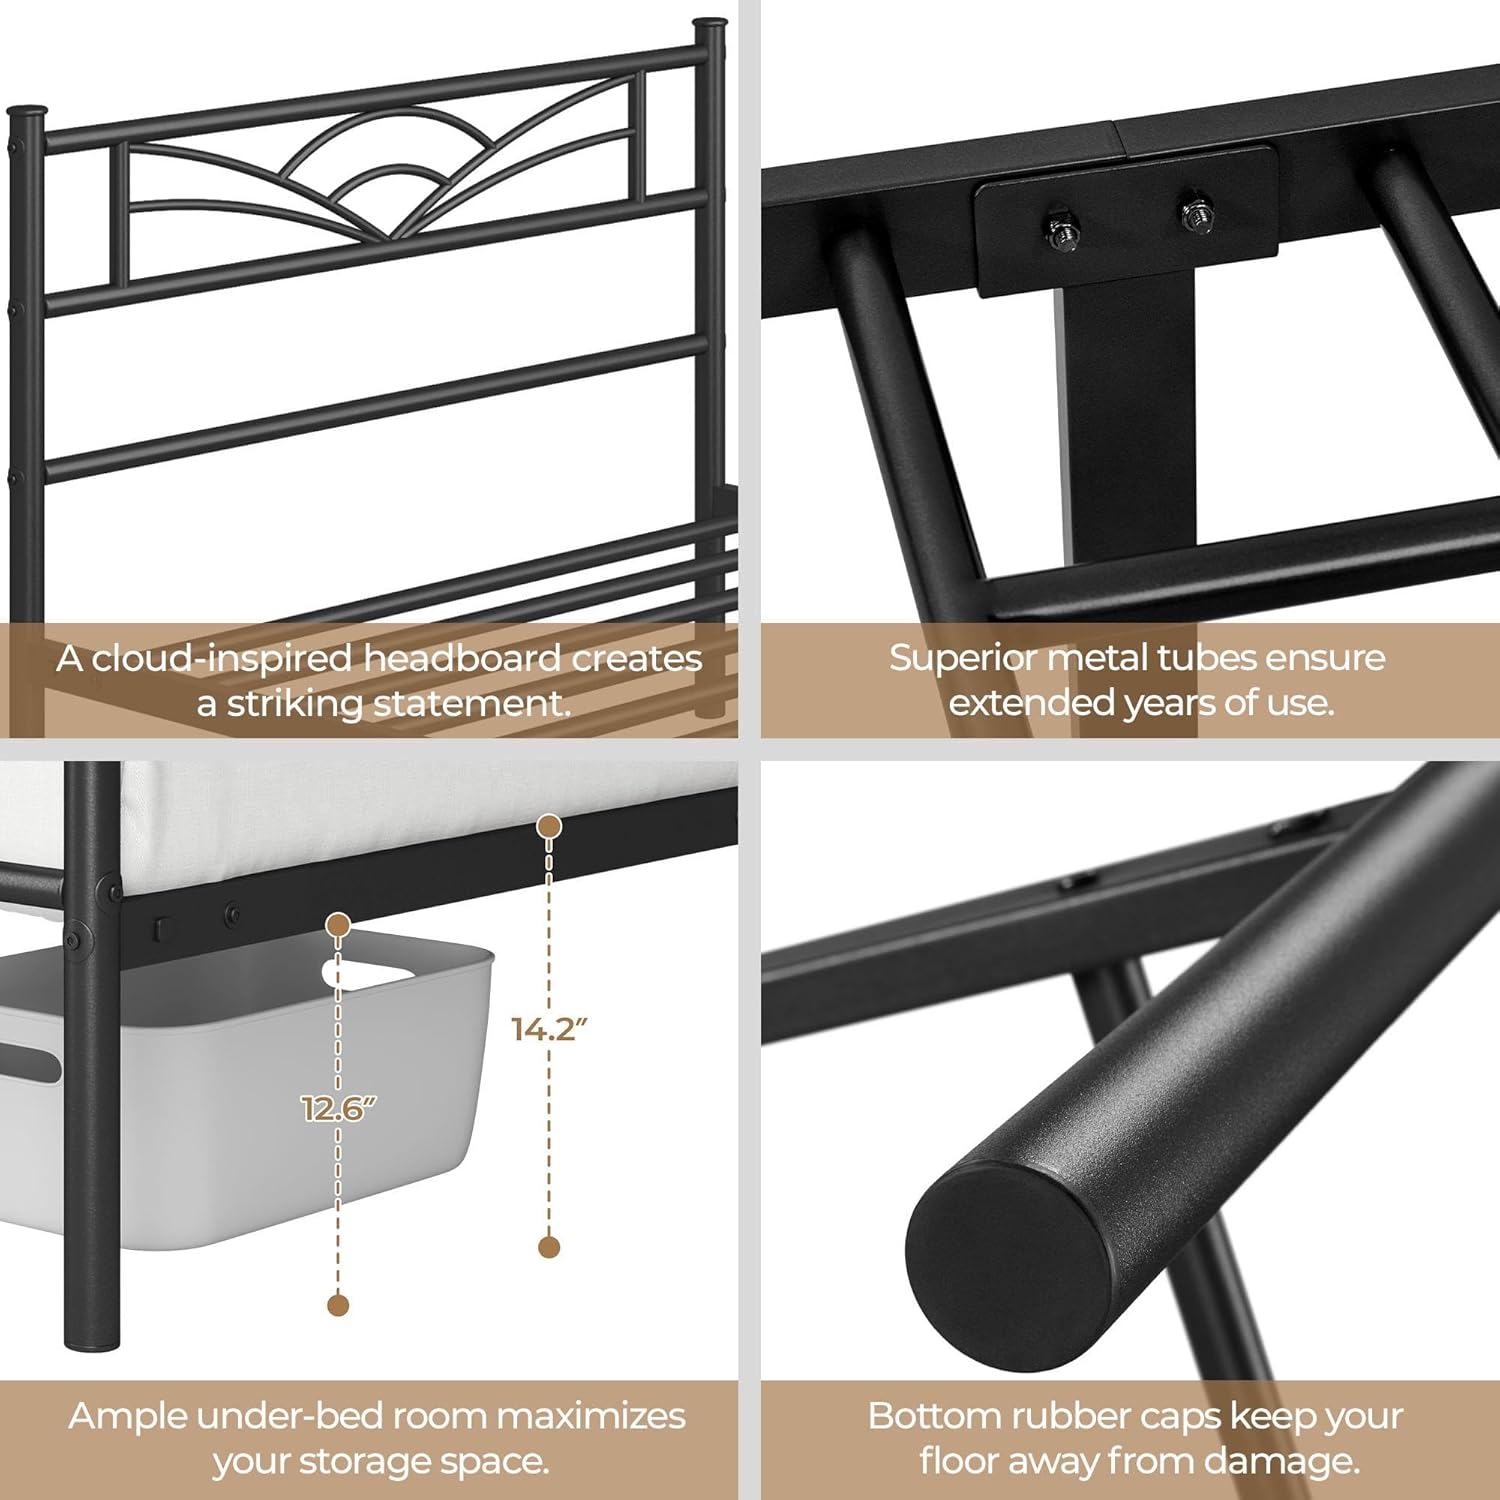
The cloud-inspired design of the headboard and footboard adds an aesthetic touch.

A closer look at the cloud-inspired design, highlighting the unique wave pattern.
Step 2: Assemble Side Rails with Center Support Legs
Attach the Center Support Legs (Part 4) to the Side Rails (Part 5) using M6x15mm Bolts (Hardware C) and M6 Washers (Hardware F). Ensure the legs are firmly attached and perpendicular to the side rails for proper support.
L-shaped brackets reinforce the joints for enhanced stability and durability.
Step 3: Connect Headboard/Footboard to Side Rails
Connect the assembled headboard and footboard units to the Side Rails (Part 5) using M8x50mm Bolts (Hardware A) and M8 Washers (Hardware E). Tighten all connections securely with the provided Allen wrench and small wrench (Hardware G). Ensure all connections are snug to prevent wobbling.

The complete bed frame structure before mattress placement.
Stap 4: Installeer Bedlatte
Place the Bed Slats (Part 9) across the Side Rails (Part 5). Secure each slat to the frame using M4x10mm Screws (Hardware D). Ensure even spacing for optimal mattress support. The built-in slats are designed to prevent mattress sliding.

The integrated slat design helps keep your mattress securely in place, preventing unwanted movement.

Gedetailleerd view of slat installation, showing the secure connection mechanism.
Bedryfsinstruksies
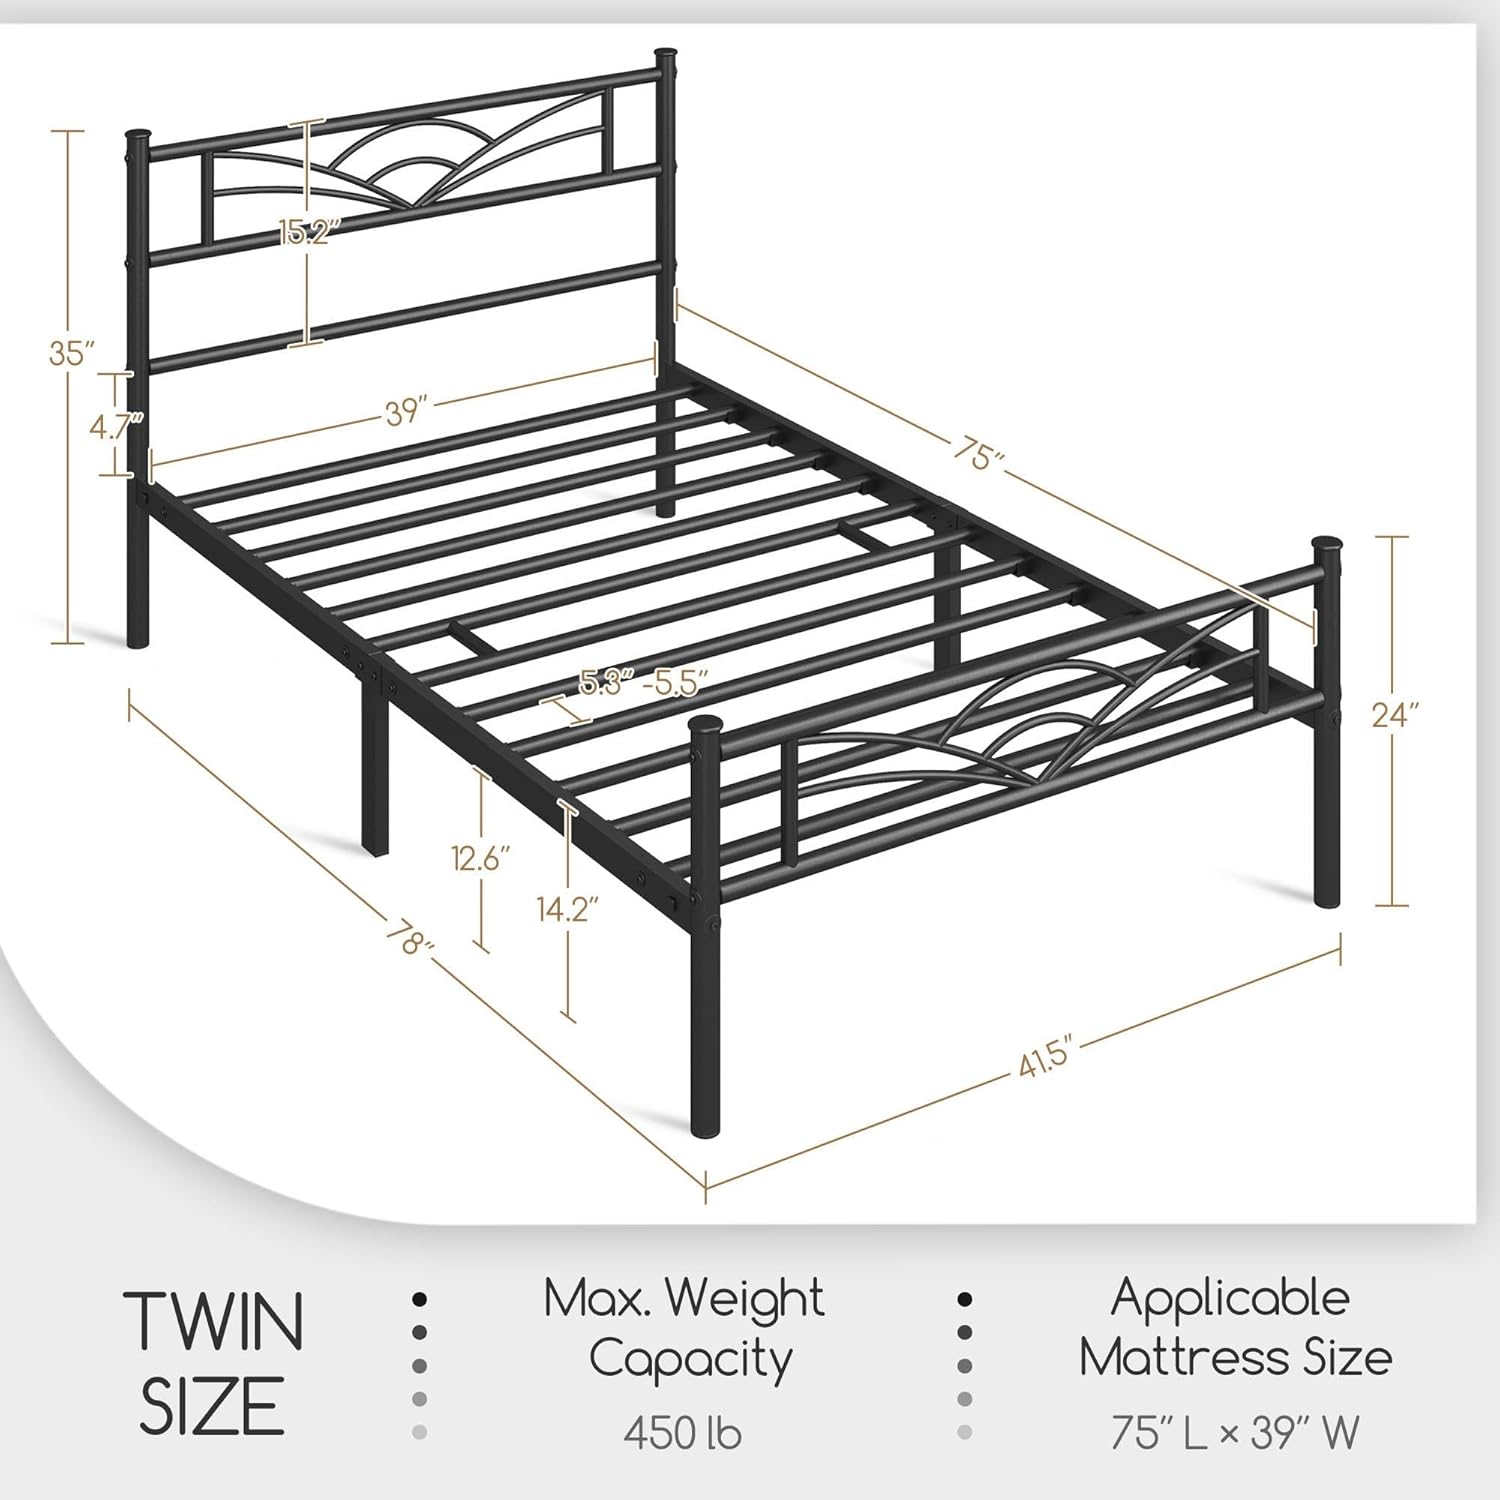
Once assembled, place your mattress directly onto the bed slats. No box spring is needed for this platform bed frame. The frame is designed to support a mattress of 75" L × 39" W. Ensure the mattress is centered on the frame for even weight distribution and stability.

The 12.6-inch ground clearance provides ample space for under-bed storage solutions.
Onderhoud
To maintain your Yaheetech Metal Platform Bed Frame, regularly wipe clean with a dry cloth to remove dust and debris. Avoid using harsh chemicals or abrasive cleaners, as these may damage the powder-coated finish. Periodically check all bolts and connections to ensure they remain tight. Re-tighten if any looseness is detected to maintain structural integrity and prevent squeaking.
Probleemoplossing
- Piepende geluide: If the bed frame produces squeaking noises, it is likely due to loose connections. Re-tighten all bolts and screws, especially those connecting the side rails to the headboard/footboard and the center support legs.
- Matrasgly: While the frame has built-in features to minimize sliding, some mattresses may still shift. Consider using a non-slip mattress pad or rubber grippers placed between the mattress and the slats to further secure it.
- Wibbelige raam: A wobbly frame indicates loose connections. Systematically check and tighten every bolt and screw on the entire frame. Ensure the center support legs are properly aligned and secured.
- Ontbrekende dele: If any parts are missing upon unboxing, please contact Yaheetech customer support immediately for assistance.
Spesifikasies
| Kenmerk | Detail |
|---|---|
| Grootte | Tweeling |
| Produk afmetings | 41.5 cm L x 78 cm B x 35 cm H |
| Spesiale kenmerk | Geen boksveer nodig nie, berging onder die bed, stewig, piepbestand |
| Kleur | Swart |
| Voltooi Tipe | Poederbedekt |
| Ingesluit komponente | Installasiehandleiding, Hoofbord, Lat, Voetbord |
| Versoenbaar met matrasgrootte | 75" L × 39" B |
| Item gewig | 29.2 pond |
| Afstand tot grond-item | 12.6 duim |
| Maksimum gewig kapasiteit | 450 lb |
Waarborg en Ondersteuning
Yaheetech stands behind the quality of its products. For warranty information, technical support, or assistance with missing/damaged parts, please contact Yaheetech customer service. Refer to your purchase documentation for specific warranty terms and contact details.
Jy kan ook die amptelike Yaheetech-winkel besoek vir meer inligting: Yaheetech Winkel
Ask a question about this manual
Ask about setup, troubleshooting, compatibility, parts, safety, or missing instructions. Manuals+ will review the question and use this page’s manual context to help answer it.