1. Inleiding
This manual provides detailed instructions for the installation, operation, and maintenance of your darkFlash Aquarius Mesh Computer Case. Please read this manual thoroughly before beginning installation to ensure proper setup and safe use of your new computer chassis.
2. Veiligheidsinligting
Neem altyd die volgende veiligheidsmaatreëls in ag:
- Disconnect all power sources before installing or removing any components.
- Dra 'n antistatiese polsband om skade aan komponente deur elektrostatiese ontlading (ESD) te voorkom.
- Hanteer komponente versigtig om fisiese skade te voorkom.
- Hou klein onderdele en gereedskap weg van kinders.
- Ensure proper ventilation around the computer case.
3. Pakketinhoud
Verifieer dat alle items in jou pakket teenwoordig is:
- darkFlash Aquarius Mesh Computer Case
- Toebehoreboks (skroewe, afstandhouers, kabelbinders, ens.)
- Gebruikershandleiding (hierdie dokument)
4. Opstelling en installering
Follow these steps for proper component installation.
4.1. Voorbereiding van die Saak
Before installing components, remove the side panels. The Aquarius Mesh case typically features a tempered glass side panel and a solid metal panel.
- Locate the thumbscrews on the rear of the case securing the side panels.
- Unscrew the thumbscrews and carefully slide the panels backward, then lift them off.

Figuur 1: Voor- en sykant view of the darkFlash Aquarius Mesh case. Note the mesh front panel and tempered glass side panel.

Figuur 2: Agter view of the darkFlash Aquarius Mesh case, showing expansion slots and rear fan mount.
4.2. Moederbord Installasie
The Aquarius Mesh supports ATX, Micro-ATX, and Mini-ITX motherboards.
- Installeer die I/O-skerm in die uitsparing aan die agterkant van die kas.
- Align your motherboard with the pre-installed standoffs. Ensure the I/O ports align with the I/O shield.
- Bevestig die moederbord met die toepaslike skroewe uit die bykomstigheidsboks.
Figuur 3: Binne view of the darkFlash Aquarius Mesh case, highlighting the motherboard tray and cable routing options.
4.3. Installasie van die kragtoevoereenheid (PSU)
The PSU mounts at the bottom rear of the case.
- Slide the PSU into its designated compartment from the rear of the case.
- Align the screw holes and secure the PSU with screws.
4.4. Installasie van stoorskyf
The case provides mounting options for 3.5-inch HDDs and 2.5-inch SSDs.
- 3.5" HDD's: Locate the drive cage usually beneath the PSU shroud or behind the motherboard tray. Slide the HDD into the bay and secure it with screws.
- 2.5" SSD's: Mount SSDs to dedicated brackets behind the motherboard tray or on the PSU shroud. Secure with screws.

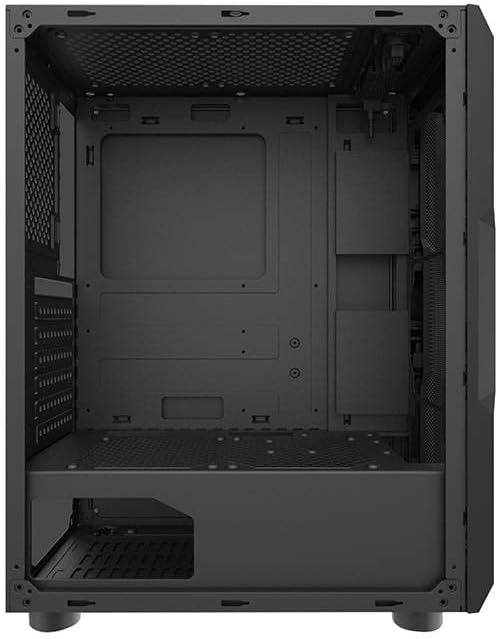
Figure 4: Rear interior view of the darkFlash Aquarius Mesh case, showing the motherboard cutout and potential SSD mounting points.
4.5. Expansion Card Installation (e.g., GPU)
- Verwyder die nodige uitbreidingsgleufdeksels van die agterkant van die kas.
- Insert the expansion card into the appropriate PCIe slot on the motherboard.
- Secure the card with the provided screws or retention clips.
4.6. Kabelbestuur
Gebruik die kabelgeleidingsuitsparings en vasmaakpunte agter die moederbordbak om kabels te organiseer. Dit verbeter lugvloei en estetika.
4.7. Reassembling the Case
Once all components are installed and cables are managed:
- Carefully reattach the side panels, ensuring they slide into place correctly.
- Secure the side panels with the thumbscrews.
5. Bedryfsinstruksies
After assembly, connect your peripherals and power cable.
- Connect your monitor, keyboard, mouse, and other peripherals to the motherboard's I/O ports.
- Koppel die kragkabel aan die PSU en 'n muuraansluiting.
- Press the power button located on the top panel of the case to start your computer.

Figuur 5: Bo view of the darkFlash Aquarius Mesh case, showing the front I/O panel with power button, reset button, USB ports, and audio jacks.
6. Onderhoud
Regular maintenance helps ensure optimal performance and longevity of your computer components.
- Stoffilters: The Aquarius Mesh case features removable dust filters (e.g., on the front, top, and bottom). Regularly remove and clean these filters with water and mild soap, or by vacuuming, to maintain good airflow. Ensure they are completely dry before reinstallation.
- Binne skoonmaak: Periodically open the case and use compressed air to remove dust buildup from fans, heatsinks, and other components.
- Buitenste skoonmaak: Vee die buite-oppervlaktes af met 'n sagte, damp lap. Vermy harde chemikalieë.
7. Probleemoplossing
If you encounter issues, consider the following common solutions:
- Geen krag:
- Maak seker dat die PSU-skakelaar in die 'AAN'-posisie is.
- Kontroleer alle kragverbindings na die moederbord en komponente.
- Verify the power cable is securely plugged into the wall outlet and PSU.
- Waaiers draai nie:
- Check fan connections to the motherboard or fan controller.
- Ensure fans are not obstructed by cables or dust.
- Voorpaneel I/O werk nie:
- Verify that the front panel connectors (USB, audio, power/reset switches) are correctly connected to the motherboard headers. Refer to your motherboard manual for header locations.
8. Spesifikasies
| Kenmerk | Detail |
|---|---|
| Handelsmerk | donkerFlits |
| Modelnommer | Aquarius Mesh |
| Soort saak | Middeltoring |
| Materiaal | Allooi staal |
| Kleur | Swart |
| Verkoelingsmetode | Lug |
| Aanbevole gebruik | Rekenaar |
| Hardeskyfvormfaktor | 3.5 duim |
9. Waarborg en Ondersteuning
For warranty information or technical support, please refer to the official darkFlash webwebwerf of kontak hul kliëntediens. Bewaar u bewys van aankoop vir waarborgeise.
Vir verdere hulp kan u die darkFlash official webwebwerf.