1. Inleiding
This manual provides detailed instructions for the installation, operation, and maintenance of your Gravity Audio 1200W 12" Premium Car Subwoofer Kit. This comprehensive package includes a Gravity 12-inch subwoofer, an Audiobank 3000W Class D amplifier, an Audiotek single 12-inch vented subwoofer enclosure, and a complete amplifier installation kit. Please read this manual thoroughly before attempting installation or operation to ensure proper use and maximum performance.

Figuur 1.1: oorview of the Gravity Audio 1200W 12" Premium Car Subwoofer Kit components.
2. Veiligheidsinligting
Neem altyd die volgende veiligheidsmaatreëls in ag tydens installasie en werking:
- Professionele installasie word aanbeveel: If you are unsure about any aspect of installation, consult a qualified car audio technician.
- Ontkoppel battery: Always disconnect the vehicle's negative battery terminal before starting any electrical work to prevent short circuits and electrical shock.
- Behoorlike bedrading: Use appropriate gauge wiring as specified in this manual and ensure all connections are secure and insulated to prevent shorts.
- Ventilasie: Verseker die amplifier is mounted in a location with adequate airflow to prevent overheating.
- Vermy obstruksie: Do not mount components in locations that obstruct airbags, driver visibility, or vehicle controls.
- Gehoorbeskerming: Langdurige blootstelling aan hoë volumevlakke kan permanente gehoorskade veroorsaak. Wees versigtig wanneer u die volume verstel.
3. Pakketinhoud
Verifieer dat alle items in jou pakket teenwoordig is:
- Gravity 12" 1200W Peak Power Subwoofer (GR-12PW)
- Audiobank 3000W Class D Monoblock Amplifier (P3001)
- Audiotek Single 12 Inch Vented Subwoofer Enclosure (CA-12SP)
- Voltooi Amplifier Installation Kit (Power Cable, Ground Cable, Remote Turn-On Wire, RCA Interconnects, Speaker Wire, Fuse Holder, Fuse, Terminals, Zip Ties)

Figuur 3.1: Inhoud van die amplifier installation kit, including various cables, fuse, and terminals.
4. Opstelling en installering
Follow these steps for proper installation of your car audio system. Ensure the vehicle's battery is disconnected before proceeding.
4.1 Subwoofer Installation into Enclosure
- Carefully place the Gravity 12" subwoofer into the opening of the Audiotek vented enclosure. Ensure the mounting holes align.
- Secure the subwoofer using appropriate screws (not included, typically self-tapping wood screws) through the mounting holes into the enclosure. Do not overtighten.
- Connect speaker wire from the subwoofer's terminals to the enclosure's internal terminals. Observe polarity: positive (+) to positive, negative (-) to negative.

Figuur 4.1: Voorkant view of the Gravity 12-inch subwoofer, showing the cone and surround.

Figuur 4.2: Voorkant view of the Audiotek single 12-inch vented subwoofer enclosure.
4.2 Amplewendiger montering
Choose a secure, well-ventilated location for the Audiobank amplifier, such as the trunk or under a seat. Ensure it is away from moisture and direct sunlight.
- Mark the mounting holes on the chosen surface.
- Drill pilot holes if necessary, taking care not to damage any vehicle components.
- Beveilig die ampverligter met behulp van gepaste skroewe.

Figuur 4.3: Bo view of the Audiobank 3000W Class D Monoblock Amplewendiger.
4.3 Bedradingsverbindings
Verwys na die amplifier's rear panel for terminal locations. Use the provided ampverligter installasie kit.
- Power Cable (+12V): Run the thick red power cable from the vehicle's positive battery terminal to the amplifier's +12V terminal. Install the fuse holder within 18 inches of the battery and insert the fuse.
- Ground Cable (GND): Connect the thick black ground cable from the ampVerbind die GND-terminaal van die verskaffer met 'n skoon, ongeverfde metaaloppervlak op die voertuig se onderstel. Verseker 'n soliede verbinding met lae weerstand.
- Remote Turn-On Wire (REM): Connect the blue remote wire from your head unit's remote output to the ampdie verskaffer se REM-terminaal. Dit draai die amplifier on/off with your head unit.
- RCA Interconnects: Connect the RCA cables from your head unit's subwoofer or full-range pre-outs to the ampdie lifer se RCA-invoeraansluitings.
- Luidspreker Uitset: Connect the speaker wire from the enclosure's external terminals to the amplifier's speaker output terminals. Ensure correct polarity.

Figure 4.4: Rear panel of the Audiobank ampVersterker wat krag-, grond-, afstandbeheer- en luidsprekeruitvoerterminale wys.

Figure 4.5: Speaker terminal on the Audiotek subwoofer enclosure for connecting to the amplewendiger.
5. Bedryfsinstruksies
Once all connections are made and verified, reconnect the vehicle's negative battery terminal.
5.1 Initial Power-Up and Basic Settings
- Skakel jou voertuig se aansitter en hoofeenheid aan. amplifier's power indicator should illuminate.
- Begin met die amplifier's GAIN control set to minimum (fully counter-clockwise).
- Set the head unit's volume to about 75% of its maximum.
- Verhoog die stadig amplifier's GAIN control until you hear distortion, then back it off slightly. This sets the maximum clean output.
5.2 Amplewendiger kontroles
The Audiobank P3001 amplifier features several controls for fine-tuning your subwoofer's performance:
- WINS: Adjusts the input sensitivity to match the output of your head unit. (See 5.1)
- LPF (laagdeurlaatfilter): This control sets the upper frequency limit for the subwoofer. Typically set between 80Hz and 120Hz. Frequencies above this setting will be filtered out.
- BAS HUPSTOOT: Provides an increase in bass output at a specific frequency. Use sparingly to avoid distortion and potential damage.
- FASE: Allows you to adjust the phase of the subwoofer output (0 or 180 degrees) to ensure it blends seamlessly with your main speakers. Experiment with both settings to find the best sound.
6. Onderhoud
Your Gravity Audio Subwoofer Kit requires minimal maintenance to ensure long-term performance.
- Skoonmaak: Vee gereeld af amplifier and subwoofer enclosure with a soft, dry cloth. Avoid using harsh chemicals or abrasive cleaners.
- Verbindingskontroles: Annually, inspect all wiring connections for tightness and corrosion. Re-tighten any loose connections.
- Ventilasie: Verseker die amplifier's cooling fins remain free of dust and debris to maintain proper heat dissipation.
7. Probleemoplossing
If you experience issues with your subwoofer kit, consult the following table before seeking professional assistance:
| Probleem | Moontlike oorsaak | Oplossing |
|---|---|---|
| Geen klank van subwoofer nie |
|
|
| Verwronge klank |
|
|
| AmpOorverhitting van die verligter |
|
|
8. Spesifikasies
Gravity 12" Subwoofer (GR-12PW)
- Tipe luidspreker: Subwoofer
- Subwoofer deursnee: 12 duim
- Stemspoelkonfigurasie: Dubbele 4 Ohm
- Piek krag: 1200 Watt elk
- RMS-krag: 600 Watt elk
- Frekwensie reaksie: 30 - 2.5kHz
- Sensitiwiteit: 90 dB
- Kegelmateriaal: Competition Grade Pressed Paper Cone
- Omring: Hoë Rol Skuim Omringing
- Verkoelingstelsel: Advanced Air Flow Cooling System
Audiobank 3000W Class D Amplifier (P3001)
- Tipe: Klas D monoblok Amplewendiger
- Piek krag: 3000 Watts (Total Package)
- Kontroles: Gain, LPF, Bass Boost, Phase
Audiotek Single 12 Inch Vented Enclosure (CA-12SP)
- Ontwerp: Vented (Ported)
- Materiaal: High Quality Gray Carpet
- Afmetings: Approximately 18"W x 16"D x 14"H (External)
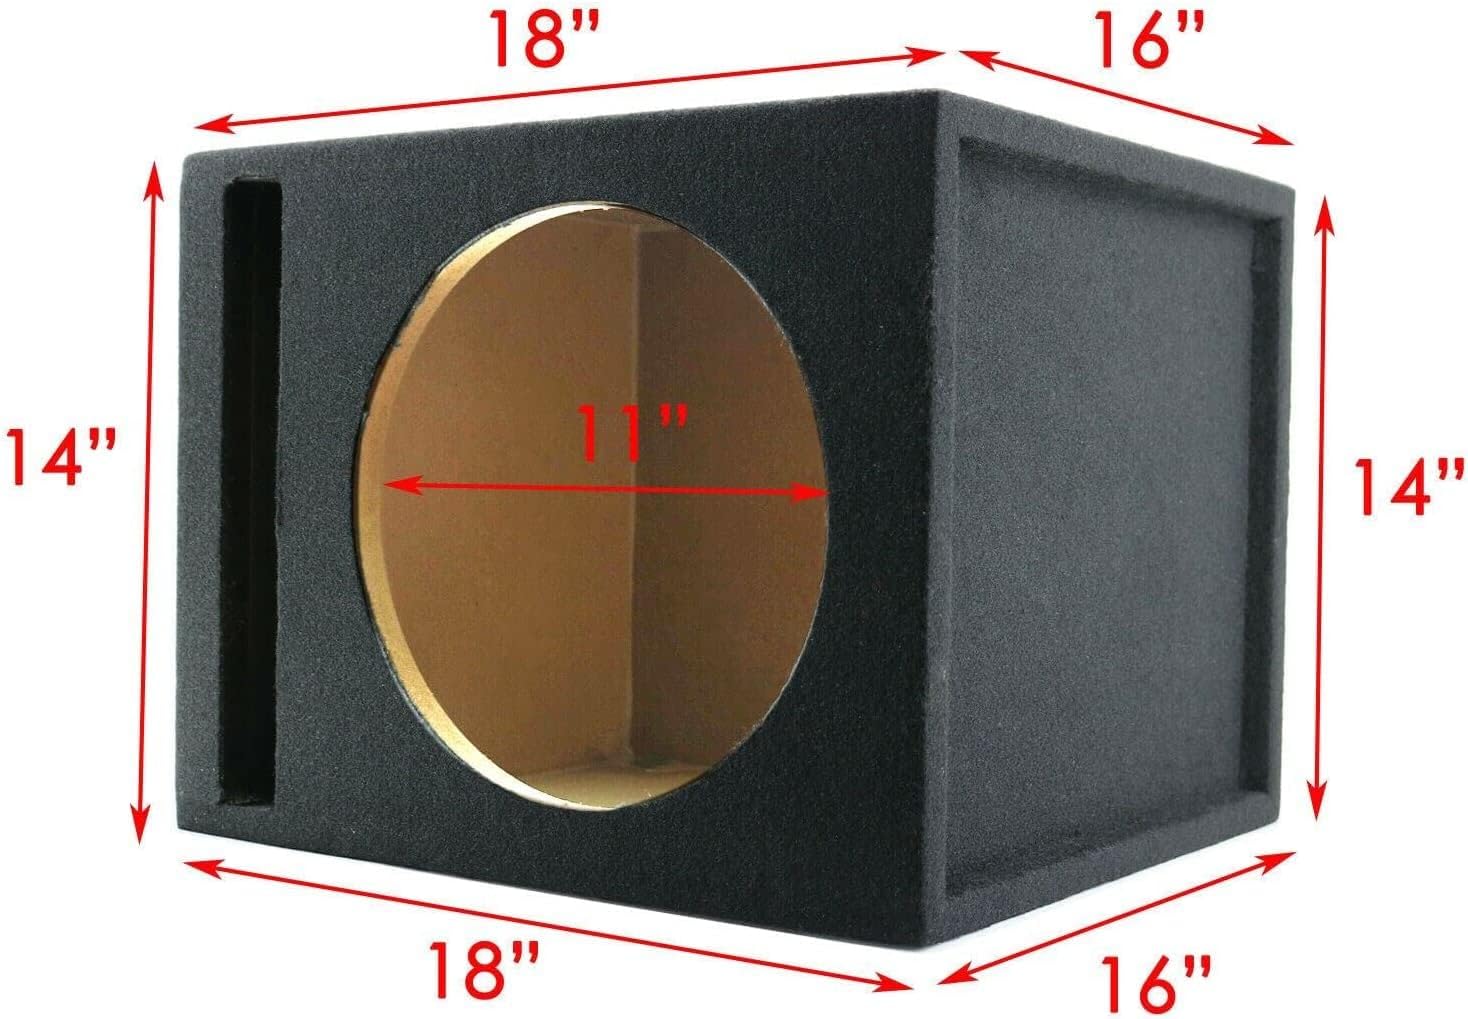
Figure 8.1: Dimensions of the Audiotek single 12-inch vented subwoofer enclosure.
9. Waarborg en ondersteuning
This product comes with a Limited Warranty. For specific details regarding warranty coverage, duration, and terms, please refer to the warranty card included with your purchase or contact Gravity Audio customer support directly.
Kliënte ondersteuning
For technical assistance, troubleshooting not covered in this manual, or warranty claims, please contact your retailer or Gravity Audio customer service. Have your product model number (GR-12PW + P3001 + CA-12SP + Kit) and purchase date available when contacting support.