Inleiding
This manual provides detailed instructions for the installation, operation, and maintenance of your Lian Li LANCOOL 216X Mid Tower Computer Case. Please read this manual thoroughly before beginning installation to ensure proper setup and optimal performance.
The LANCOOL 216X is a high-performance ATX mid-tower case designed for excellent airflow and component compatibility, featuring tempered glass and pre-installed PWM fans. Its robust construction and thoughtful design facilitate an efficient and organized PC build.
Opstelling en installasie
Before starting, ensure you have all necessary components and tools, including a screwdriver set, zip ties, and your PC components (motherboard, PSU, GPU, storage drives, etc.).
1. Berei die saak voor
- Carefully remove the side panels. The tempered glass side panel typically uses thumbscrews or a latch mechanism.
- Identify the accessory box, which contains screws, standoffs, and cable ties.
2. Install the Motherboard
- Install the I/O shield into the rear opening of the case, if not pre-installed on your motherboard.
- Align the motherboard with the pre-installed standoffs. Ensure all standoff holes on the motherboard match the case.
- Secure the motherboard with the provided screws. Do not overtighten.
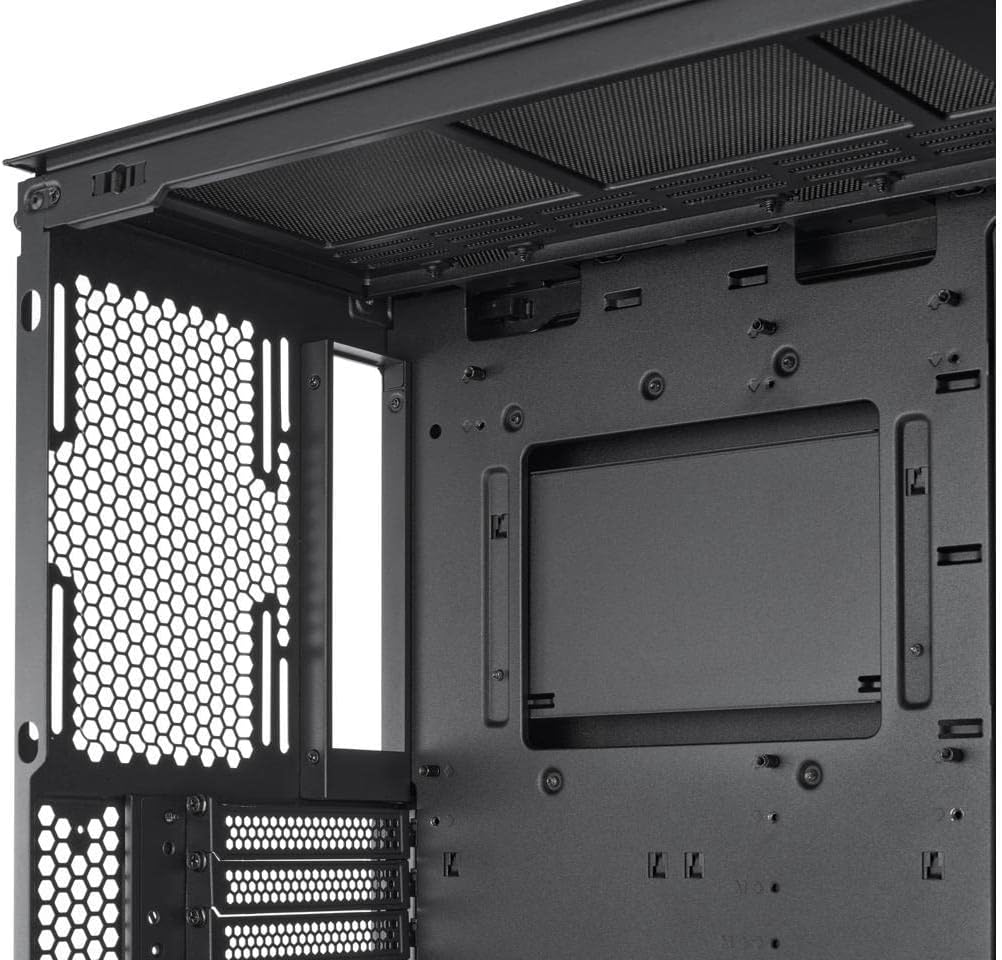
Intern view of the Lian Li LANCOOL 216X case, highlighting the spacious motherboard tray and various cable management cutouts for a clean build.
3. Install the Power Supply Unit (PSU)
- The LANCOOL 216X supports rear-mounted PSUs. Slide the PSU into its designated compartment at the bottom rear of the case.
- Bevestig die PSU met skroewe van die agterkant van die kas.
4. Install Storage Drives
- Utilize the dedicated drive bays for 3.5-inch HDDs and 2.5-inch SSDs. Refer to the case diagram for specific locations.
- Secure drives using the provided screws or tool-less mechanisms.
5. Install Expansion Cards (GPU, etc.)
- Remove the necessary PCI-e slot covers from the rear of the case.
- Insert your expansion card(s) into the motherboard's PCI-e slots and secure them with screws.
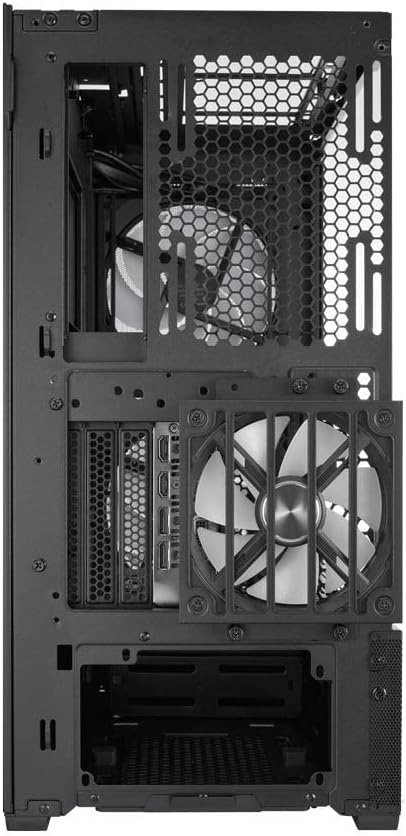
Agter view of the Lian Li LANCOOL 216X case, illustrating the PCI-e expansion slots, the pre-installed rear fan, and the power supply mounting area.
6. Kabelbestuur
- Route all cables (power, data, front panel) through the designated cutouts behind the motherboard tray.
- Use the included cable ties to bundle and secure cables for optimal airflow and a clean aesthetic.
- Connect front panel headers (USB, audio, power/reset buttons, LEDs) to the motherboard according to your motherboard manual.
Bedryfsinstruksies
Skakel aan
- After all components are installed and cables connected, replace the side panels.
- Connect your monitor, keyboard, mouse, and power cable to the PSU.
- Draai die kragskakelaar op die PSU na die 'AAN'-posisie.
- Press the power button on the front panel of the case to start your system.
Lugvloei en verkoeling
- The LANCOOL 216X is designed for high airflow. Ensure the front and rear fans are operating correctly.
- The pre-installed PWM fans can be controlled via your motherboard's BIOS or dedicated software for optimized cooling and noise levels.
Onderhoud
Regular maintenance helps ensure the longevity and optimal performance of your PC components.
Stoffilter skoonmaak
- The LANCOOL 216X features removable dust filters (e.g., front, top, bottom).
- Periodically remove and clean these filters using compressed air or by rinsing them with water (ensure they are completely dry before reinstallation).
- Frequency of cleaning depends on your environment; typically every 1-3 months.
General Case Cleaning
- Gebruik 'n sagte, damp cloth to wipe down exterior surfaces. Avoid harsh chemicals.
- For interior cleaning, use compressed air to remove dust from fans and components. Ensure the system is powered off and unplugged.
Probleemoplossing
Indien u probleme ondervind, raadpleeg die volgende algemene stappe vir probleemoplossing:
Geen krag
- Check if the PSU is switched 'ON' at the back.
- Maak seker dat die kragkabel stewig aan beide die PSU en die muuraansluiting gekoppel is.
- Verify that the front panel power switch header is correctly connected to the motherboard.
- Confirm all internal power cables (24-pin ATX, CPU, GPU) are firmly seated.
Fan Noise or Malfunction
- Check fan connections to the motherboard or fan controller.
- Ensure no cables are obstructing fan blades.
- Clean dust from fan blades and grilles.
- Adjust fan speeds via BIOS or software if noise is excessive.
Overheating Components
- Verify all case fans are spinning and oriented correctly for optimal airflow (front intake, rear/top exhaust).
- Ensure CPU cooler and GPU fans are functioning.
- Clean dust filters and internal components to improve airflow.
Spesifikasies
| Kenmerk | Detail |
|---|---|
| Handelsmerk | Lian Li |
| Model Naam | LanCool 216 |
| Modelnommer | PC-LAN216X |
| Soort saak | Mid Tower |
| Kleur | Swart |
| Materiaal | Gehard glas |
| Moederbordversoenbaarheid | Micro ATX (also supports ATX, E-ATX) |
| Verkoelingsmetode | Lug |
| Fan Grootte | 140 Millimeters (pre-installed 160mm PWM fans) |
| Totale Uitbreidingsgleuwe | 7 |
| Total USB 2.0 Ports | 2 |
| Total USB 3.0 Ports | 2 |
| Hardeskyfvormfaktor | 3.5 duim |
| Internal Bays Quantity | 1 (for 3.5" drives, multiple for 2.5" drives) |
| Item gewig | 28.7 pond |
| UPC | 840353043763 |
Waarborg inligting
Lian Li products are covered by a manufacturer's warranty against defects in materials and workmanship. The specific warranty period may vary by region and product. Please retain your proof of purchase for warranty claims.
For detailed warranty terms and conditions, please visit the official Lian Li webwebwerf of kontak hul kliëntediens.
Kliënte ondersteuning
If you require further assistance, have questions about your LANCOOL 216X case, or need technical support, please contact Lian Li customer service.
- Amptelik Webwebwerf: Besoek die Lian Li official webwebwerf vir ondersteuningshulpbronne, algemene vrae en kontakinligting.
- Amazon Winkel: You can also find product information and support through the Lian Li Amazon Store.