VYSER F2 Projector
VYSER F2 Projector User Manual
Model: F2 Projector
1. Inleiding
This manual provides detailed instructions for the setup, operation, and maintenance of your VYSER F2 Projector. Please read this manual thoroughly before using the projector to ensure proper functionality and to maximize your viewing experience. The VYSER F2 Projector is a versatile device designed for various entertainment and presentation needs, offering high-definition projection with multiple connectivity options.
2. Wat is in die boks
Upon unboxing your VYSER F2 Projector, please verify that all the following items are included:
- VYSER F2 Projector
- Afstandbeheer
- Gebruikershandleiding (hierdie dokument)
- HDMI kabel
- Kragkabel
3. Produk verbyview
Familiarize yourself with the components and ports of your VYSER F2 Projector.

Figure 3.1: VYSER F2 Projector with key features highlighted.
3.1 Voorkant View
- Fokus lens: Pas die helderheid van die geprojekteerde beeld aan.
- IR -ontvanger: Ontvang seine van die afstandsbediening.
3.2 Side and Rear Views (Poorts en Kontroles)
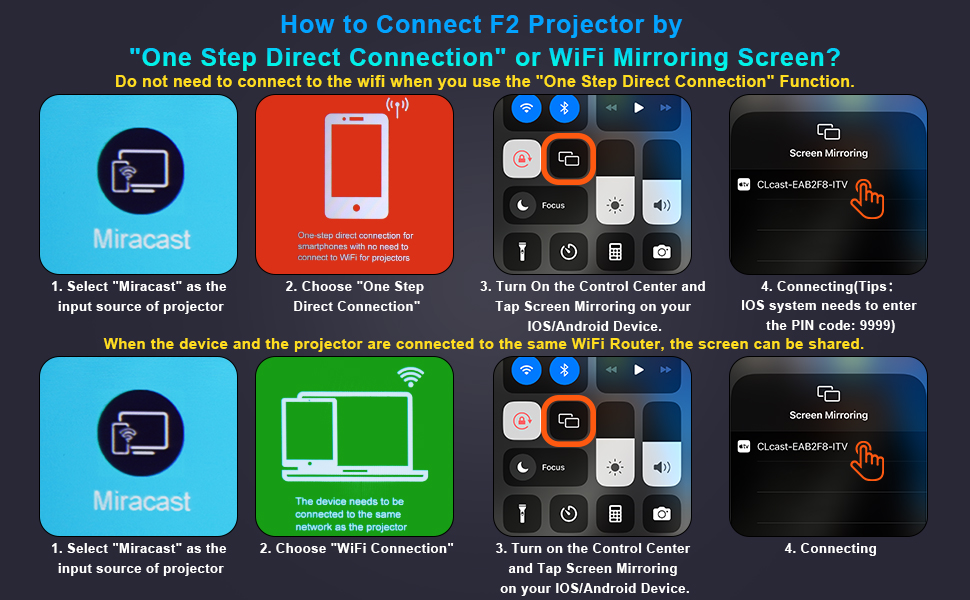
Figure 3.2: Multiple connection options on the VYSER F2 Projector.
- HDMI-poorte (x2): Connect to devices like laptops, TV sticks, gaming consoles (e.g., PS5/Xbox).
- USB-poorte (x2): Koppel USB-skywe vir mediaweergawe.
- AV-poort: Koppel aan ouer toestelle met behulp van 'n AV-kabel.
- 3.5 mm oudio-uitvoer: Koppel eksterne luidsprekers of oorfone.
- Kragtoevoer: Koppel die kragkabel aan.
- Cooling Windows: Verseker behoorlike ventilasie vir hitte-afvoer.
- On-board Controls: Buttons for power, menu, input source, and navigation.
3.3 360 Degree View van die Projektor
Video 3.1: A comprehensive 360-degree view of the VYSER F2 Projector, showcasing its design and various ports from all angles.
4. Opstelling
Follow these steps to set up your VYSER F2 Projector for the first time.
4.1 Plasing
Place the projector on a stable, flat surface. Ensure there is adequate ventilation around the projector to prevent overheating. The projection distance can range from 5-15 feet, allowing for an adjustable screen size of 50-300 inches.
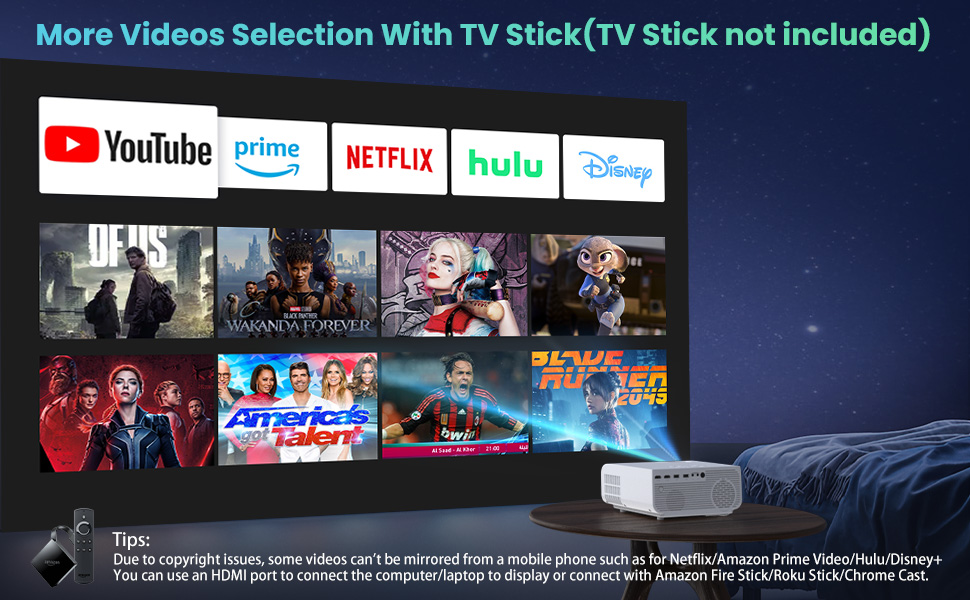
Figure 4.1: Adjustable display size from 50 to 300 inches.
The projector can be placed on a table, mounted on a tripod, or ceiling-mounted. Use the adjustable foot at the bottom of the projector to fine-tune the projection angle if needed.
4.2 Kragverbinding
- Koppel die kragkabel aan die kragtoevoerpoort op die projektor.
- Steek die ander kant van die kragkabel in 'n kragaansluiting.
- Press the Power button on the projector or remote control to turn it on.
4.3 Fokus- en Keystone-korreksie
- Fokus verstelling: Rotate the focus lens ring on the front of the projector until the image appears clear and sharp.
- Keystone-korreksie: Use the keystone correction dial (usually on top or side) to adjust the image shape if it appears trapezoidal. The projector supports ±15° keystone correction.
5. Bedryfsinstruksies
Learn how to connect your devices and utilize the various features of your projector.
5.1 Koppel toestelle
The VYSER F2 Projector offers multiple ways to connect your devices:
- HDMI: For high-definition video and audio from laptops, gaming consoles, TV boxes, etc.
- USB: Vir die speel van media files direk vanaf 'n USB-flash drive.
- VAN: For connecting older devices with AV output.
5.2 Wireless Connectivity (Screen Mirroring)
The projector supports 5G/2.4G WiFi for seamless screen mirroring from your smartphone or tablet.
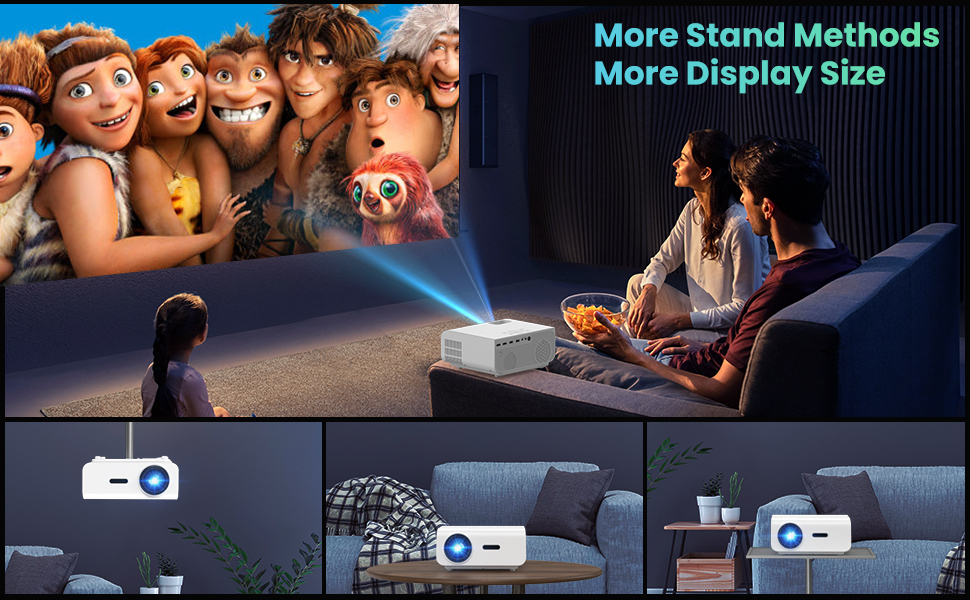
Figure 5.1: 5G/2.4G WiFi Screen Mirroring for various devices.
One-Step Direct Connection: This feature allows direct connection to your phone without needing a WiFi network. Ideal for outdoor use or when a router is unavailable.
Video 5.1: Demonstration of the F2 Projector's One-Step Direct Connection with WiFi and Bluetooth, showing quick setup for phone mirroring.
For detailed steps on screen mirroring, refer to the on-screen instructions by selecting "Miracast" from the input source menu.
Note: Due to copyright restrictions, some streaming services (e.g., Netflix, Amazon Prime Video, Hulu, Disney+) may block screen mirroring. For these services, it is recommended to use an HDMI connection with a compatible device like a Fire TV Stick, Roku Stick, or laptop.
5.3 Bluetooth-verbinding
The projector features Bluetooth 5.1 for connecting to external Bluetooth speakers or headphones, enhancing your audio experience.

Figure 5.2: Bluetooth connection for external audio devices.
To connect: Navigate to the Bluetooth settings on the projector, enable Bluetooth, and select your desired audio device from the list of available devices. (Note: The projector connects to Bluetooth speakers, not directly to smartphones/tablets via Bluetooth for audio input).
5.4 Spyskaartnavigasie
Use the remote control or the on-board buttons to navigate the projector's menu. Options typically include input source selection, picture settings (brightness, contrast, color), sound settings, and system settings.
6. Onderhoud
Behoorlike onderhoud verseker die lang lewensduur en optimale werkverrigting van u projektor.
- Lens skoonmaak: Gebruik 'n sagte, pluisvrye lap wat spesifiek vir optiese lense ontwerp is om die projektorlens sagkens skoon te maak. Vermy skuurmiddels of harde chemikalieë.
- Stofverwydering: Regularly clean the cooling vents to prevent dust buildup, which can affect performance and lifespan. Use a soft brush or compressed air.
- Berging: Wanneer dit nie vir lang tye gebruik word nie, bêre die projektor op 'n koel, droë plek, verkieslik in sy oorspronklike verpakking of 'n beskermende omhulsel.
- Skakel behoorlik af: Always turn off the projector using the power button and allow it to cool down before unplugging or moving it.
7. Probleemoplossing
Indien u probleme met u projektor ondervind, raadpleeg die volgende algemene stappe vir probleemoplossing:
| Probleem | Moontlike oorsaak/oplossing |
|---|---|
| Geen beeld of "Geen sein"-boodskap |
|
| Vervaagde beeld |
|
| Trapezoidal image |
|
| Geen klank of lae klank |
|
| Screen mirroring issues (e.g., Netflix not working) |
|
| Projector overheating or shutting down |
|
8. Spesifikasies
Key technical specifications for the VYSER F2 Projector:
| Kenmerk | Detail |
|---|---|
| Handelsmerk | VYSER |
| Model | F2 projektor |
| Inheemse resolusie | 1920 x 1080 (Inheemse 1080P) |
| Helderheid | 12000 Lux (350 ANSI Lumens) |
| Kontrasverhouding | 10000:1 (implied from image comparison) |
| Projeksie grootte | 50-300 duim |
| Projeksie afstand | 5-15 voet |
| Verbindingstegnologie | Wireless (5G/2.4G WiFi), Bluetooth 5.1, HDMI (x2), USB (x2), AV, 3.5mm Audio Out |
| Keystone-regstelling | ±15° Handleiding |
| Item gewig | 4.11 pond |
| Kleur | White-White |
9. Waarborg en Ondersteuning
VYSER is committed to providing excellent customer service and technical support for your projector.
- Lewenslange kliëntediens: Enjoy lifetime customer service and technical support for your VYSER F2 Projector.
- For any inquiries, technical assistance, or warranty claims, please contact VYSER customer support through the platform where you purchased the product or refer to the official VYSER webwebwerf vir kontakinligting.
Ask a question about this manual
Ask about setup, troubleshooting, compatibility, parts, safety, or missing instructions. Manuals+ will review the question and use this page’s manual context to help answer it.