PELONIS 0750545106520
Pelonis Personal Mini Fan Forced Heater User Manual
Model: 0750545106520 | Brand: PELONIS
Inleiding
Thank you for choosing the Pelonis Personal Mini Fan Forced Heater. This compact and efficient heater is designed to provide supplemental warmth to small personal spaces such as offices, bedrooms, or bathrooms. Its adjustable thermostat and multiple heat settings allow for personalized comfort. Please read this manual thoroughly before operation to ensure safe and effective use.
Belangrike veiligheidsinligting
Always follow basic safety precautions when using electrical appliances to reduce the risk of fire, electric shock, and injury to persons. This heater is for indoor use only.
- MOENIE DEK NIE: Never cover the heater or block the air intake/outlet openings. This can lead to overheating and fire.
- Kantelbeskerming: The heater is equipped with a safety switch that automatically turns the unit off if it is accidentally tipped over.
- Oorverhittingbeskerming: A red indicator light will illuminate if the heater gets too hot, and the unit will automatically shut off to prevent overheating.
- Keep combustible materials (furniture, pillows, bedding, papers, clothes, and curtains) at least 3 feet (0.9 m) from the front of the heater and away from the sides and rear.
- Do not use in bathrooms, laundry areas, or similar indoor locations where water is present.
- Prop verwarmers altyd direk in 'n muuraansluiting/houer in. Moet nooit met 'n verlengkoord of herplaasbare kragkraan (uitlaat/kragstrook) gebruik nie.
Produk verbyview
Familiarize yourself with the components of your Pelonis Personal Mini Fan Forced Heater:
- Termostaat skakelaar: Adjusts the desired temperature (Min to Max).
- Heat Setting Dial: Selects fan-only mode or one of three heat levels (Off, Fan, 1, 2, 3).
- Aanwyserlig: Illuminates when the heater is operating or if an overheat condition occurs.
- Voorrooster: Air outlet for heated or fan-only air.
- Rear Air Intake: Waar lug in die eenheid ingetrek word.
- Dra handvatsel: Geïntegreerde handvatsel vir maklike draagbaarheid.
- Tip-Over Safety Switch: Geleë aan die onderkant van die eenheid.
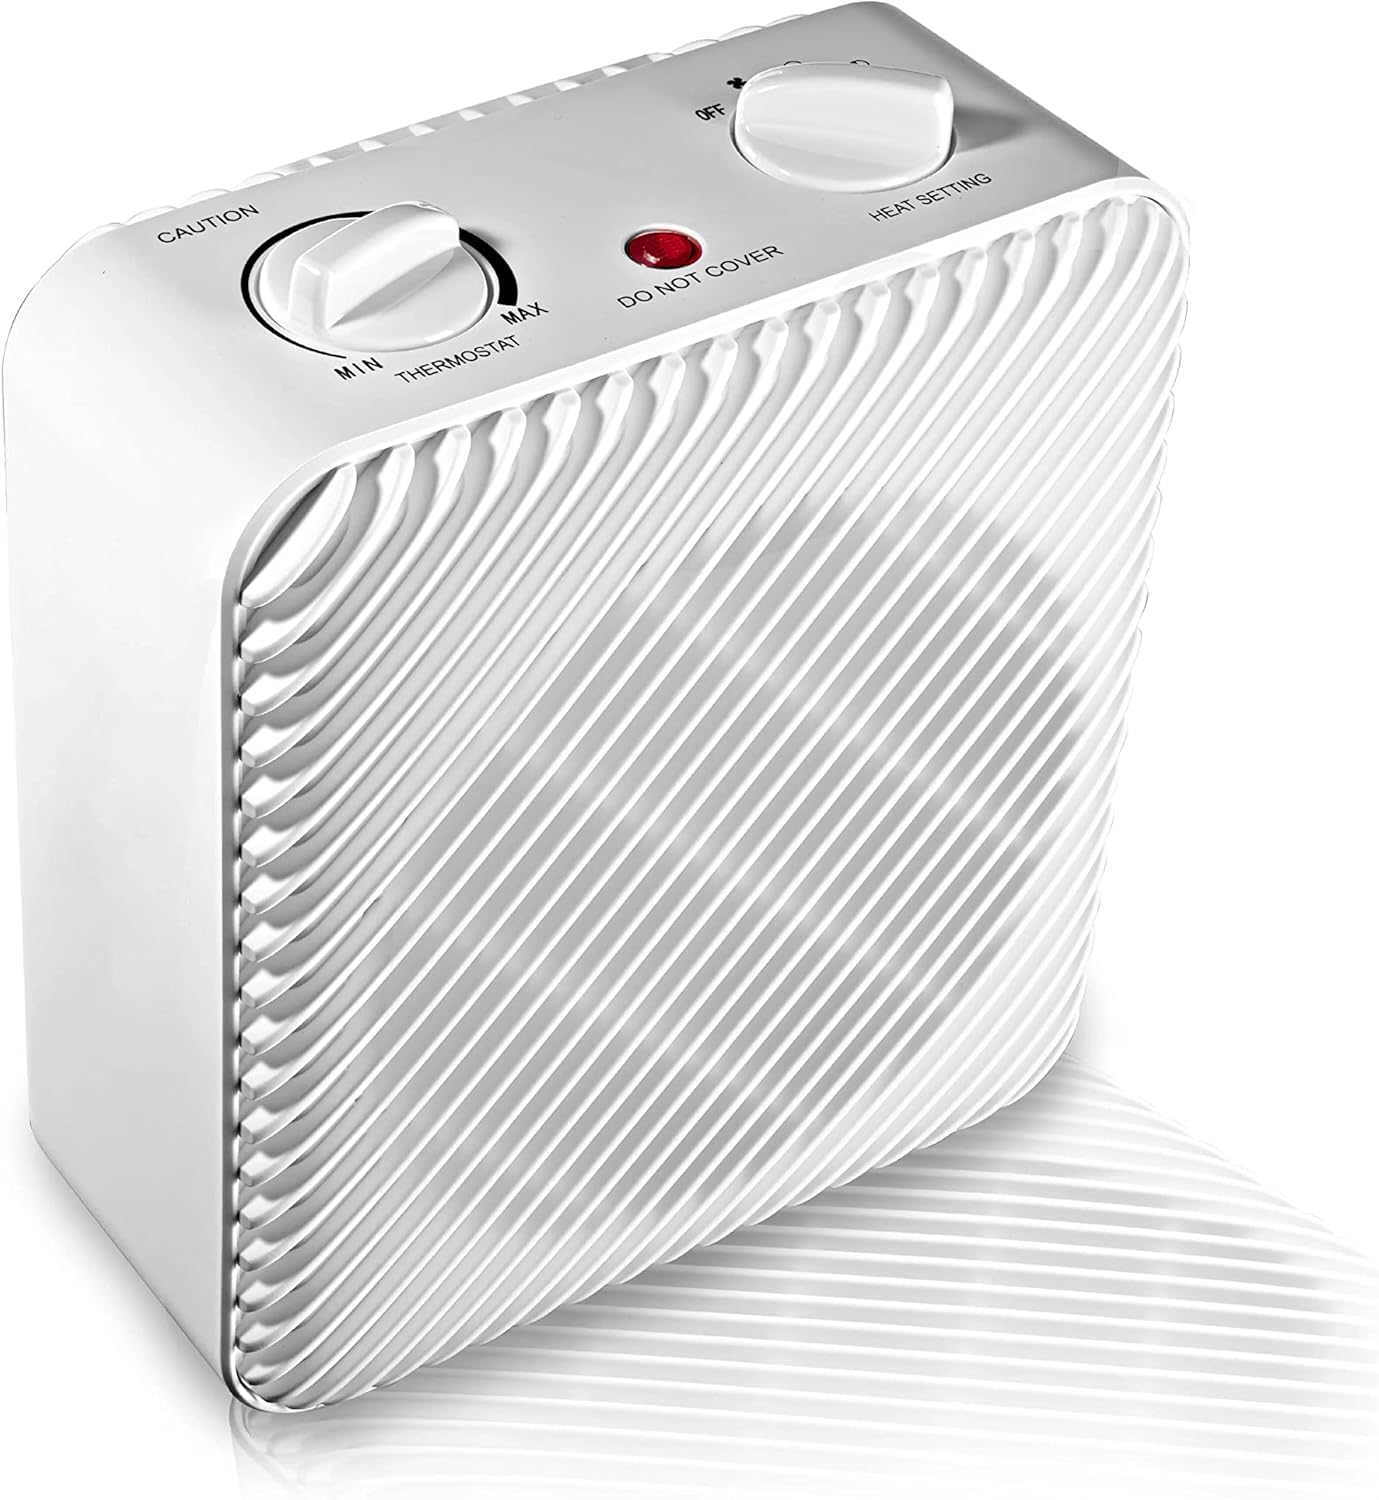
Figuur 1: Voorkant en bokant view of the Pelonis Personal Mini Fan Forced Heater, highlighting the thermostat and heat setting dials.

Figuur 2: Naby-voorkant view of the heater, showing the protective grille over the fan.

Figuur 3: Agter view of the heater, illustrating the power cord connection and the location of the tip-over safety switch on the base.
Opstelling
- Unpack the heater from its packaging and remove all protective materials.
- Plaas die verwarmer op 'n ferm, gelyk oppervlak. Maak seker dat dit ten minste 0.9 meter (3 voet) van mure, meubels en ander voorwerpe af is.
- Ensure the power cord is not obstructed or placed under rugs.
- Steek die verwarmer direk in 'n 120V WS-muuraansluiting. Moenie verlengkoorde of kragstroke gebruik nie.
Bedryfsinstruksies
Turning On/Off and Heat Settings
- To turn the heater on, rotate the Hitte-instelknop clockwise from the "OFF" position.
- Kies jou verlangde modus:
- Fan Only (Fan icon): Provides cool air circulation without heat.
- Heat Setting 1: Lae hitte-uitset.
- Heat Setting 2: Medium heat output.
- Heat Setting 3: Hoë hitte-uitset.
- To turn the heater off, rotate the Hitte-instelknop antikloksgewys na die "AF"-posisie.
Verstelling van die termostaat
- Once a heat setting (1, 2, or 3) is selected, rotate the Termostaatskakelaar to your desired temperature.
- Turn the dial towards "MAX" for higher heat and "MIN" for lower heat.
- Die verwarmer sal aan- en afskakel om die vasgestelde temperatuur te handhaaf.
Onderhoud
Regular maintenance helps ensure the longevity and safe operation of your heater.
- Skoonmaak: Ontkoppel altyd die verwarmer se kragtoevoer en laat dit heeltemal afkoel voordat jy dit skoonmaak. Gebruik 'n sagte, damp lap om die buite-oppervlaktes af te vee. Moenie skuurmiddels of oplosmiddels gebruik nie.
- Berging: Wanneer dit nie gebruik word nie, bêre die verwarmer op 'n koel, droë plek. Dit word aanbeveel om dit in sy oorspronklike verpakking te bêre om dit teen stof en skade te beskerm.
- Moenie probeer om die verwarmer self oop te maak of te herstel nie. Verwys alle diens na gekwalifiseerde dienspersoneel.
Probleemoplossing
| Probleem | Moontlike oorsaak | Oplossing |
|---|---|---|
| Verwarmer skakel nie aan nie. | Not plugged in; power outlet not working; tip-over switch activated; overheat protection activated. | Ensure unit is securely plugged into a working outlet. Check if the heater was tipped over (reset by placing upright). Allow unit to cool down if overheat light is on. |
| Die verwarmer hou onverwags op met werk. | Overheat protection activated; tip-over switch activated. | Unplug the unit, allow it to cool for 10-15 minutes, then plug back in. Ensure unit is on a stable, flat surface. |
| Die verwarmer is aan, maar geen hitte word geproduseer nie. | Set to "Fan Only" mode; thermostat set too low. | Ensure the Heat Setting Dial is on 1, 2, or 3. Adjust the Thermostat Dial to a higher setting. |
Spesifikasies
- Handelsmerk: PELONIS
- Modelnommer: 0750545106520
- Vormfaktor: Voetstuk
- Binne/buiteluggebruik: Binneshuise
- Kamer tipe: Binnelandse Kantoor
- Brandstof tipe: Elektries
- Aantal snelhede: 3 (Hitte-instellings) + Slegs waaier
- Voltage: 120 Volt (AC)
- Ampouderdom: 12.5 Amps
- Maksimum temperatuurinstelling: 450 grade Fahrenheit
- Item gewig: 3.66 pond
- Pakket afmetings: 10.35 x 8.62 x 4.72 duim
- UPC: 750545106520
Waarborg en Ondersteuning
For warranty information or technical support, please refer to the warranty card included with your product or visit the official PELONIS webMoenie probeer om die eenheid self te herstel nie.
Ask a question about this manual
Ask about setup, troubleshooting, compatibility, parts, safety, or missing instructions. Manuals+ will review the question and use this page’s manual context to help answer it.