Inleiding
This manual provides comprehensive instructions for the safe and effective installation, operation, and maintenance of your NORDRIVE N15090 Silenzio Black Rail Roof Rack System. Please read all instructions carefully before installation and use to ensure proper function and safety.
Veiligheidsinligting
- Maksimum laaikapasiteit: Adhere strictly to the maximum load capacity specified for your vehicle's roof and the roof rack system. Never exceed these limits.
- Veilige aanhegsel: Always ensure the roof rack and any loaded items are securely attached before driving. Check all fasteners regularly, especially after initial installation and before each trip.
- Gewig verspreiding: Distribute the load evenly across the roof rack to maintain vehicle stability.
- Driving Speed: Adjust your driving speed to suit road conditions, especially when carrying a load on the roof rack. Avoid sudden braking or sharp turns.
- Hoogtevrystelling: Be aware of the increased vehicle height when the roof rack is installed, especially when entering garages, car washes, or low-clearance areas.
- Gereelde inspeksie: Periodically inspect the roof rack for any signs of wear, damage, or loose components. Replace damaged parts immediately.
- Installation by Qualified Personnel: If you are unsure about any installation steps, seek assistance from a qualified professional.
Pakketinhoud
The NORDRIVE N15090 Silenzio Black Rail Roof Rack System typically includes the following components:
- Two (2) robust, powder-coated aluminum alloy profiles (crossbars).
- Four (4) foot couplings for attachment to vehicle's standard roof rails.
- Rubber front profiles designed to reduce wind noise and improve aerodynamics.
- Rubber profiles for sealing the T-groove after accessory installation.
- All necessary fasteners and tools for assembly.
Opstelling en installasie
Follow these steps for proper installation of your NORDRIVE Silenzio Black Rail Roof Rack System. Refer to your vehicle's owner's manual for specific roof rail information.
1. Prepare the Roof Rails
Ensure your vehicle's standard roof rails are clean and free from debris. Identify the optimal positions for the front and rear crossbars, typically equidistant from the front and rear of the roof, or as specified by your vehicle manufacturer.
2. Assemble the Crossbars and Feet
Attach the foot couplings to the aluminum crossbars. The bottom groove of the crossbar is designed for inserting and hiding the foot couplings. Use the graduated positioning scale for quick and easy assembly, ensuring the feet are correctly spaced for your vehicle's roof rails.
Beeld: Nabyskoot view of the NORDRIVE Silenzio roof rack foot, showing how it connects to the aluminum profile.
3. Mount the Roof Rack to Vehicle
Carefully place the assembled crossbars onto your vehicle's standard roof rails. Ensure the foot couplings engage securely with the rails. Tighten all fasteners according to the manufacturer's specifications. Do not overtighten.

Image: The NORDRIVE Silenzio Black Rail Roof Rack system securely installed on a vehicle's roof rails.
4. Install Accessories (if applicable)
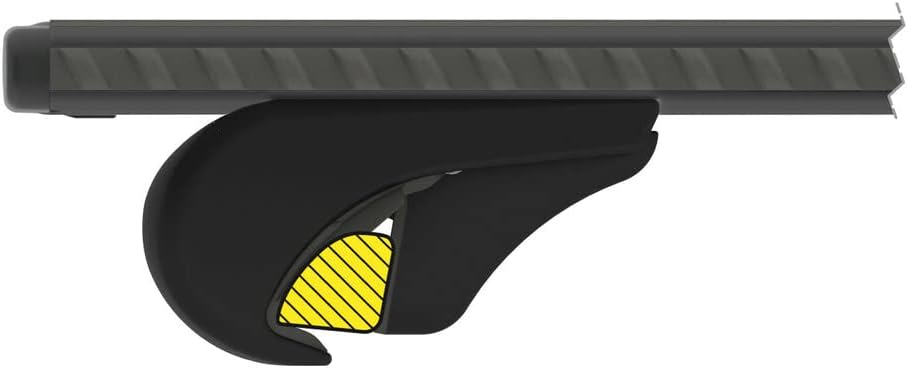
Die robuuste profile features a provision for quick coupling "T" connectors in the upper groove. The patented PTO "Press-to-open" system allows for easy placement of these T-connectors without needing to remove the terminal end caps. After installing accessories, use the provided rubber profile to seal the groove, which helps maintain aerodynamics and reduce noise.

Image: The NORDRIVE N15090 Silenzio Black Rail Roof Rack System, showing the aerodynamic profile and T-groove.
Bedryfsinstruksies
- Laai tans: When loading items onto the roof rack, ensure they are evenly distributed and do not exceed the maximum weight capacity.
- Securing Load: Always use appropriate straps or tie-downs to secure your load. Ensure there is no movement of items during transit.
- Aërodinamika: The Silenzio design incorporates a rubber front profile to minimize wind noise. For optimal performance, ensure this profile is correctly seated.
- Gereelde tjeks: Before and during long journeys, stop and check that the roof rack and its load are still securely fastened.
Onderhoud
- Skoonmaak: Clean the roof rack regularly with mild soap and water. Avoid abrasive cleaners or solvents that could damage the finish or rubber components.
- Inspeksie: Periodically inspect all bolts, nuts, and other fasteners for tightness. Check rubber seals and profiles for wear or damage.
- Berging: If removing the roof rack for extended periods, store it in a dry, protected area to prevent corrosion or damage.
Probleemoplossing
- Oormatige windgeraas:
- Ensure the rubber front profile is correctly installed and seated along the crossbar.
- Verify that the T-groove rubber seals are properly inserted if no accessories are mounted, or if accessories are mounted, that the seals are cut to fit and properly seated around them.
- Loose Roof Rack:
- Re-check all mounting bolts and fasteners for tightness. Refer to the installation section for proper tightening procedures.
- Ensure the foot couplings are correctly engaged with your vehicle's roof rails.
- Difficulty Installing T-Connectors:
- Utilize the patented PTO "Press-to-open" system by pressing down on the designated area to open the T-groove for insertion.
- Ensure the T-connector is compatible with the NORDRIVE system.
Spesifikasies
| Handelsmerk | NORDRIVE |
| Modelnommer | N15090 |
| Materiaal | Rubber, Aluminum |
| Vervaardiger | Lampa |
| Eerste Beskikbare Datum | 1 Desember 2022 |
Waarborg en Ondersteuning
For warranty information or technical support, please refer to the documentation provided with your purchase or contact your retailer or the NORDRIVE manufacturer directly. Keep your proof of purchase for warranty claims.
For further assistance, visit the official NORDRIVE webwebwerf of kontak hul kliëntediensafdeling.