Deeyaple F-8816
Deeyaple LED Digital Alarm Clock User Manual
Model: F-8816
1. Inleiding
Dankie vir die aankoopasing the Deeyaple LED Digital Alarm Clock. This manual provides detailed instructions for setting up, operating, and maintaining your new alarm clock. Please read this manual thoroughly before use to ensure proper functionality and to maximize your user experience. This clock features adjustable brightness, dual alarms, a snooze function, and a clear LED display showing both time and day.
2. Veiligheidsinligting
- Moenie die toestel blootstel aan uiterste temperature, direkte sonlig of hoë humiditeit nie.
- Hou die toestel weg van water en ander vloeistowwe.
- Use only the provided USB cable for power. An AC adapter is not included.
- Moenie probeer om die toestel self uitmekaar te haal of te herstel nie. Kontak kliëntediens indien probleme ontstaan.
- Hou buite bereik van kinders.
3. Pakketinhoud
- Deeyaple LED Digital Alarm Clock (Model: F-8816)
- USB-kragkabel (Let wel: Kragadapter nie ingesluit nie)
- Gebruikershandleiding (Hierdie dokument)

Figure 3.1: Back panel and side view of the alarm clock, showing control buttons and USB port.
4. Produk verbyview
4.1 Voorskerm
The front of the clock features a large LED display that shows the time, day of the week, and indicators for Alarm 1 and Alarm 2. The display uses vibrant, multi-colored digits for enhanced readability.

Figuur 4.1: Voorkant view of the alarm clock with time and day displayed.
4.2 Top Buttons
- SNOOZE/LIGHT Button: Located on the top. Press to activate snooze during an alarm or to adjust display brightness.
4.3 Back Controls
- TIME SET Button: Word gebruik om tydinstellingsmodus te betree.
- ALARM SET-knoppie: Word gebruik om alarminstellingsmodus te betree.
- UP (+) Button: Increases values during setting or toggles functions.
- DOWN (-) Button: Decreases values during setting or toggles functions.
- DC 5V Poort: USB power input.
- RESET-knoppie: Small button to reset the clock to factory settings.

Figuur 4.2: Agter view of the alarm clock, highlighting the USB power input and control buttons.
5. Opstelling
5.1 Die krag van die toestel
- Connect the provided USB power cable to the DC 5V port on the back of the alarm clock.
- Plug the other end of the USB cable into a standard USB power adapter (not included) or a powered USB port (e.g., computer, power bank).
- The display will light up, indicating the clock is powered on.

Figure 5.1: The alarm clock is powered via a USB cable, ensuring continuous display.
6. Bedryfsinstruksies
6.1 Stel die tyd in
- Druk die TYD BEREIK button on the back of the clock. The hour digits will start flashing.
- Gebruik die OP (+) or AF (-) knoppies om die uur aan te pas.
- Druk TYD BEREIK druk weer om die uur te bevestig en na die minuutinstelling oor te skakel. Die minuutsyfers sal flikker.
- Gebruik die OP (+) or AF (-) knoppies om die minute aan te pas.
- Druk TYD BEREIK a third time to confirm the minutes and move to 12/24H format selection.
- Gebruik die OP (+) or AF (-) buttons to select between 12-hour (with AM/PM indicator) or 24-hour format.
- Druk TYD BEREIK one last time to save the settings and exit time setting mode.
6.2 Alarms instel (dubbele alarms)
Die horlosie ondersteun twee onafhanklike alarms (Alarm 1 en Alarm 2).
- Druk die ALARMSTEL button. The Alarm 1 hour digits will start flashing, and the Alarm 1 icon will appear.
- Gebruik die OP (+) or AF (-) buttons to adjust the Alarm 1 hour.
- Druk ALARMSTEL again to confirm the hour and move to Alarm 1 minute setting. The minute digits will flash.
- Gebruik die OP (+) or AF (-) buttons to adjust the Alarm 1 minutes.
- Druk ALARMSTEL a third time to confirm minutes and move to Alarm 1 day setting.
- Gebruik die OP (+) or AF (-) buttons to select the alarm days:
- 1-1: Enkeldag alarm
- 1-5: Maandag tot Vrydag
- 1-6: Maandag tot Saterdag
- 1-7: Monday to Sunday (Every day)
- 6-7: Saturday to Sunday (Weekend)
- Druk ALARMSTEL again to confirm Alarm 1 settings and proceed to Alarm 2 setting. Repeat steps 2-6 for Alarm 2.
- After setting Alarm 2, press ALARMSTEL one last time to save all alarm settings and exit.

Figure 6.1: Alarm days setting options for customized wake-up schedules.
6.3 Snooze -funksie
Wanneer 'n alarm afgaan, druk die groot knoppie SNOOZE / LIG button on the top of the clock. The alarm will pause for 5 minutes and then sound again. You can repeat the snooze cycle multiple times.

Figure 6.2: Activating the snooze function by touching the top button for an additional 5 minutes of rest.
6.4 Aanpassing van die skermhelderheid
The clock has 3 levels of brightness (Bright, Medium, Low) and an option to turn off the display.
- Druk die SNOOZE / LIG button on the top of the clock (when no alarm is sounding) to cycle through the brightness levels: Bright > Medium > Low > Off > Bright.
- Select the brightness level that best suits your environment and preference.
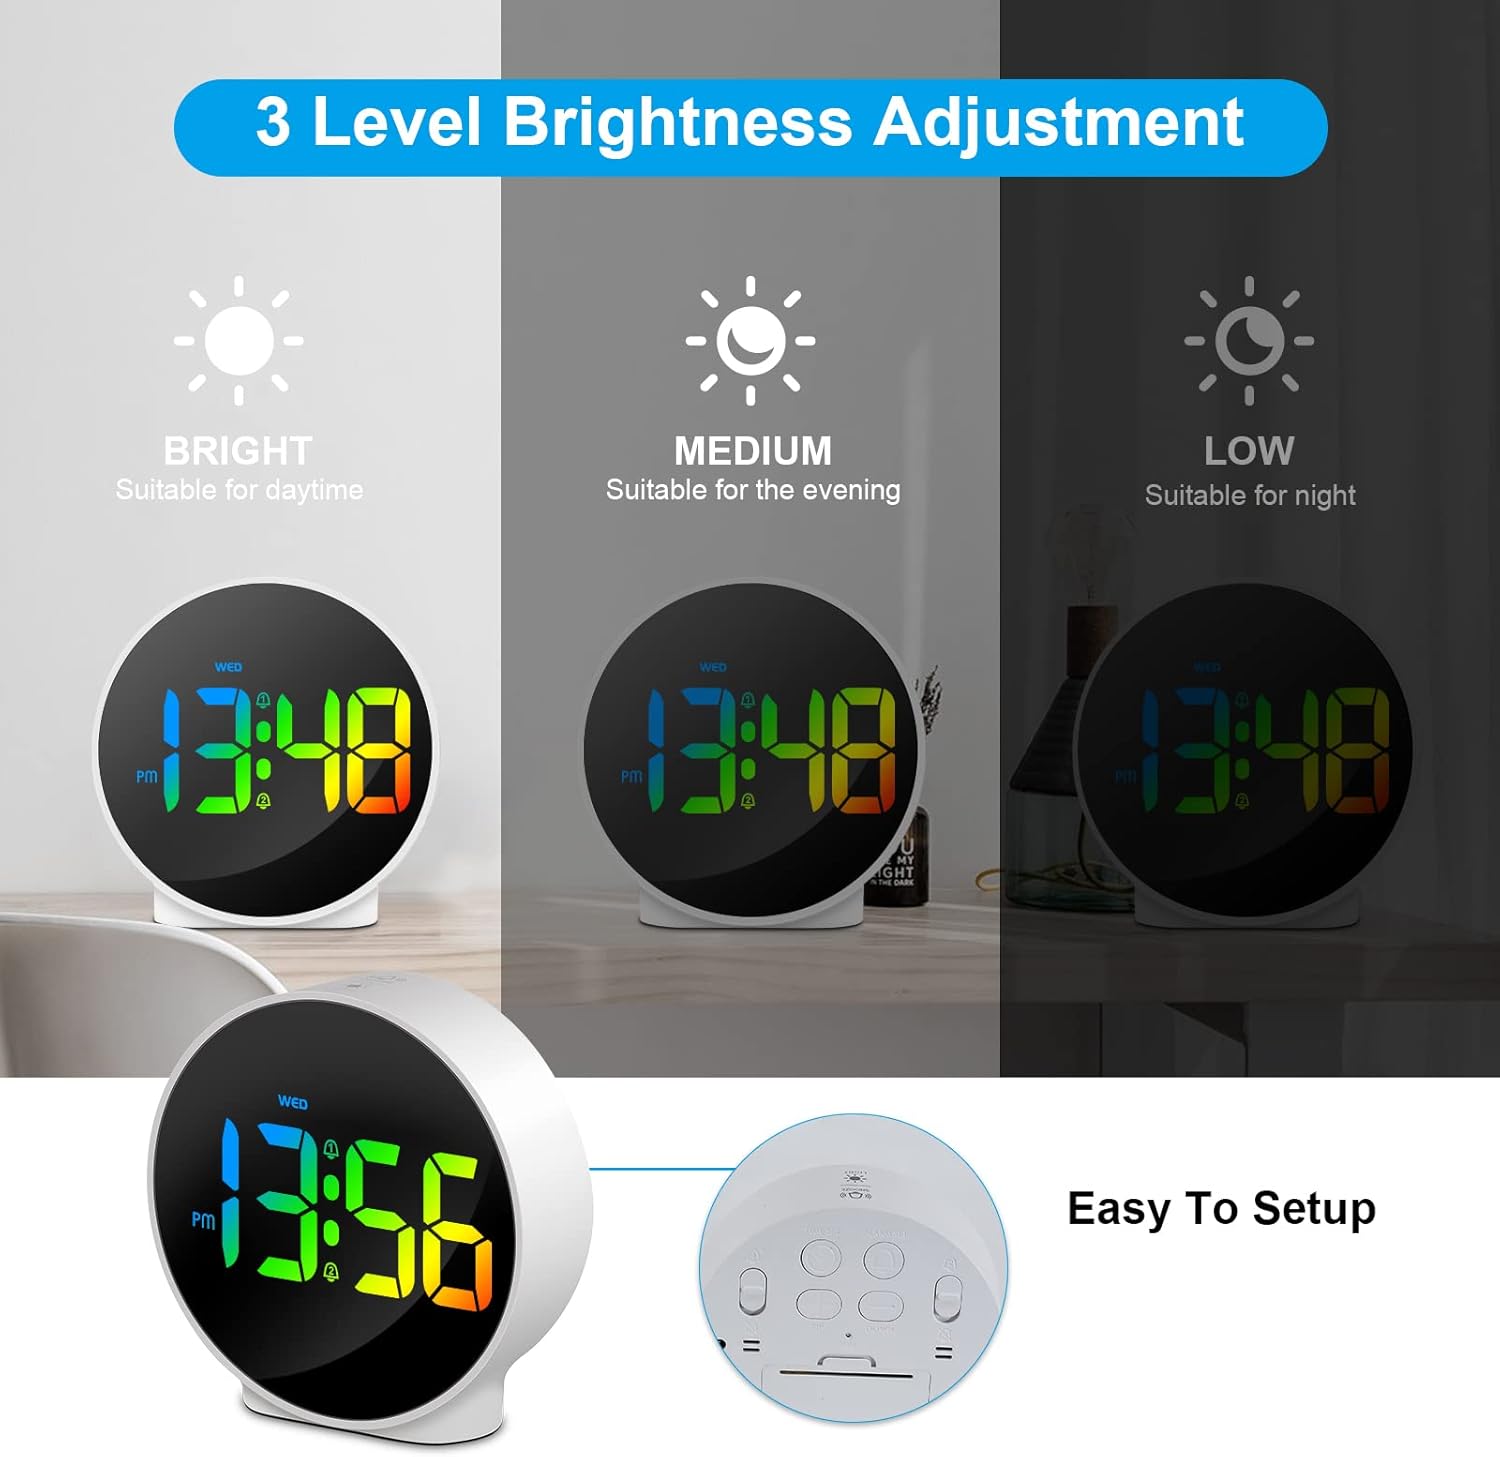
Figure 6.3: Three adjustable brightness levels for optimal viewin verskillende beligtingstoestande.
6.5 Week and Time Display
The clock simultaneously displays the current time and the day of the week on the same screen, eliminating the need to switch displays.

Figure 6.4: The clock displays both the time and the day of the week on a single screen for convenience.
7. Onderhoud
- Skoonmaak: Gebruik 'n sagte, droë lap om die oppervlak van die horlosie skoon te maak. Moenie skuurmiddels of oplosmiddels gebruik nie.
- Berging: If storing the clock for an extended period, disconnect it from power and store it in a cool, dry place.
8. Probleemoplossing
| Probleem | Moontlike oorsaak | Oplossing |
|---|---|---|
| Die skerm is af of dof. | Not powered, brightness set to off/low. | Ensure USB cable is securely connected to a power source. Press SNOOZE/LIGHT button to adjust brightness. |
| Die alarm lui nie. | Alarm not set, alarm volume too low (not applicable for this model), incorrect alarm days. | Verify alarm time and ensure the alarm icon is displayed. Check alarm day settings. |
| Tyd is verkeerd. | Time not set correctly, power interruption. | Re-set the time following Section 6.1. Ensure continuous power supply. |
| Knoppies reageer nie. | Tydelike sagtewarefout. | Unplug the USB cable, wait 10 seconds, then plug it back in. If issue persists, use the RESET button on the back (requires a thin object like a paperclip). |
9. Spesifikasies
- Handelsmerk: Deeyaple
- Modelnommer: F-8816
- Kleur: White shell with multi-color display
- Afmetings (L x B x H): 10 x 3.81 x 10 cm (3.94 x 1.5 x 3.94 duim)
- Gewig: 180 gram (0.4 lbs)
- Kenmerke: Dual Alarm, Snooze, Adjustable Brightness (3 levels + off), 12/24H Display, Week Display, Corded Electric
- Kragbron: USB Cable (DC 5V)
- Vertoon tipe: Digitale LED
- Materiaal: Akrielnitril Butadieen Styreen (ABS)

Figure 9.1: Dimensions of the Deeyaple LED Digital Alarm Clock.
10. Waarborg en Ondersteuning
Deeyaple products are designed for quality and reliability. For any questions, technical support, or warranty claims, please contact the seller or manufacturer directly through your purchase platform. Please retain your proof of purchase for warranty purposes.
Ask a question about this manual
Ask about setup, troubleshooting, compatibility, parts, safety, or missing instructions. Manuals+ will review the question and use this page’s manual context to help answer it.