1. Inleiding
Thank you for choosing the GHB Baby Monitor Charger. This manual provides essential information for the safe and proper operation, maintenance, and troubleshooting of your charger. Please read this manual thoroughly before use and retain it for future reference.
This charger is specifically designed for use with GHB baby monitor models VB601, VB603, and VB607.
2. Produk verbyview
The GHB Baby Monitor Charger is a power adapter designed to supply electrical power to compatible GHB baby monitor units. It ensures your baby monitor remains powered and operational, providing continuous monitoring.
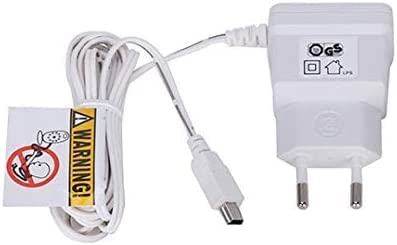
Image 1: GHB Baby Monitor Charger. This image shows the compact design of the charger, featuring its power plug and connector cable.
The package includes one (1) GHB Baby Monitor Charger.

Beeld 2: Voorbeeldample of a GHB Baby Monitor Camera Unit. This charger is compatible with models such as VB601, VB603, and VB607.
3. Veiligheidsinligting
Om veilige werking te verseker en skade te voorkom, neem asseblief die volgende veiligheidsmaatreëls in ag:
- Use only with specified models: This charger is designed exclusively for GHB baby monitor models VB601, VB603, and VB607. Using it with incompatible devices may cause damage or malfunction.
- Slegs binnenshuise gebruik: This product is intended for indoor use. Do not expose it to rain, moisture, or extreme temperatures.
- Vermy water: The charger is not water-resistant. Keep it away from liquids and do not operate with wet hands.
- Behoorlike ventilasie: Ensure the charger is placed in a well-ventilated area to prevent overheating. Do not cover it with cloths or other materials.
- Hanteer versigtig: Do not drop, disassemble, or attempt to repair the charger. Refer all servicing to qualified personnel.
- Kragbron: Connect the charger only to a power outlet that matches the voltage and current ratings specified on the charger.
- Kabelintegriteit: Regularly inspect the power cord for any damage. Do not use if the cord is frayed or damaged.
- Hou buite bereik van kinders: Ensure the charger and its cable are positioned where they cannot be reached or pulled by infants or young children.
4. Opstelling
Follow these steps to set up your GHB Baby Monitor Charger:
- Pak uit: Verwyder die laaier versigtig uit sy verpakking.
- Identify connection port: Locate the power input port on your GHB baby monitor unit (VB601, VB603, or VB607). This is typically a small circular port.
- Connect to monitor: Insert the small connector end of the charger cable firmly into the power input port of your baby monitor unit.
- Connect to power outlet: Plug the larger end of the charger (the power adapter) into a standard electrical wall outlet.
- Verifieer krag: Once connected, your baby monitor should power on or begin charging its internal battery. Refer to your baby monitor's manual for specific power indicators.
5. Bedryfsinstruksies
Using the GHB Baby Monitor Charger is straightforward:
- Laai: When the charger is connected to both the baby monitor and a power outlet, it will automatically begin charging the monitor's battery or providing direct power if the battery is fully charged or absent.
- Deurlopende krag: For continuous operation, keep the charger plugged into both the monitor and the power outlet.
- Ontkoppel tans: To disconnect, first unplug the charger from the wall outlet, then gently remove the connector from the baby monitor. Avoid pulling the cable itself.
6. Onderhoud
Proper maintenance ensures the longevity and reliable performance of your charger:
- Skoonmaak: Disconnect the charger from the power outlet and the baby monitor before cleaning. Use a soft, dry cloth to wipe the surface. Do not use liquid cleaners or abrasive materials.
- Berging: When not in use, store the charger in a cool, dry place, away from direct sunlight and extreme temperatures. Avoid tightly winding the cable to prevent damage.
- Inspeksie: Periodically check the charger cable and connectors for any signs of wear, cuts, or damage. If damage is observed, discontinue use and replace the charger.
7. Probleemoplossing
If you encounter issues with your GHB Baby Monitor Charger, refer to the following common problems and solutions:
| Probleem | Moontlike oorsaak | Oplossing |
|---|---|---|
| Monitor not powering on/charging |
|
|
| Stadige laai |
|
|
Indien die probleem voortduur nadat u hierdie oplossings probeer het, kontak asseblief kliëntediens.
8. Spesifikasies
- Handelsmerk: GHB
- Model: VB60X (Compatible with VB601, VB603, VB607)
- Produk Tipe: Charger / Power Adapter
- Afmetings: Approximately 8.7 x 6.8 x 2.9 cm (Package dimensions)
- Gewig: Approximately 60 grams (Item weight)
- Komponente ingesluit: 1 x laaier
- Waterweerstandvlak: Nie waterbestand nie
- Verbinding: Wired (for power delivery)
9. Waarborg en Ondersteuning
For warranty information and customer support, please refer to the documentation provided with your original GHB baby monitor purchase or visit the official GHB webwebwerf. Bewaar u aankoopbewys as bewys van aankoop vir waarborgeise.
For technical assistance or inquiries, please contact GHB customer service through their official channels.