
1. Belangrike veiligheidsinstruksies
Please read all instructions carefully before using this heater. Failure to follow these instructions may result in fire, electric shock, or injury.
- Do not use this heater outdoors. It is designed for indoor use only.
- Prop verwarmers altyd direk in 'n muuraansluiting/houer in. Moet nooit met 'n verlengkoord of herplaasbare kragkraan (uitlaat/kragstrook) gebruik nie.
- Hierdie verwarmer is warm wanneer dit gebruik word. Om brandwonde te vermy, moenie toelaat dat kaal vel warm oppervlaktes raak nie.
- Hou brandbare materiale, soos meubels, kussings, beddegoed, papiere, klere en gordyne ten minste 3 voet (0.9 m) van die voorkant van die verwarmer en hou dit weg van die kante en agterkant.
- Uiterste versigtigheid is nodig wanneer enige verwarmer deur of naby kinders of invalides gebruik word en wanneer die verwarmer ook al in werking gelaat word en sonder toesig.
- Ontkoppel altyd verwarmer wanneer dit nie gebruik word nie.
- Moenie enige verwarmer gebruik met 'n beskadigde koord of prop of nadat die verwarmer wanfunksioneer, laat val of op enige manier beskadig is nie. Stuur verwarmer terug na gemagtigde diensfasiliteit vir ondersoek, elektriese of meganiese verstelling, of herstel.
- Moenie enige ventilasie- of uitlaatopening inbring of toelaat dat vreemde voorwerpe binnedring nie, aangesien dit 'n elektriese skok of brand kan veroorsaak, of die verwarmer kan beskadig.
- Om 'n moontlike brand te voorkom, moenie luginlate of -uitlaat op enige manier blokkeer nie. Moet nie op sagte oppervlaktes, soos 'n bed, gebruik waar openinge geblokkeer kan word nie.
- This heater has an automatic overheat protection system. If the heater overheats, it will automatically shut off. Unplug the heater, wait 10 minutes for it to cool down, then plug it back in.
- This heater is equipped with a tip-over safety switch. If the heater is accidentally tipped over, it will automatically shut off. Place the heater on a firm, level surface to resume operation.
2. Produk verbyview
The PELONIS PSH10C2ABB is a compact and portable 1500W ceramic electric fan heater designed for efficient indoor heating. It features multiple heat settings and a fan-only mode for year-round use.
Sleutel kenmerke:
- 3 hitte instellings: 700W, 900W, and 1500W for customizable warmth.
- Slegs-waaiermodus: Allows for air circulation without heat, suitable for all seasons.
- Verstelbare termostaat: Maintain your desired room temperature.
- Kompakte en draagbare ontwerp: Easy to move between rooms with a cool-touch handle.
- Keramiese verwarmingselement: Provides rapid and energy-efficient heating.
- Veiligheidskenmerke: Overheat protection and tip-over switch for enhanced safety.
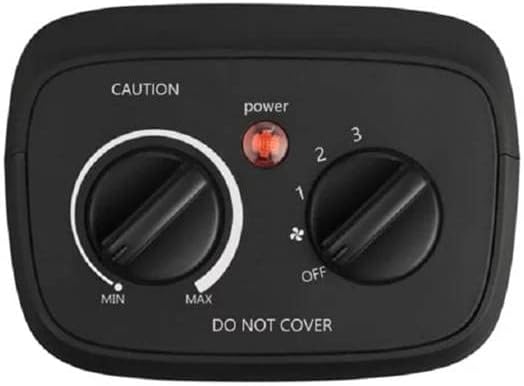
Beeld: Bo view of the heater's control panel, showing the thermostat dial (Min to Max) and the mode selector dial (Off, Fan, Heat 1, Heat 2, Heat 3) with a power indicator light.
3. Opstelling
Pakketinhoud:
- PELONIS PSH10C2ABB Ceramic Electric Fan Heater
- Gebruikershandleiding
Plasing:
- Unpack the heater from its packaging and remove all packing materials.
- Place the heater on a firm, level, and stable surface. Ensure it is at least 3 feet (0.9 meters) away from walls, furniture, and other combustible materials.
- Maak seker dat die kragkabel nie vasgeknyp of onder die verwarmer geplaas word nie.
- Plug the heater directly into a 127V AC, 60Hz wall outlet. Do not use extension cords or power strips.

Image: The PELONIS ceramic heater positioned on a shelf, demonstrating proper placement in a living space.
4. Bedryfsinstruksies
The heater features two control dials on the top panel: one for thermostat control and one for mode selection.
Mode Selection Dial:
This dial controls the power and operating mode of the heater. Rotate the dial to select your desired setting:
- AF: Skakel die verwarmer af.
- FAN (indicated by fan icon): Activates the fan without heat, providing air circulation.
- HEAT 1 (700W): Lae hitte-instelling.
- HEAT 2 (900W): Medium hitte-instelling.
- HEAT 3 (1500W): High heat setting for maximum warmth.
Termostaatbeheerknop:
This dial allows you to set your desired room temperature. It works in conjunction with the heat settings.
- Turn the Mode Selection Dial to one of the HEAT settings (1, 2, or 3).
- Rotate the Thermostat Control Dial clockwise towards "MAX" for higher temperatures, or counter-clockwise towards "MIN" for lower temperatures.
- Once the room reaches your desired temperature, slowly turn the Thermostat Control Dial counter-clockwise until the heater turns off. The heater will now cycle on and off to maintain this temperature.
Kragaanwyserlig: A red light on the control panel illuminates when the heater is powered on and operating.
5. Onderhoud
Regular cleaning and proper storage will help ensure the longevity and efficient operation of your heater.
Skoonmaak:
- Ontkoppel altyd die verwarmer en laat dit heeltemal afkoel voordat jy dit skoonmaak.
- Gebruik 'n sagte, damp lap om die buite-oppervlaktes van die verwarmer af te vee. Moenie skuurmiddels of oplosmiddels gebruik nie.
- Use a vacuum cleaner with a brush attachment to gently remove dust and lint from the air intake and exhaust grilles.
- Never immerse the heater in water or allow water to drip into the interior of the heater.
Berging:
When not in use, store the heater in its original packaging or a clean, dry place. Wrap the power cord loosely to prevent damage.
6. Probleemoplossing
| Probleem | Moontlike oorsaak | Oplossing |
|---|---|---|
| Verwarmer skakel nie aan nie. |
|
|
| Heater produces no heat in a heat setting. |
|
|
| Die verwarmer skakel gereeld aan en af. |
|
|
7. Spesifikasies
- Model: PSH10C2ABB (DUDULAILE-311-2643)
- Handelsmerk: PELONIS
- Kraguitset: 700W / 900W / 1500W
- Voltage: 127 Volt
- Aantal snelhede: 3 (Heat settings) + Fan-only
- Afmetings: Approximately 26 x 22 x 13 cm (Package dimensions, actual unit is similar)
- Gewig: Ongeveer 500 g
- Spesiale kenmerke: Compact, space-saving, energy-saving, lightweight, portable, overheat protection, tip-over switch.
- Kleur: Swart

Image: Diagram showing the approximate dimensions of the PELONIS heater: 23cm height, 10cm depth, 20cm width.
8. Waarborg en Ondersteuning
For warranty information and customer support, please refer to the warranty card included with your product or visit the official PELONIS webwebwerf. Bewaar u aankoopbewys as bewys van aankoop vir enige waarborgeise.
If you experience any issues not covered in the troubleshooting section, please contact PELONIS customer service for assistance.
Aanlyn hulpbronne:
- Official PELONIS Webwebwerf: www.pelonis.com (Let wel: Hierdie is 'n plekhouer URL, please refer to your product documentation for the correct webwebwerf.)