1. Inleiding
This manual provides essential information for the safe and efficient use of your AOC U34V5C/BK 34-inch WQHD LED Monitor. Please read this manual thoroughly before operating the device and retain it for future reference. The AOC U34V5C/BK is designed to deliver a high-quality visual experience with its 3440 x 1440 WQHD resolution and 21:9 aspect ratio, suitable for various applications from professional work to entertainment.
2. Veiligheidsinligting
Neem die volgende veiligheidsmaatreëls in ag om skade aan die monitor te voorkom en persoonlike veiligheid te verseker:
- Moenie die monitor aan reën of vog blootstel om brand- of skokgevare te vermy.
- Moenie die monitor oopmaak nie casing. Daar is geen onderdele binne wat deur die gebruiker onderhou kan word nie. Verwys alle onderhoud na gekwalifiseerde dienspersoneel.
- Plaas die monitor op 'n stabiele, plat oppervlak om te verhoed dat dit val.
- Verseker behoorlike ventilasie rondom die monitor. Moenie ventilasie-openinge blokkeer nie.
- Gebruik slegs die kragkabel en adapter wat saam met die monitor voorsien word.
- Ontkoppel die monitor van die kragtoevoer tydens weerligstorms of wanneer dit vir lang tye nie gebruik word nie.
3. Pakketinhoud
Verifieer dat alle items in die pakket teenwoordig is:
- AOC U34V5C/BK Monitor
- Monitorstaander (basis en nek)
- Kragkabel
- HDMI kabel
- DisplayPort-kabel
- USB-C-kabel
- Gebruikershandleiding (hierdie dokument)
4. Produk verbyview
The AOC U34V5C/BK monitor features a 34-inch VA panel with WQHD resolution, USB-C connectivity with 65W Power Delivery, and a 100Hz refresh rate with AMD FreeSync support.
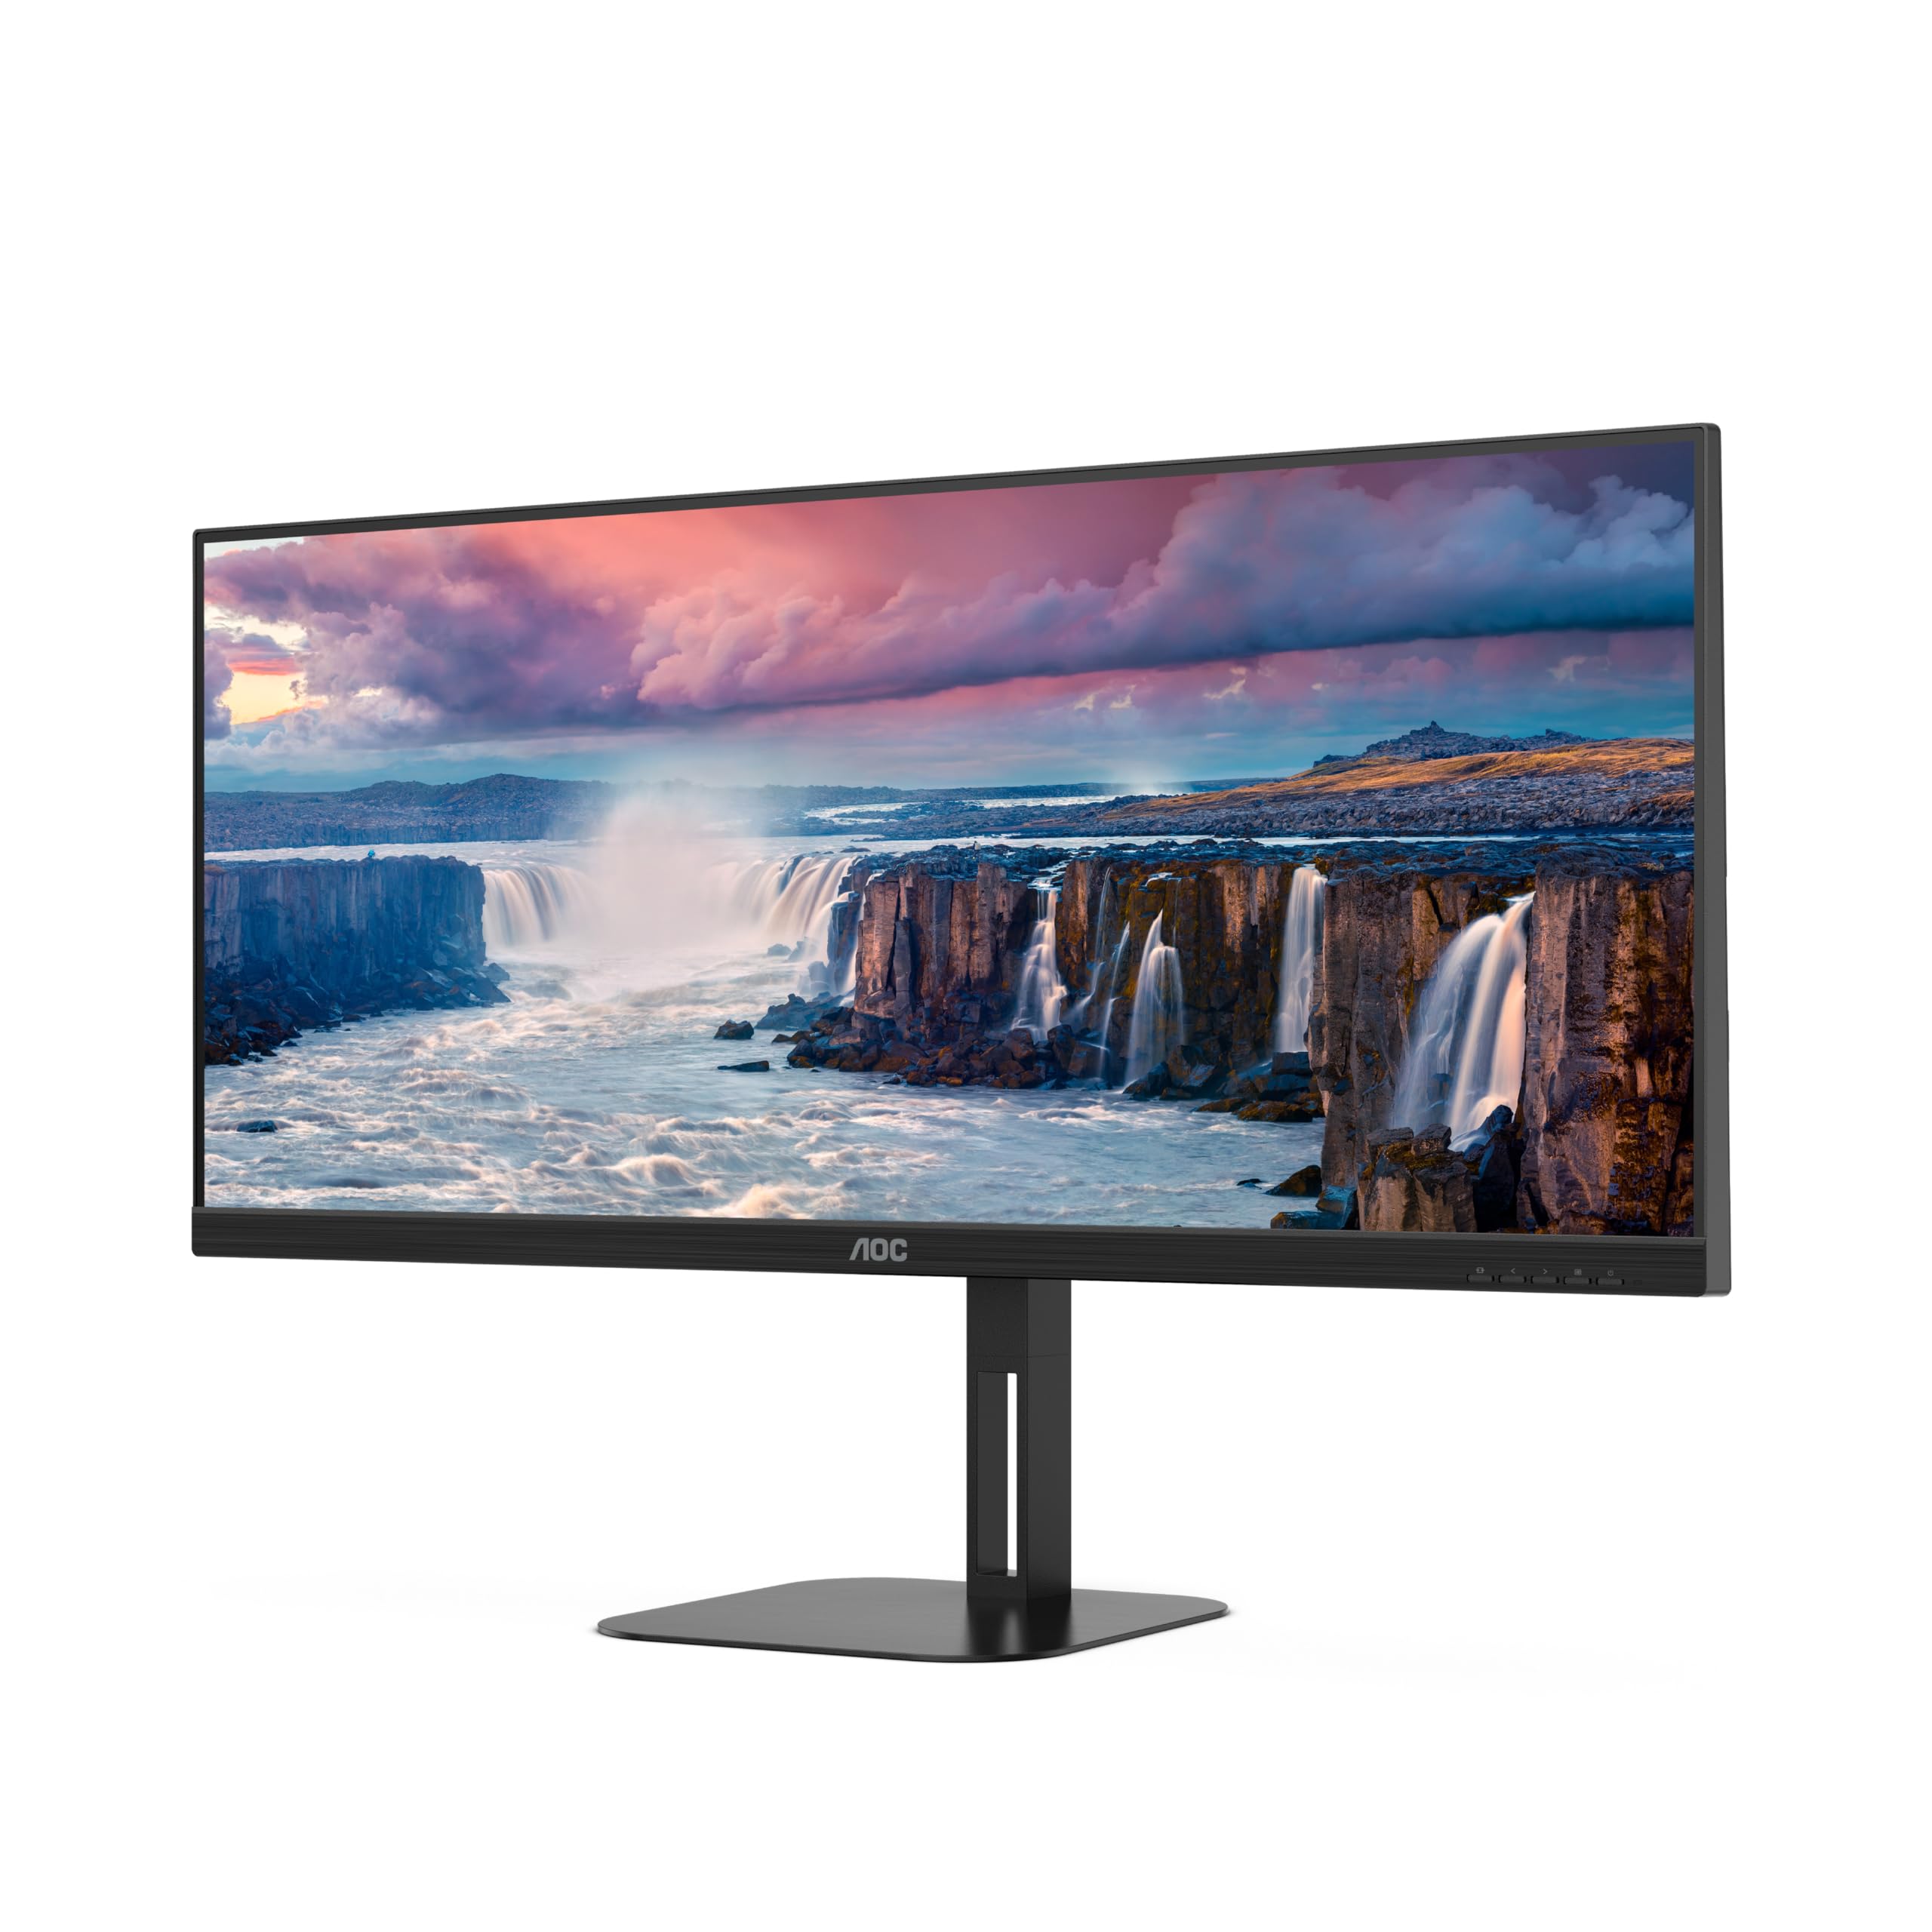
Figuur 4.1: Voorkant view of the AOC U34V5C/BK monitor highlighting its 34-inch VA panel, USB-C port with 65W Power Delivery, 100Hz refresh rate, and AMD FreeSync technology.
4.1 Monitor Components
Familiarize yourself with the various parts of your monitor:
- Voorpaneel: Display screen, OSD control buttons (usually located on the bottom right bezel).
- Agter Paneel: Power input, video input ports (HDMI, DisplayPort, USB-C), USB hub ports, security lock slot.
- Staan: Provides stable support and allows for height, tilt, and swivel adjustments.

Figuur 4.2: Agter view of the AOC U34V5C/BK monitor, showing the VESA mount compatibility and the stand attachment point.

Figuur 4.3: Onder view of the AOC U34V5C/BK monitor, detailing the power input, DisplayPort, HDMI, USB-C, and USB-A hub ports.
5. Opstelling
5.1 Montering van die Staanplek
- Plaas die monitor versigtig met die gesig na onder op 'n sagte, skoon lap om skrape te voorkom.
- Attach the stand neck to the back of the monitor until it clicks into place or is secured with screws (if applicable).
- Heg die staanderbasis aan die staandernek vas en draai die bevestigingsskroef aan die onderkant van die basis vas.
- Lig die monitor versigtig op en plaas dit op 'n stabiele lessenaar.
5.2 Koppel die monitor
Maak seker dat jou rekenaar en monitor afgeskakel is voordat jy enige verbindings maak.
- Kragverbinding: Koppel die kragkabel aan die monitor se kragtoevoer en dan aan 'n geaarde elektriese aansluiting.
- Videoverbinding: Kies een van die volgende opsies:
- HDMI: Connect one end of the HDMI cable to your computer's HDMI output and the other end to an HDMI input on the monitor.
- DisplayPort: Connect one end of the DisplayPort cable to your computer's DisplayPort output and the other end to the DisplayPort input on the monitor.
- USB-C: Connect one end of the USB-C cable to your computer's USB-C port (which supports video output) and the other end to the USB-C input on the monitor. This connection can also provide power delivery and USB data transfer.
- USB-hub-verbinding (opsioneel): If using the monitor's USB hub, connect a USB upstream cable (USB-C to USB-A or USB-C to USB-C, depending on your computer) from your computer to the monitor's USB upstream port. This enables the monitor's USB-A ports for peripherals.
6. Bedien die monitor
6.1 Krag aan/af
Press the power button, usually located on the bottom right bezel, to turn the monitor on or off. The power indicator light will illuminate when the monitor is on.
6.2 Skermvertoning (OSD) Kieslys
The OSD menu allows you to adjust various monitor settings. Use the control buttons (joystick or individual buttons) on the monitor's bezel to navigate the menu.
- Press the Menu button (or push the joystick) to open the OSD menu.
- Use the navigation buttons (or joystick) to move through the menu options.
- Press the Select button (or push the joystick) to enter a sub-menu or confirm a selection.
- Use the Exit button (or move the joystick left) to go back to the previous menu or exit the OSD.
6.3 Algemene OSD-instellings
- Luminansie: Adjust brightness, contrast, and gamma.
- Prentopstelling: Fine-tune image quality, sharpness, and pixel clock.
- Kleuropstelling: Kies kleurtemperatuur, sRGB-modus of gebruikergedefinieerde kleurinstellings.
- Picture Boost: Enhance specific areas of the screen.
- OSD-opstelling: Adjust OSD language, position, and transparency.
- Speletjie-instelling: Enable/disable FreeSync, adjust overdrive, and game modes.
- Ekstra: Select input source, reset settings, view inligting.
7. Onderhoud
7.1 Skoonmaak van die monitor
- Ontkoppel altyd die monitor voordat dit skoongemaak word.
- Gebruik 'n sagte, pluisvrye lap liggies dampmet water of 'n sagte, nie-skurende skermreiniger afgevee.
- Do not use alcohol, ammonia, or abrasive cleaners, as they may damage the screen or casing.
- Wipe the screen gently. Do not apply excessive pressure.
7.2 Algemene sorg
- Vermy die plasing van swaar voorwerpe op die monitor of sy kabels.
- Hou die monitor weg van direkte sonlig, hittebronne en uiterste temperature.
- Do not expose the monitor to strong vibrations or impacts.
8. Probleemoplossing
As jy probleme met jou monitor ondervind, raadpleeg die volgende algemene probleme en oplossings:
| Probleem | Moontlike oorsaak | Oplossing |
|---|---|---|
| Geen beeld op die skerm nie | Monitor not powered on; Incorrect input source; Loose video cable | Press power button; Select correct input via OSD; Reconnect video cable securely |
| Beeld te donker/helder | Helderheid/Kontrasinstellings verkeerd | Adjust Brightness and Contrast in OSD menu |
| Flikkerende beeld | Incorrect refresh rate; Faulty cable | Set refresh rate to 100Hz in display settings; Try a different video cable |
| USB-poorte werk nie | USB upstream cable not connected | Connect the USB-C upstream cable from the monitor to your computer |
If the problem persists after trying these solutions, contact AOC customer support.
9. Spesifikasies
Below are the technical specifications for the AOC U34V5C/BK monitor:

Figure 9.1: Product Information Sheet for AOC U34V5C/BK, detailing energy efficiency and technical parameters.
| Parameter | Waarde |
|---|---|
| Handelsmerk | AOC |
| Model | U34V5C/BK |
| Skerm grootte | 34 duim (86.4 cm) |
| Resolusie | 3440 x 1440 WQHD |
| Aspekverhouding | 21:9 |
| Reaksie Tyd | 4 millisekondes |
| Herlaaitempo | 100 Hz (default 60 Hz) |
| Paneeltegnologie | VA Panel, LED LCD |
| Viewing Hoek | 178 Degrees (Horizontal/Vertical) |
| Hardeware-koppelvlak | DisplayPort, HDMI, USB-C |
| Totale USB-poorte | 4 (USB Hub) |
| Kraglewering (USB-C) | 65 W |
| Voltage | 5 Volt (Interne Kragtoevoer) |
| Produk afmetings | 50 x 25 x 40 cm; 7 kg |
| Energiedoeltreffendheidklas (SDR) | G |
| Kragverbruik (SDR) | 34.0 W |
| Energiedoeltreffendheidklas (HDR) | G |
| Kragverbruik (HDR) | 35.0 W |
| Standby Krag | 0.5 W |
| Minimum guaranteed software/firmware updates | 8 Jaar |
| Minimum guaranteed spare parts availability | 7 Jaar |
| Minimum gewaarborgde produkondersteuning | 8 Jaar |
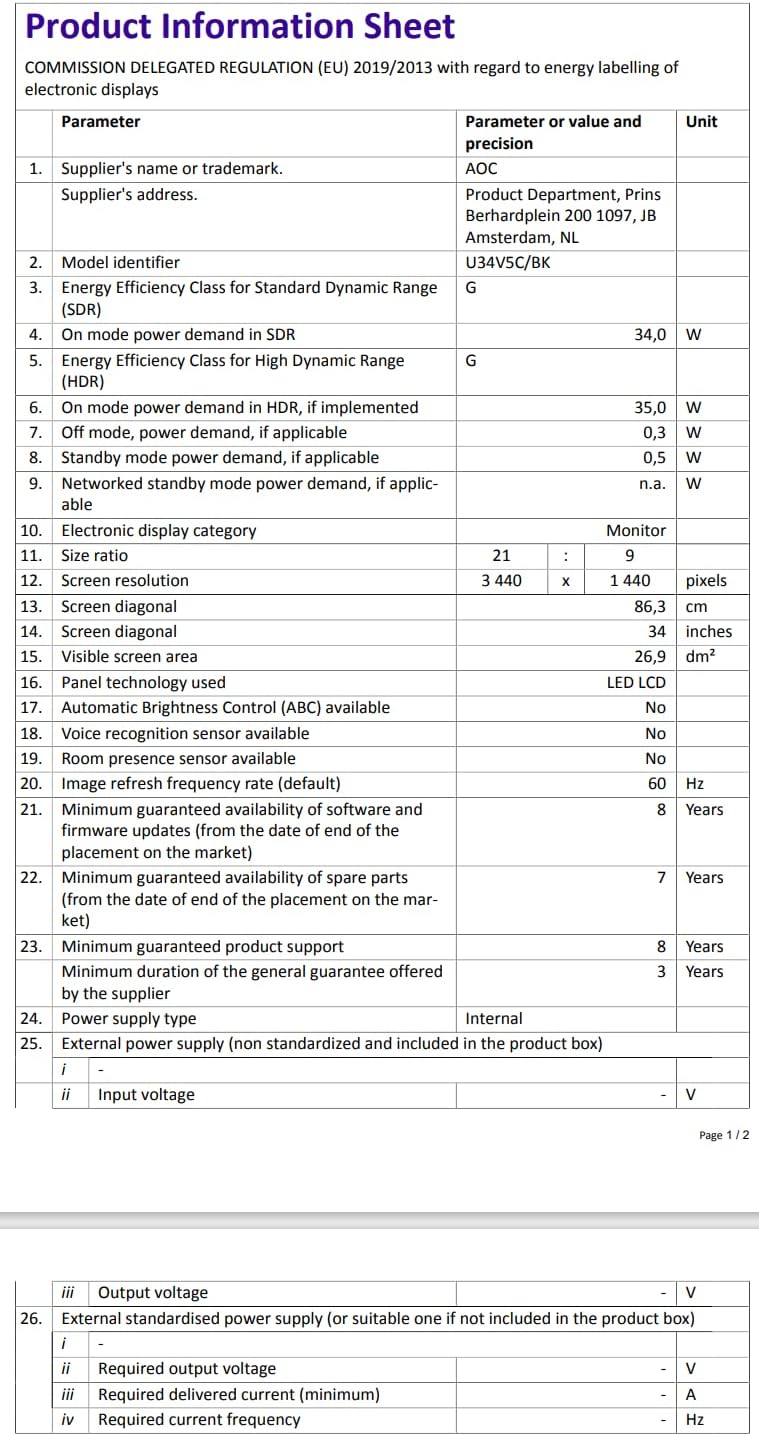
Figure 9.2: Energy Label for AOC U34V5C/BK. For more details, visit the EPREL-databasis.
10. Waarborg en Ondersteuning
The AOC U34V5C/BK monitor comes with a minimum guaranteed general warranty of 3 jaar verskaf deur die verskaffer.
For technical support, warranty claims, or service inquiries, please visit the official AOC website or contact your local AOC customer service center. Ensure you have your monitor's model number (U34V5C/BK) and serial number ready when contacting support.