Inleiding
This manual provides detailed instructions for the installation, operation, and troubleshooting of your CKLau 2 Port USB 3.0 Triple Monitor KVM Switch. This device allows two computers or laptops to share one set of keyboard and mouse, three monitors, audio, microphone, and two USB 3.0 peripheral devices. It supports HDMI 2.1, HDCP 2.2, and HDR 10, with resolutions up to 8K@60Hz or 4K@144Hz.
Veiligheidsinligting
- Ensure all devices are powered off before connecting or disconnecting cables.
- Use only the provided DC 5V 2A power adapter.
- Vermy om die toestel aan vog of uiterste temperature bloot te stel.
- Moenie probeer om die toestel self oop te maak of te herstel nie. Raadpleeg gekwalifiseerde personeel vir diens.
Pakketinhoud
- 1 x CKLau 2 Port HDMI KVM Switch
- 6 x HDMI-kabels
- 2 x USB 3.0-kabels
- 1 x DC 5V 2A Kragadapter
- 1 x Gebruikershandleiding (hierdie dokument)
- 1 x Wired Remote Push Button Switch

Image: Package contents of the CKLau KVM Switch.
Produk verbyview
Voorpaneel
- SELECT -knoppie: Manual switch button to change between connected computers.
- Hot Key ON/OFF Switch: Enables or disables keyboard hotkey switching.
- Aanwyser-LED's: Show active computer and hotkey status.
- USB 3.0 HUB (x2): For connecting USB 3.0 peripheral devices.
- USB-muispoort: Dedicated USB port for mouse connection.
- USB-sleutelbordpoort: Dedicated USB port for keyboard connection.
- Oudio-uitvoer: 3.5mm jack for speakers or headphones.
- Mikrofooninvoer: 3.5mm jack for microphone.
Agterpaneel
- PC1 HDMI Input (x3): Connects to the three HDMI outputs of Computer 1.
- PC1 USB Input: Connects to a USB 3.0 port on Computer 1.
- PC2 HDMI Input (x3): Connects to the three HDMI outputs of Computer 2.
- PC2 USB Input: Connects to a USB 3.0 port on Computer 2.
- HDMI Output (x3): Connects to your three monitors.
- DC5V Kraginvoer: Om die kragadapter aan te sluit.
- Bedrade afstandbeheerpoort: For connecting the wired remote control switch.
- I/O skakelaar: Power on/off switch for the KVM.

Image: Front and Rear Panel Layout.
Opstel instruksies
Follow these steps to properly set up your KVM switch:
- Skakel af: Turn off all computers and monitors, and unplug all cables.
- Koppel rekenaars:
- Connect the three HDMI 2.1 cables from Computer 1's video outputs to the 'PC1 HDMI IN' ports on the KVM switch.
- Connect one USB 3.0 cable from a USB 3.0 port on Computer 1 to the 'PC1 USB IN' port on the KVM switch.
- Repeat the above steps for Computer 2, connecting its HDMI and USB 3.0 cables to the 'PC2 HDMI IN' and 'PC2 USB IN' ports respectively.
Belangrik: Each computer requires three video outputs. If a computer has only two HDMI ports and one DisplayPort (DP), you will need an 8K 60Hz DP to HDMI adapter for that DP port.
- Koppel monitors: Connect your three monitors to the 'HDMI OUT' ports on the KVM switch using HDMI cables.
- Koppel randapparatuur:
- Plug your keyboard into the dedicated USB Keyboard port on the front panel.
- Plug your mouse into the dedicated USB Mouse port on the front panel.
- Connect any other USB 3.0 peripheral devices (e.g., printer, USB hub, U disk) to the 'USB 3.0 HUB' ports.
- Connect your speakers or headphones to the 'Audio Out' port and your microphone to the 'Mic In' port if desired.
- Connect the wired remote push button switch to its dedicated port on the rear panel.
- Krag aan:
- Plug the DC 5V 2A power adapter into the KVM switch and then into an AC power outlet.
- Turn on the KVM switch using the I/O switch on the rear panel.
- Skakel jou rekenaars aan.
BIOS Startup Note: If one computer is BIOS-based, turn it on first, log in, and wait for the display. Then switch to the second computer and turn it on. If both computers are BIOS-based, start the KVM, then the first BIOS computer, log in, wait for the display, switch the KVM to the second computer, and finally, turn on the second BIOS computer. Avoid starting both BIOS computers simultaneously to prevent issues like a black screen or disabled keyboard/mouse.
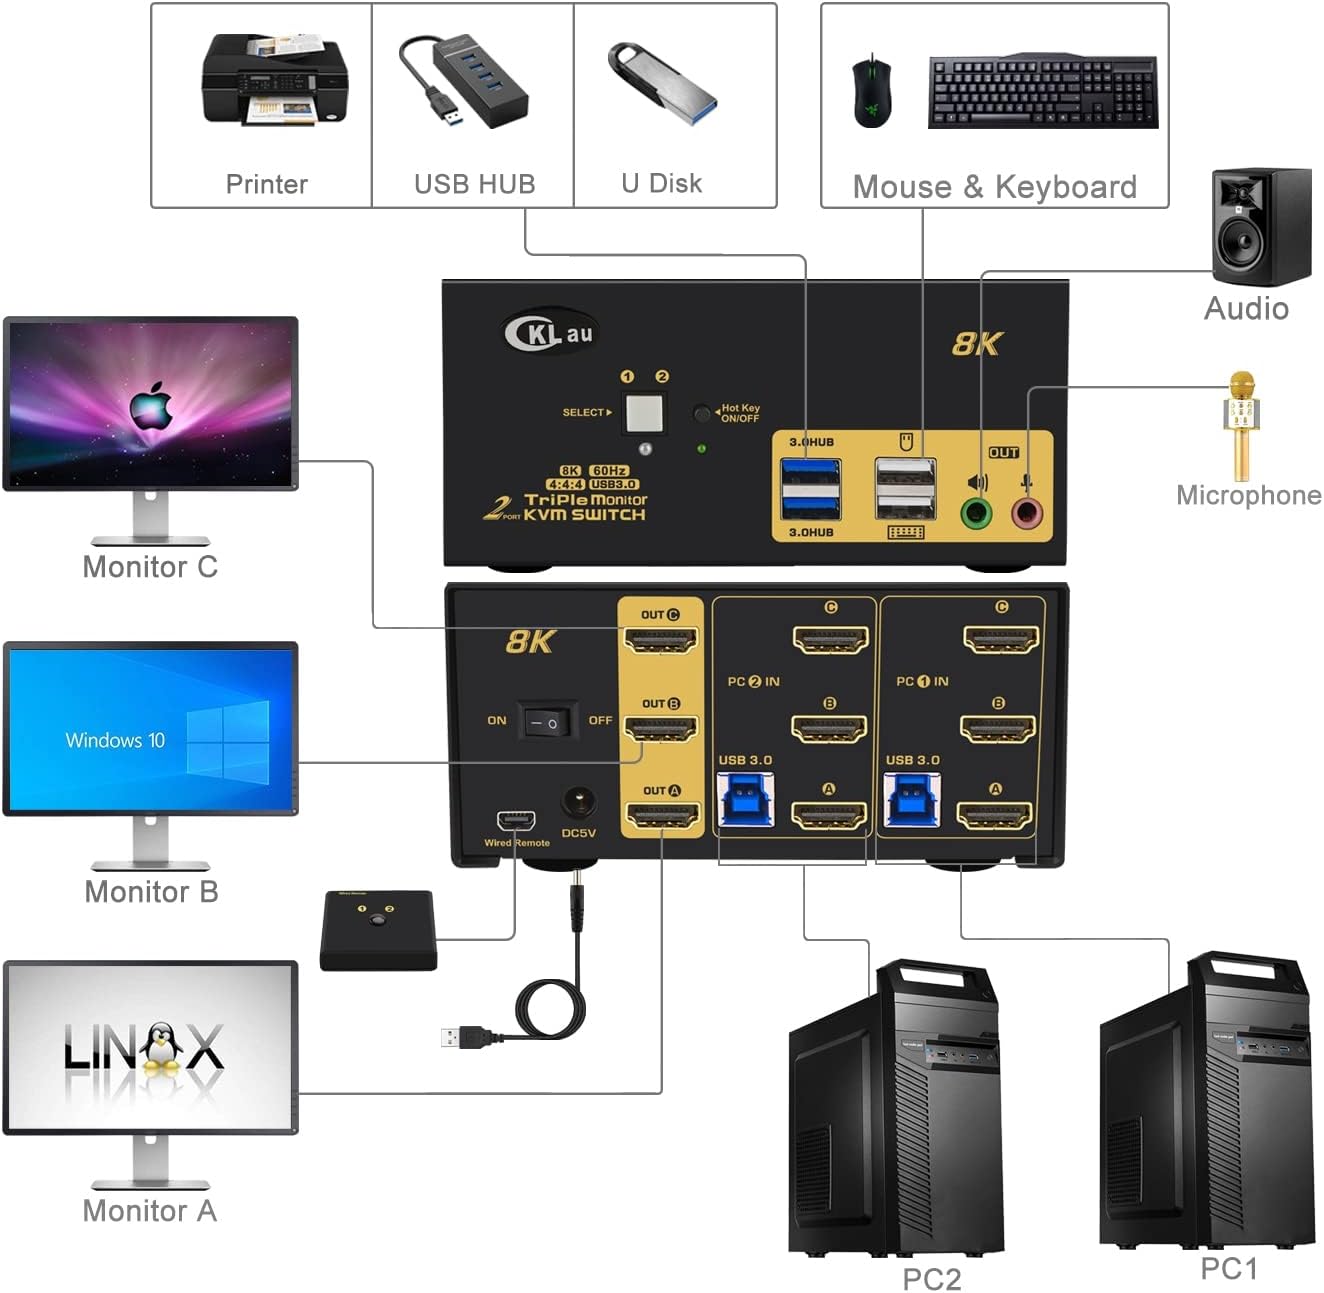
Image: KVM Switch Setup Diagram.
Bedryfsinstruksies
The CKLau KVM switch offers four methods to switch between the two connected computers:
- Keyboard Hotkey Switching: Press the hotkey sequence to switch between computers. The default hotkeys are:
- Num Lock + Num Lock + 1 / 2 + Enter
- Ctrl + Ctrl + 1 / 2 + Enter
- Scroll Lock + Scroll Lock + 1 / 2 + Enter
Ensure the 'Hot Key ON/OFF' switch on the front panel is in the 'ON' position. The hotkey can be changed if needed.
- Mouse Switching: Double-click the mouse wheel to switch to the next computer.
- Manual Button Switching: Press the 'SELECT' button on the front panel of the KVM switch to cycle between computers.
- Wired Remote Push Button Switching: Press the button on the wired remote control to switch between computers.

Image: Four Switching Modes.
Official Product Video: Setup and Switching Demonstration
Video: A demonstration of the CKLau 2 Port 8K 60Hz USB 3.0 HDMI KVM switch, including setup, resolution verification, and various switching methods.
Vertoonmodusse
The KVM switch supports three display modes:
- Uitgebreide skerm: Each monitor displays a different part of the desktop, extending your workspace.
- Spieëlvertoning: All monitors display the same content, mirroring your desktop.
- Splice Display (Video Wall): Combines multiple monitors to act as one large display.

Image: Three Working Modes (Mirror, Extended, Video Wall).
Resolusie en herlaaitempo
This KVM switch supports a maximum 8K resolution at a 60Hz refresh rate. For optimal performance, ensure your PC, monitors, and TV all support the desired resolution and refresh rate.
- Example 1: If your PC supports 8K 60Hz, but your monitor/TV supports only 4K 60Hz, you will get 4K 60Hz as a result.
- Example 2: If your PC supports 4K 60Hz, and your monitor/TV supports 8K 60Hz, you will get 4K 60Hz as a result.
- Example 3: If your PC and your monitor/TV both support 8K 60Hz, you will get 8K 60Hz as a result.
The switch is compatible with a wide range of resolutions, including:
- 10240x4320@60Hz
- 7680x4320@60Hz
- 5120x2880@50/60Hz
- 4096x2160@50/60/100/120Hz
- 3840x2160@60/120/144Hz
- ...and many others up to 240Hz for lower resolutions.
It is drive-free for Windows 10/7/2000/XP/Vista, Linux, Mac, Debian, Ubuntu, Fedora, Raspbian, and other operating systems.
Probleemoplossing
- Geen skerm / Swart skerm:
- Ensure all HDMI and USB cables are securely connected to both the KVM switch and your computers/monitors.
- Verify that the KVM switch is powered on.
- Check the BIOS startup sequence as described in the Setup Instructions to avoid conflicts.
- Confirm that your PC, monitors, and cables support the selected resolution and refresh rate.
- Sleutelbord/Muis Werk Nie:
- Ensure the keyboard and mouse are connected to the dedicated USB ports on the front panel.
- Try reconnecting the USB cables.
- If using hotkeys, ensure the 'Hot Key ON/OFF' switch is in the correct position.
- Monitor Drops/Flickers:
- Switch between computers and then back to the desired computer.
- Ensure all cables are high-quality HDMI 2.1 certified.
- Windows Size/Location Moving After Switching: This KVM switch does not feature EDID emulation. This behavior is expected as the KVM does not hold the EDID information of the monitors when switching, causing the operating system to re-detect displays.
Spesifikasies
| Handelsmerk | CKLau |
| Model | CKLau-923Hua-4 |
| Verbindingsprotokol | HDMI 2.1, USB 3.0 |
| Maksimum resolusie | 8K@60Hz, 4K@144Hz |
| Number of Computers | 2 |
| Aantal monitors | 3 |
| USB-poorte | 2 x USB 3.0 Hub, 2 x USB 2.0 (Keyboard/Mouse) |
| Oudio Ondersteuning | Yes (Audio Out, Mic In) |
| Skakelmetodes | Hotkey, Mouse, Manual Button, Wired Remote |
| Kragtoevoer | DC 5V 2A |
| Afmetings (L x B x H) | 5.12 x 2.95 x 2.48 duim |
| Materiaal | Metaal, plastiek |
| Kleur | Swart |
Onderhoud
To ensure the longevity and optimal performance of your KVM switch:
- Keep the device in a cool, dry place away from direct sunlight and heat sources.
- Maak die buitekant skoon met 'n sagte, droë lap. Moenie vloeibare skoonmaakmiddels of aërosols gebruik nie.
- Verseker behoorlike ventilasie rondom die toestel om oorverhitting te voorkom.
Waarborg en Ondersteuning
For warranty information, technical support, or any questions regarding your CKLau KVM switch, please contact CKLau Technologies Inc. customer service. Refer to the contact details provided with your product or visit the official CKLau webwebwerf vir hulp.