1. Inleiding
Thank you for choosing the Karlsson LED Mirror Alarm Clock. This digital alarm clock features a modern design with a clear LED display integrated into a silver mirror surface, showing time and temperature. This manual provides essential information for the safe and efficient use of your device.
Wat is in die boks:
- Karlsson LED Mirror Alarm Clock
- USB-kragkabel

Figuur 1: Voorkant view of the Karlsson LED Mirror Alarm Clock, showing the time (15:08) and temperature (19°C) on its reflective display.
2. Veiligheidsinligting
- Moenie die toestel aan water of oormatige vog blootstel nie.
- Vermy uiterste temperature, direkte sonlig of stowwerige omgewings.
- Hou buite bereik van kinders.
- Use only the provided USB cable or a compatible power adapter.
- When inserting batteries, ensure correct polarity (+/-).
- Moenie ou en nuwe batterye, of verskillende tipes batterye meng nie.
- Verwyder batterye as die toestel vir 'n lang tydperk nie gebruik gaan word nie.
3. Produk verbyview
Familiarize yourself with the components and controls of your alarm clock.
Voorskerm:
- Tydvertoning: Shows current time in 12-hour or 24-hour format.
- Temperatuur vertoon: Shows ambient temperature in Celsius or Fahrenheit.
Agterste kontroles:
- SET -knoppie: Used to enter setting modes (time, alarm).
- UP -knoppie: Word gebruik om waardes te verhoog of deur spyskaarte te navigeer.
- AFKNOP knoppie: Word gebruik om waardes te verlaag of deur spyskaarte te navigeer.
- MODE/V Button: Used to switch display modes or activate voice control (if available).
- RESET-knoppie: Stel die toestel terug na fabrieksinstellings.
- DC 5V-invoer: For connecting the USB power cable.
- Battery kompartement: Holds 3 x AAA batteries for backup power.
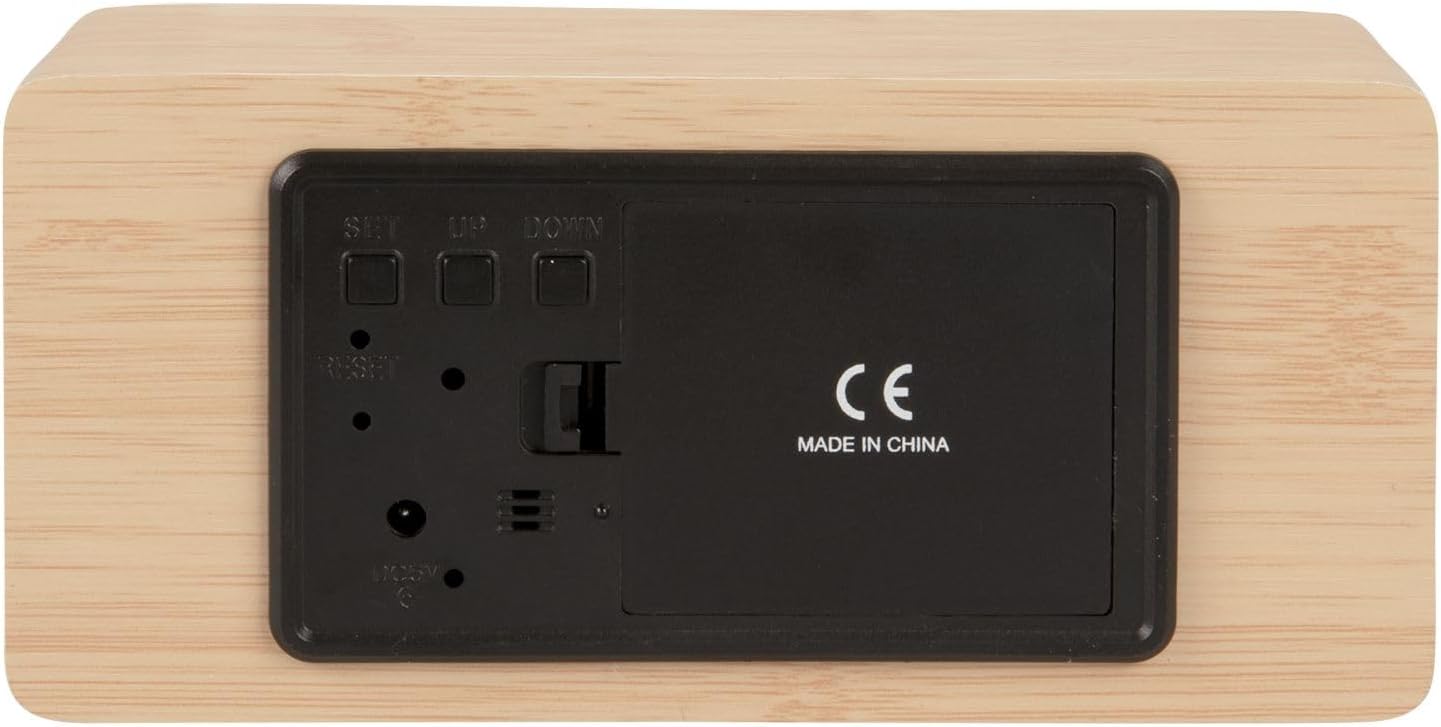
Figuur 2: Agter view of the alarm clock, highlighting the SET, UP, DOWN buttons, power input, and battery compartment.
4. Opstelling
Die krag van die toestel:
The alarm clock can be powered via the included USB cable or by 3 x AAA batteries (not included) for backup.
- USB krag: Connect the small end of the USB cable to the DC 5V input port on the back of the alarm clock. Connect the other end to a USB power adapter (not included) or a powered USB port.
- Battery-rugsteun: Open the battery compartment cover on the back of the clock. Insert 3 x AAA batteries, ensuring correct polarity. Close the cover securely. Batteries are primarily for backup and may not power the display continuously.

Figuur 3: The USB power cable provided for connecting the alarm clock to a power source.
5. Bedryfsinstruksies
Stel die tyd in:
- Druk en hou die STEL knoppie totdat die uursyfers begin flikker.
- Gebruik die UP or AF knoppies om die uur aan te pas.
- Druk STEL weer om die uur te bevestig en na die minuutinstelling oor te skakel.
- Gebruik die UP or AF knoppies om die minute aan te pas.
- Druk STEL to confirm the minutes and exit time setting mode.
Stel die wekker in:
- Druk die STEL button once (do not hold) to cycle through display modes until 'AL' or an alarm icon appears.
- Druk en hou die STEL button again until the alarm hour digits flash.
- Gebruik die UP or AF knoppies om die verlangde alarmuur in te stel.
- Druk STEL to confirm the alarm hour and move to alarm minute setting.
- Gebruik die UP or AF knoppies om die verlangde alarmminute in te stel.
- Druk STEL om die alarminstellingsmodus te bevestig en te verlaat.
- Om die alarm te aktiveer/deaktiveer, druk die UP button while in normal time display mode. An alarm icon will appear/disappear on the display.
Switching Display Modes (12/24 Hour, Temperature Unit):
- In normale tyd vertoonmodus, druk die UP button to switch between 12-hour and 24-hour formats.
- Druk die AF knoppie om tussen Celsius (°C) en Fahrenheit (°F) temperatuureenhede te wissel.
6. Onderhoud
- Clean the alarm clock with a soft, dry cloth.
- Do not use abrasive cleaners, solvents, or harsh chemicals, as these may damage the mirror surface or casing.
- Ensure the device is unplugged and batteries are removed before cleaning.
7. Probleemoplossing
- Die vertoning is leeg: Check if the USB cable is securely connected to a power source. If using batteries, ensure they are inserted correctly and are not depleted.
- Alarm lui nie: Verify that the alarm is set and activated (alarm icon visible on display). Check the alarm volume if adjustable (this model may not have adjustable volume).
- Incorrect time/settings: Druk die TERUGSTEL button on the back of the unit using a thin object (e.g., a paperclip) to restore factory settings, then re-set the time and alarm.
- Temperatuurlesing lyk onakkuraat: Ensure the clock is placed in a location away from direct heat sources or drafts that could affect ambient temperature readings.
8. Spesifikasies
| Modelnommer | PTG-KA5879WD |
| Materiaal | Hout fineer |
| Afmetings (L x B x H) | 15 cm x 7 cm x 4.5 cm (ongeveer 5.9 x 2.76 x 1.77 duim) |
| Gewig | 245 g (ongeveer 0.54 lbs) |
| Kleur | Light wood casing, silver mirror display |
| Tipe vertoon | Digitale LED |
| Spesiale kenmerk | Alarm |
| Kragbron | USB powered (cable included), 3 x AAA batteries (not included) for backup |
9. Waarborg en Ondersteuning
This product is manufactured by Karlsson. For any support inquiries, warranty information, or service requests, please refer to the retailer where the product was purchased or visit the official Karlsson website for contact details. Please retain your proof of purchase for warranty claims.