Inleiding
This manual provides instructions for the proper use and maintenance of your Alecto AK-20 Alarm Clock with Thermometer. Please read these instructions carefully before operating the device and retain them for future reference. The AK-20 is designed to display time, date, day, and indoor temperature, featuring multiple alarms, a snooze function, and radio-controlled time synchronization.
Veiligheidsinligting
- Moenie die toestel blootstel aan uiterste temperature, direkte sonlig of hoë humiditeit nie.
- Vermy om die toestel te laat val of om dit aan sterk impakte te onderwerp.
- Moenie probeer om die eenheid self uitmekaar te haal of te herstel nie. Verwys alle diens na gekwalifiseerde personeel.
- Gooi gebruikte batterye verantwoordelik volgens plaaslike regulasies weg.
Pakketinhoud
Maak seker dat alle items teenwoordig en in 'n goeie toestand is wanneer u dit uitpak:
- Alecto AK-20 Alarm Clock
- User Manual (NL/EN/DE/FR)
Produk verbyview
The Alecto AK-20 features a clear digital display and intuitive controls for easy operation.

Figuur 1: Voorkant view of the Alecto AK-20 Alarm Clock, showing the large digital display with time, date, day, and temperature, along with control buttons at the bottom.

Figuur 2: Hoekig view of the Alecto AK-20, highlighting the main display and the alarm ON/OFF switches on the right side.
Kontroles en vertoonelemente:
- Groot digitale skerm: Shows time (AM/PM indicator), date, day of the week, and indoor temperature.
- TIME SET Button: Word gebruik om tydinstellingsmodus te betree.
- - / + Buttons: Used to adjust values (decrease/increase).
- ALARM SET-knoppie: Word gebruik om alarminstellingsmodus te betree.
- ALARM 1-4 ON/OFF Switches: Located on the side for individual alarm activation.
- SNOOZE / LIG-knoppie: Located on top, activates backlight and snooze function.
- AUTO LIGHT Switch: Located on the back, controls automatic backlight.
- RESET-knoppie: Located on the back, for factory reset.

Figuur 3: Regterkant view of the alarm clock, showing the physical ON/OFF switches for Alarm 3 and Alarm 4.

Figuur 4: Terug view of the alarm clock, showing the battery compartment, RESET button, and AUTO LIGHT switch.
Opstelling
1. Battery Installasie
- Locate the battery compartment on the back of the alarm clock (refer to Figure 4).
- Maak die batteryvakdeksel oop.
- Insert two AA batteries, ensuring correct polarity (+ and -).
- Maak die batterykompartement se deksel stewig toe.
The display will light up, and the clock will begin searching for the DCF radio signal for automatic time synchronization.
2. Initial Time and Date Synchronization (DCF)
The AK-20 is a radio-controlled clock. Upon battery installation, it will automatically attempt to synchronize with the DCF signal. This process may take several minutes. A signal icon on the display indicates successful reception.
- Plaas die horlosie naby 'n venster vir beter seinontvangs.
- Vermy die plasing daarvan naby elektroniese toestelle wat steuring kan veroorsaak.
3. Manual Time and Date Setting (Optional)
If DCF synchronization is not desired or unsuccessful, you can set the time and date manually:
- Druk en hou die TYD BEREIK knoppie totdat die uursyfers begin flikker.
- Gebruik die - or + knoppies om die uur aan te pas.
- Druk TYD BEREIK weer om die uur te bevestig en na minute oor te skakel.
- Herhaal die proses vir minute, jaar, maand en dag.
- Druk TYD BEREIK een laaste keer om die instellingsmodus te verlaat.
4. Taalkeuse
The device supports multiple languages for day display. To change the language:
- While in normal time display mode, press the - knoppie herhaaldelik.
- The day of the week will cycle through available languages (Dutch, French, German, English, Spanish, Italian, Danish, Russian).
- Stop when your desired language is displayed.
Bedryfsinstruksies
1. Stel alarms in
The AK-20 allows setting up to four independent alarms.
- Druk en hou die ALARMSTEL button until the alarm time (e.g., ALARM-1) starts flashing.
- Gebruik die - or + knoppies om die verlangde alarmuur aan te pas.
- Druk ALARMSTEL weer om die uur te bevestig en na minute oor te skakel.
- Gebruik die - or + knoppies om die verlangde alarmminute aan te pas.
- Druk ALARMSTEL to confirm and move to the next alarm (ALARM-2, ALARM-3, ALARM-4).
- Repeat steps 2-4 for each alarm you wish to set.
- After setting all desired alarms, press ALARMSTEL om die alarminstellingsmodus te verlaat.
2. Activating/Deactivating Alarms
Each alarm has a dedicated ON/OFF switch on the side of the unit (refer to Figure 3).
- Slide the corresponding switch to ON to activate an alarm. An alarm icon will appear on the display.
- Skuif die skakelaar na AF to deactivate an alarm. The alarm icon will disappear.
3. Sluimerfunksie
Wanneer 'n alarm afgaan, druk die SNOOZE / LIG button on top of the clock. The alarm will temporarily stop and sound again after a few minutes (typically 5-10 minutes, depending on the model's default setting).
4. Agterligfunksie
The display features a backlight for visibility in low-light conditions.
- Handmatige agterlig: Druk kortliks die SNOOZE / LIG button to activate the backlight for a few seconds.
- Outomatiese agtergrondlig: On the back of the unit, slide the AUTO LIG skakel oor na ON. The backlight will automatically illuminate in dark environments. Slide to AF om hierdie funksie te deaktiveer.
5. Temperatuurvertoning
The integrated thermometer displays the indoor temperature.
- Om tussen Celsius (°C) en Fahrenheit (°F) te wissel, druk die + knoppie terwyl in normale tydvertoningsmodus.
Onderhoud
- Maak die toestel skoon met 'n sagte, droë lap. Moenie skuurmiddels of oplosmiddels gebruik nie.
- Indien die toestel nie vir 'n lang tydperk gebruik gaan word nie, verwyder die batterye om lekkasie te voorkom.
Probleemoplossing
| Probleem | Moontlike oorsaak | Oplossing |
|---|---|---|
| Die skerm is leeg of dof. | Batterye is laag of verkeerd geplaas. | Vervang batterye met nuwe AA-batterye en maak seker dat die polariteit korrek is. |
| Tyd is verkeerd. | DCF-sein nie ontvang nie of handmatige tyd nie ingestel nie. | Ensure the clock is in an area with good signal reception. Manually set the time if necessary. |
| Die alarm lui nie. | Die alarm is nie geaktiveer nie of verkeerd gestel. | Check the alarm ON/OFF switch on the side. Verify alarm time settings. |
| Agterlig werk nie. | AUTO LIGHT switch is OFF or batteries are low. | Check the AUTO LIGHT switch on the back. Replace batteries if needed. |
Indien die probleem voortduur nadat u hierdie oplossings probeer het, kontak asseblief kliëntediens.
Spesifikasies
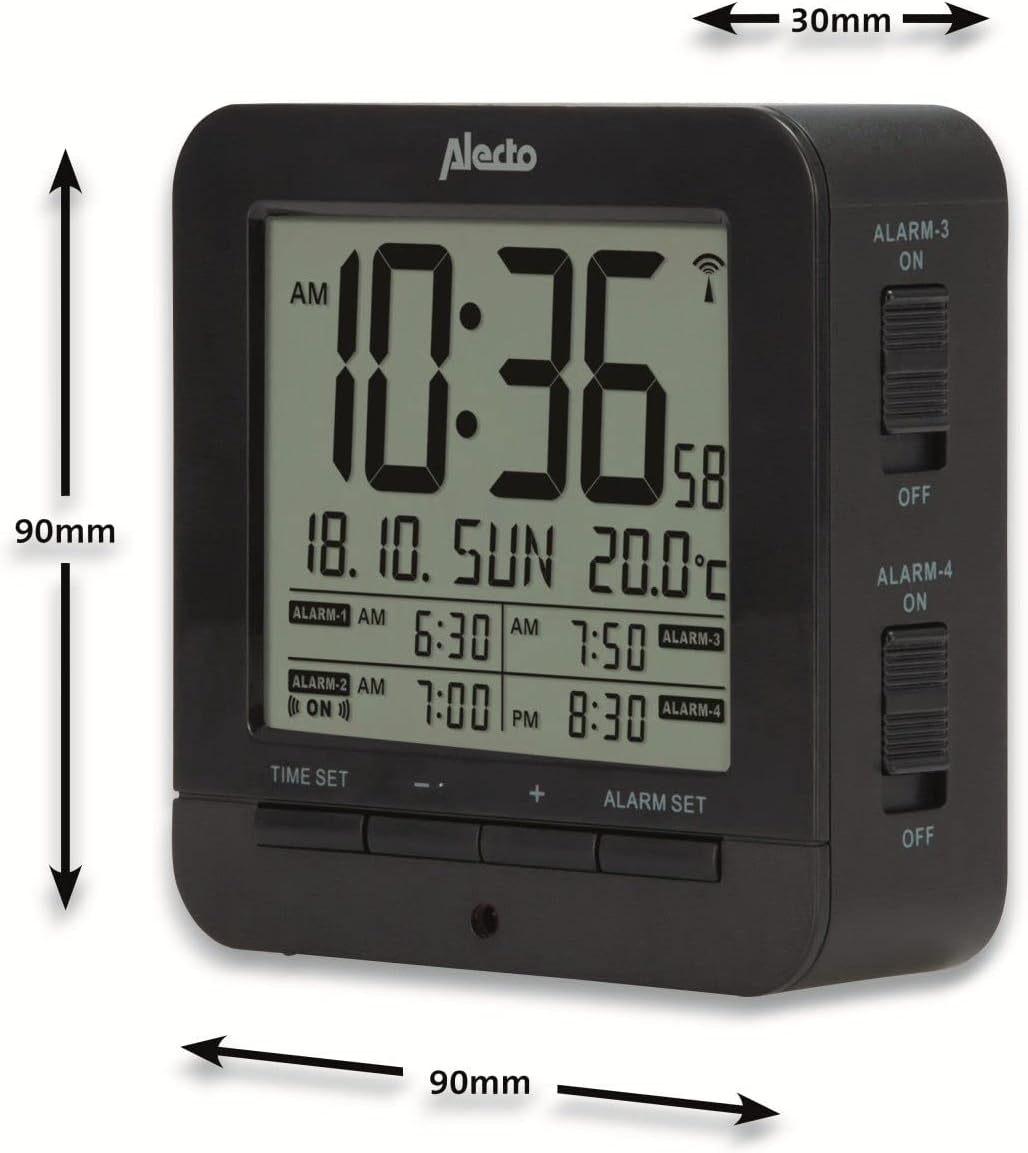
Figure 5: Alecto AK-20 Alarm Clock showing its approximate dimensions: 90mm height, 90mm width, and 30mm depth.
| Kenmerk | Detail |
|---|---|
| Modelnommer | AK-20 (A003319) |
| Handelsmerk | Alecto |
| Kleur | Swart |
| Materiaal | Akrielnitril Butadieen Styreen (ABS) |
| Afmetings (H x B x D) | 9 x 9 x 3 cm (ongeveer 3.54 x 3.54 x 1.18 duim) |
| Skermafmetings | 6.4 x 5.4 cm (ongeveer 2.52 x 2.13 duim) |
| Gewig | 231 g (ongeveer 0.51 lbs) |
| Kragbron | 2 x AA-batterye (nie ingesluit nie) |
| Tipe vertoon | Digitaal |
| Spesiale kenmerke | Temperature Display, 4 Alarms, Snooze Function, Backlight, DCF Radio Control |
| Temperatuur Eenhede | °C / °F selectable |
| Ondersteunde tale | Dutch, French, German, English, Spanish, Italian, Danish, Russian |
Waarborg en Ondersteuning
Alecto products are manufactured to high quality standards. For information regarding warranty terms and conditions, please refer to the documentation provided with your purchase or visit the official Alecto website. For technical support or service inquiries, please contact your retailer or the Alecto customer service department.