Inleiding
Thank you for choosing the PELONIS 16" Height Adjustable Silent Oscillating Pedestal Fan. This manual provides important information regarding the safe operation, assembly, maintenance, and troubleshooting of your fan. Please read it thoroughly before use and retain it for future reference.
Belangrike veiligheidsinstruksies
Wanneer elektriese toestelle gebruik word, moet basiese voorsorgmaatreëls altyd gevolg word om die risiko van brand, elektriese skok en besering aan persone te verminder, insluitend die volgende:
- Lees alle instruksies voordat u hierdie waaier gebruik.
- Use this fan only as described in this manual. Other uses not recommended may cause fire, electric shock, or injury to persons.
- To protect against electrical shock, do not place fan in window, immerse unit, plug or cord in water or spray with liquids.
- Noukeurige toesig is nodig wanneer enige toestel deur of naby kinders gebruik word.
- Trek uit die stopcontact wanneer dit nie gebruik word nie, wanneer waaier van een plek na 'n ander verskuif word, en voor skoonmaak.
- Moenie enige waaier gebruik met 'n beskadigde koord of prop nie, of nadat die waaier wanfunksioneer of op enige manier geval of beskadig is nie.
- Moenie koord onder die matte dra nie. Moenie koord bedek met matte, lopers of soortgelyke bedekkings nie. Moenie koord onder meubels of toestelle intrek nie. Rangskik koord weg van die verkeersarea en waar dit nie gestruikel sal word nie.
- Do not insert or allow foreign objects to enter any ventilation or exhaust opening as this may cause an electric shock or fire, or damage the fan.
- Moenie luginlaat of -uitlaat op enige manier blokkeer nie. Moenie op sagte oppervlaktes, soos 'n bed, gebruik waar openinge geblokkeer kan word nie.
- Hierdie waaier is slegs bedoel vir huishoudelike gebruik.
Produk verbyview
The PELONIS PSPF18AR40B fan is designed for efficient air circulation with multiple features for user convenience.
Sleutel kenmerke:
- 12-speed fan configuration for precise airflow control.
- Remote control included for convenient operation from a distance.
- Adjustable height settings: 28", 40", and 52" to suit various needs.
- Clear LED display on the fan for easy monitoring of settings.
- 12-Hour Programmable Timer for automatic shut-off.
- Oscillation function for wide area coverage or static adjustment for direct airflow.
- Power off memory function retains last settings upon restart.
- Easy to carry handle for portability.
Komponente:

Voorkant view of the assembled PELONIS 16-inch Pedestal Fan, showcasing its sleek black design and stable round base.

Hoekig view of the PELONIS Pedestal Fan, highlighting its height-adjustable pole and the fan head's position.
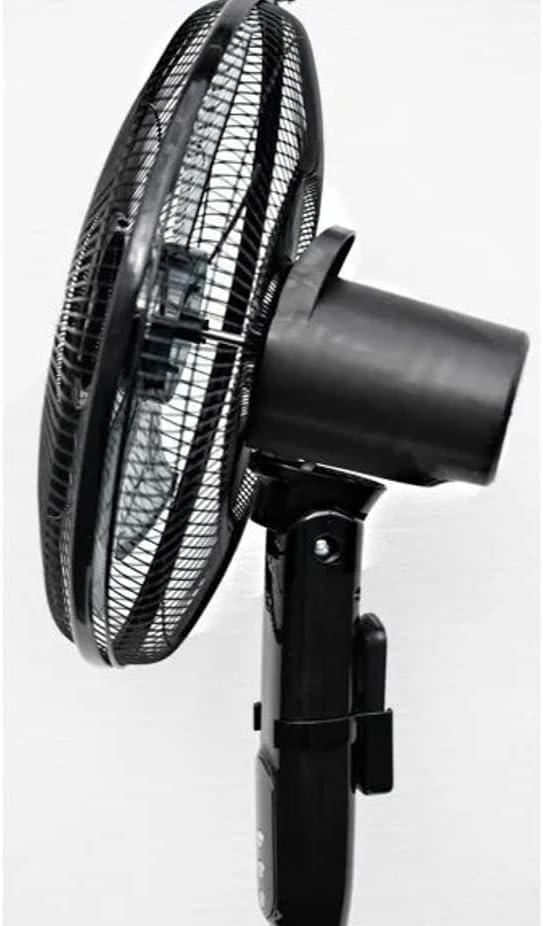
Kant view of the fan head, demonstrating the adjustable tilt mechanism for directing airflow up or down.

Close-up view of the fan's protective grill and internal blades, designed for silent and efficient air movement.

Gedetailleerd view of the control panel on the fan's stand, showing the power, oscillation, and mode buttons.
Opstelling en samestelling
Please follow these steps to assemble your PELONIS Pedestal Fan:
- Carefully unpack all components from the box and ensure all parts are present: fan head, front and rear grills, fan blade, motor shaft nut, grill retaining nut, stand pole, base, and remote control.
- Attach the stand pole to the base. Secure it firmly using the provided screws or locking mechanism.
- Mount the motor housing onto the top of the stand pole. Ensure it clicks securely into place.
- Remove the grill retaining nut and motor shaft nut from the motor shaft.
- Place the rear grill onto the motor housing, aligning the locating pins. Secure it with the grill retaining nut.
- Slide the fan blade onto the motor shaft, ensuring the notch on the blade aligns with the pin on the shaft. Secure it with the motor shaft nut, tightening it counter-clockwise.
- Attach the front grill to the rear grill, ensuring the clips snap together firmly around the edge. Secure with any provided screws or clips.
- Adjust the height of the fan by loosening the height adjustment collar on the stand pole, extending or retracting the pole, and then tightening the collar firmly.
- Plaas die waaier op 'n stewige, gelyk oppervlak.
- Steek die kragsnoer in 'n standaard elektriese aansluiting.
Bedryfsinstruksies
Beheerpaneel en afstandbeheer:
The fan can be operated using the control buttons on the fan's stand or the included remote control. The LED display will show current settings.
- Kragknoppie (ⓘ): Druk om die waaier AAN of AF te skakel.
- Spoedknoppie (✴): Press repeatedly to cycle through the 12 available fan speeds. The current speed will be indicated on the LED display.
- Ossillasieknoppie (⌣): Press to activate or deactivate the oscillation function, which allows the fan head to sweep from side to side.
- Timer Button (on Remote): Press to set the auto-off timer in 1-hour increments, up to 12 hours. The fan will automatically turn off after the set time.
- Mode Button (on Remote): Cycles through different fan modes (e.g., Normal, Natural, Sleep, if available). Refer to the LED display for the active mode.
Adjusting Fan Height and Tilt:
- Hoogte verstelling: Loosen the height adjustment collar on the main pole, extend or retract the inner pole to the desired height (28", 40", or 52"), and then firmly tighten the collar.
- Kantelverstelling: Gently push the fan head up or down to adjust the vertical angle of airflow. The fan head will hold its position once set.
Onderhoud en Skoonmaak
Gereelde skoonmaak sal help om jou waaier se werkverrigting te handhaaf en sy lewensduur te verleng.
- Ontkoppel altyd die waaier uit die kragtoevoer voordat u dit skoonmaak.
- Gebruik 'n sagte, damp lap om die buite-oppervlaktes van die waaier af te vee. Moenie skuurmiddels of oplosmiddels gebruik nie.
- To clean the fan blades and inside the grills, you may need to disassemble the front grill. Refer to the assembly instructions in reverse. Use a soft cloth or a vacuum cleaner with a brush attachment to remove dust and debris.
- Ensure all parts are completely dry before reassembling and plugging the fan back in.
- Bêre die waaier op 'n koel, droë plek wanneer dit nie gebruik word nie, verkieslik in sy oorspronklike verpakking.
Probleemoplossing
Indien u probleme met u waaier ondervind, raadpleeg asseblief die volgende algemene probleme en oplossings:
| Probleem | Moontlike oorsaak | Oplossing |
|---|---|---|
| Die waaier skakel nie aan nie. | Not plugged in; power outlet not working; fan not assembled correctly. | Ensure the power cord is securely plugged into a working outlet. Check circuit breaker. Verify all assembly steps are correct. |
| Die waaier is raserig. | Loose parts; fan not on a level surface; dust accumulation. | Check for any loose screws or components. Place fan on a stable, level surface. Clean fan blades and grills. |
| Ossillasie werk nie. | Oscillation function not activated; obstruction. | Press the oscillation button. Ensure there are no obstructions preventing the fan head from turning. |
| Afstandbeheer werk nie. | Batterye is pap of verkeerd geplaas; afstandbeheerder buite bereik. | Replace batteries (ensure correct polarity). Point remote directly at the fan's receiver. Ensure you are within effective range. |
Spesifikasies
| Handelsmerk | PELONIS |
| Modelnommer | PSPF18AR40B / VES760 |
| Kleur | Swart |
| Produk afmetings | 38.1 x 12.7 x 88.9 cm (15 x 5 x 35 duim) |
| Item gewig | 3.5 kg (7.7 lbs) |
| Aantal snelhede | 12 |
| Spesiale kenmerke | Oscillating, Digital Display, Remote Control, 12-Hour Timer, Power Off Memory |
| Kragbron | Elektries met koord |
Waarborg en Ondersteuning
This PELONIS Pedestal Fan is an Amazon Renewed product and comes with a 90-day Amazon Renewed warranty. This warranty covers any defects in material or workmanship under normal use during the warranty period.
For warranty claims or technical support, please contact Amazon Renewed customer service directly through your Amazon purchase history. They will assist you with troubleshooting or arranging a replacement/refund as per the warranty terms.