1. Inleiding en Veiligheidsinligting
Thank you for choosing the CABLETECH UCH0199-1 Universal Full-Motion TV Wall Mount. This manual provides detailed instructions for safe installation, operation, and maintenance of your TV mount. Please read all instructions carefully before assembly and use to ensure proper installation and to prevent personal injury or property damage.
Belangrike veiligheidswaarskuwings:
- Gewig kapasiteit: Do not exceed the maximum load capacity of 35 kg (77 lbs). Exceeding this limit may result in serious injury or property damage.
- Skermgrootte: Hierdie montering is ontwerp vir TV's tussen 37 en 70 duim.
- Muurtipe: Ensure the mounting surface can safely support the combined weight of the mount and your TV. This mount is suitable for solid concrete walls, brick walls, and wood stud walls. Do not install on drywall alone.
- Professionele installasie: As u onseker is oor die installasieproses, raadpleeg 'n gekwalifiseerde professionele persoon.
- Kinders: Keep children away from the assembly area during installation. Small parts may be a choking hazard.
- Gereedskap: Use appropriate tools and follow all safety precautions for tool usage.
- Gereelde tjeks: Kontroleer gereeld of die bevestiging stewig is en dat alle bevestigingsmiddels styf vas is.
2. Pakketinhoud
Verify that all components are present and undamaged before beginning installation. If any parts are missing or defective, contact CABLETECH customer support.

Figuur 2.1: verbyview of the CABLETECH UCH0199-1 TV Wall Mount components. The image displays the main articulating arm assembly, the wall plate, and the two vertical TV bracket arms.
- Wall Plate Assembly (1)
- Articulating Arm Assembly (1)
- TV Bracket Arms (2)
- Monteringshardeware-stel (skroewe, ankers, wassers, spasieerders)
3. Spesifikasies
Refer to the following technical specifications to ensure compatibility with your television and installation environment.
| Kenmerk | Spesifikasie |
|---|---|
| Skermgrootte verenigbaarheid | 37" - 70" |
| Maksimum laaikapasiteit | 35 kg (77 lbs) |
| VESA-versoenbaarheid | 200x200, 300x200, 300x300, 400x200, 400x300, 400x400, 600x400 mm |
| Kantelhoek | +5° / -18° |
| Draaihoek | +90° / -90° |
| Afstand vanaf Muur | 105 mm - 429 mm |
| Kabelbestuur | Geïntegreerde |
| Materiaal | Staal |
| Kleur | Swart |
| Produk Gewig | 2.2 kg |
4. Opstelling en installering
4.1 Kontrolelys voor die installasie
- Gereedskap benodig: Pencil, drill, stud finder (for wood studs), level, Phillips head screwdriver, socket wrench.
- Muurtipe: Identify your wall type (wood stud, solid concrete, brick). Different wall types require specific mounting hardware and procedures.
- TV Weight and VESA Pattern: Confirm your TV's weight is within the mount's capacity and its VESA pattern matches the mount's compatibility.
4.2 Stap-vir-stap installasie
Step 1: Determine TV Height and Wall Plate Position
- Decide on the desired viewing height for your TV.
- Using a stud finder, locate the center of the wood studs in your desired mounting area. Mark these locations with a pencil. For concrete/brick walls, choose a suitable location away from electrical wires or plumbing.
Step 2: Install the Wall Plate Assembly
- Hold the wall plate assembly against the wall at the marked height and use a level to ensure it is perfectly horizontal.
- Mark the drilling holes through the wall plate onto the wall.
- Drill pilot holes at the marked locations. For wood studs, use a smaller drill bit than the lag bolts. For concrete/brick, use a masonry drill bit and insert wall anchors.
- Secure the wall plate assembly to the wall using the provided lag bolts and washers. Tighten firmly but do not overtighten.
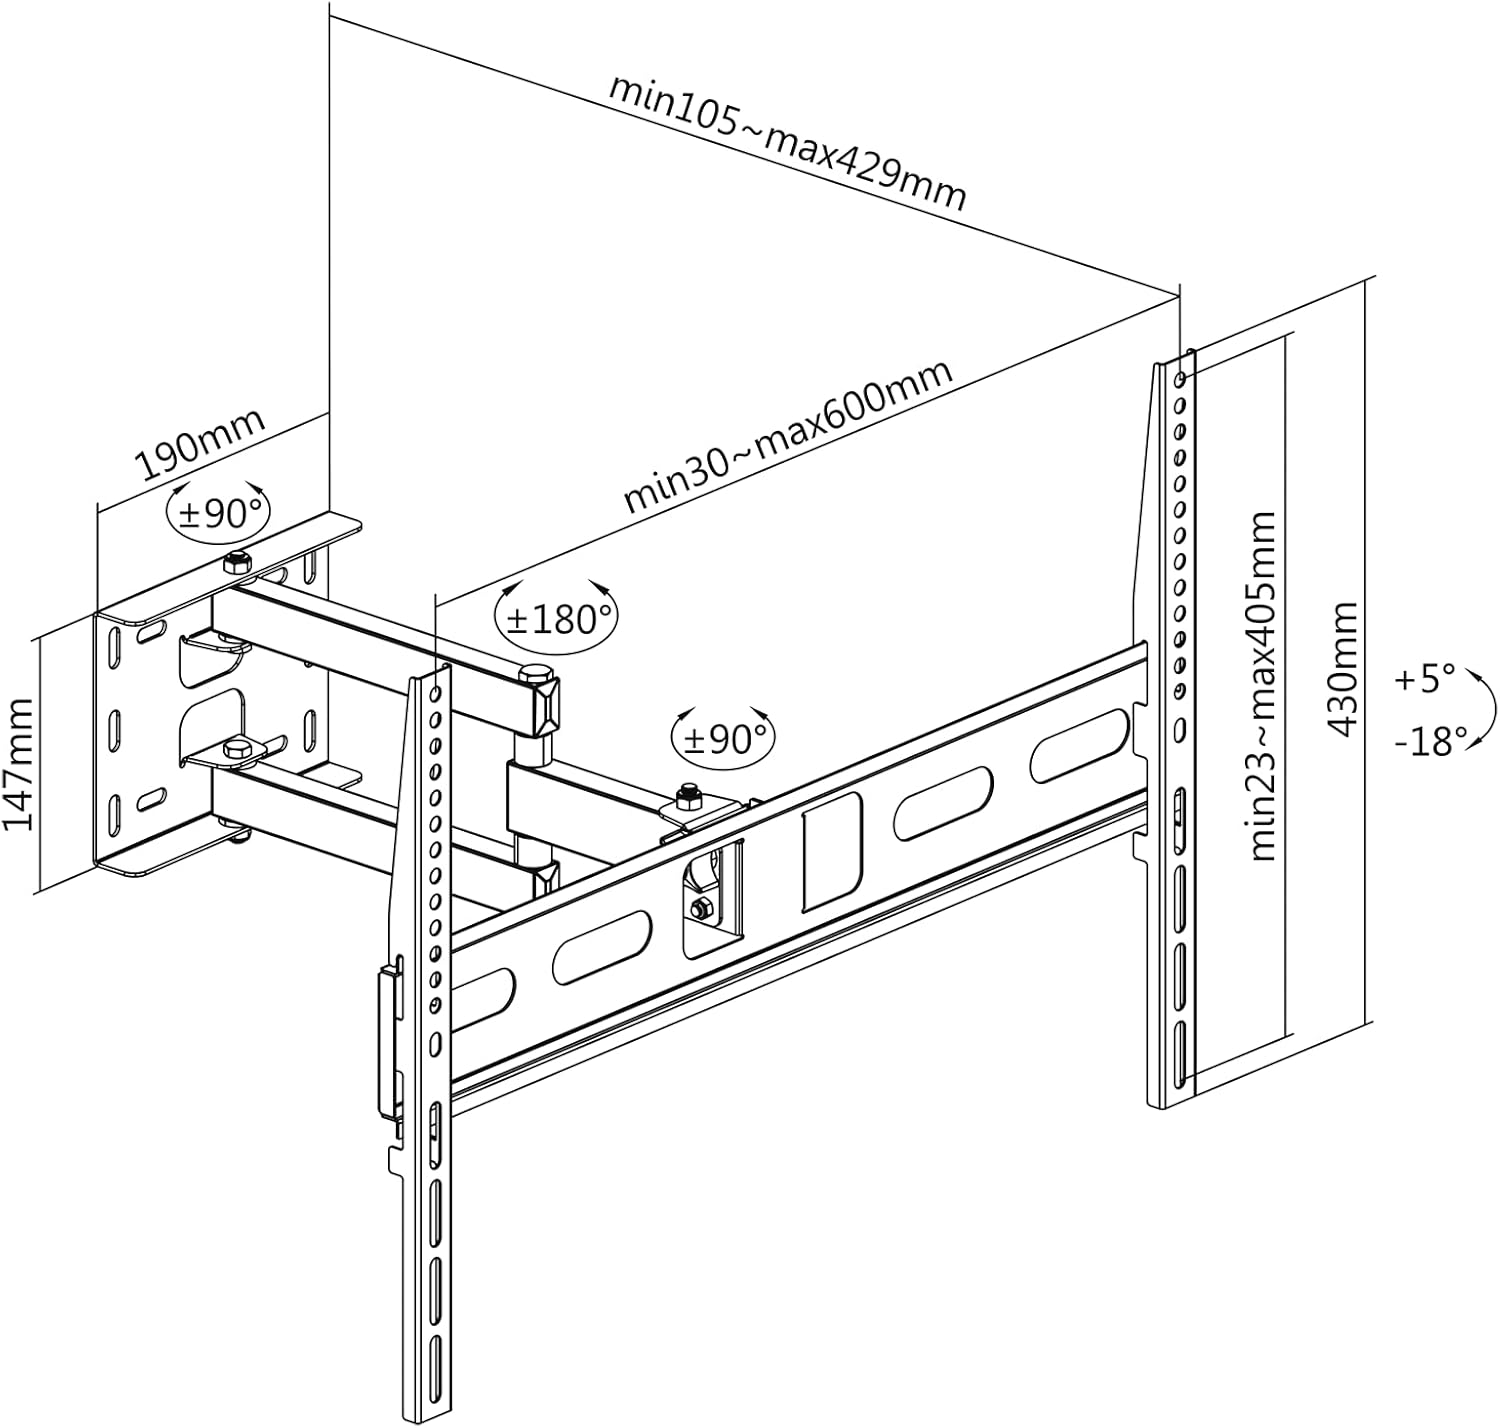
Figuur 4.1: Dimensional drawing showing the mount's measurements, VESA compatibility, and articulation ranges. This diagram assists in planning the installation and understanding the mount's capabilities.
Step 3: Attach TV Brackets to Your TV
- Plaas jou TV versigtig met die gesig na onder op 'n sagte, skoon oppervlak om skermskade te voorkom.
- Identifiseer die VESA-monteringsgate aan die agterkant van jou TV.
- Select the appropriate screws, washers, and spacers from the hardware kit that fit your TV's VESA holes.
- Attach the two TV bracket arms to the back of your TV. Ensure the hooks on the brackets are facing upwards and the brackets are centered and level. Tighten the screws securely.
Stap 4: Monteer die TV op die muurplaat
- Lig die TV versigtig op met die aangehegte hakies, met hulp.
- Hook the TV bracket arms onto the wall plate assembly. Ensure both brackets are securely seated on the wall plate.
- Locate the safety screws or locking mechanisms on the bottom of the TV brackets and tighten them to prevent the TV from accidentally lifting off the mount.
5. Bedryfsinstruksies
Once installed, your CABLETECH UCH0199-1 mount allows for flexible TV positioning.
5.1 Aanpassing van kantelhoek
- Die montering maak 'n kantelbereik van +5° (opwaarts) tot -18° (afwaarts) moontlik.
- To adjust the tilt, loosen the tilt adjustment knobs or bolts located on the TV bracket arms.
- Carefully tilt the TV to your desired angle.
- Tighten the tilt adjustment knobs/bolts to secure the TV in place.

Figuur 5.1: Visual representation of the TV tilt adjustment feature, showing the range of motion from upward to downward tilt.
5.2 Adjusting Swivel Angle and Wall Distance
- The articulating arm allows for a swivel range of +90° to -90° (depending on TV size and wall clearance) and extends the TV from 105 mm to 429 mm from the wall.
- Gently grasp the sides of your TV and move it to the desired swivel angle or extend/retract it from the wall. The joints are designed to move smoothly.
- No locking mechanism is typically required for swivel, as the friction in the joints holds the position.

Figuur 5.2: The mount shown fully extended from the wall, demonstrating its maximum reach and swivel capability.
5.3 Portrait and Landscape Orientation
- This mount supports installing your TV in either portrait or landscape orientation. This is typically achieved during the initial installation by aligning the TV's VESA mounting holes with the mount's brackets in the desired orientation.
- Let wel: The mount itself does not provide a rotational mechanism to switch between portrait and landscape after installation. This feature refers to the flexibility of initial setup.
5.4 Kabelbestuur
- Utilize the integrated cable clips or channels on the articulating arm to route and secure your TV cables. This helps maintain a tidy appearance and prevents cables from snagging during adjustments.
6. Onderhoud
Gereelde onderhoud verseker die lang lewensduur en veilige werking van jou TV-muurbevestiging.
- Dichtheidskontrole: Every 3-6 months, check all screws and bolts (wall plate, arm joints, TV brackets) to ensure they are securely tightened. Do not overtighten.
- Skoonmaak: Wipe the mount with a soft, dry cloth to remove dust. For stubborn marks, a slightly damp cloth can be used, followed by drying. Avoid abrasive cleaners or solvents.
- Smering: The articulating joints are designed for smooth movement. If movement becomes stiff, a small amount of silicone-based lubricant can be applied to the pivot points, but this is rarely necessary.
7. Probleemoplossing
If you encounter issues with your CABLETECH UCH0199-1 TV wall mount, refer to the following common problems and solutions.
- TV is nie gelyk na installasie nie:
Oplossing: Ensure the wall plate was installed level. Some mounts offer post-installation leveling adjustments on the TV brackets; check your specific model for this feature. If not, you may need to slightly adjust the wall plate. - Montering voel los of onstabiel:
Oplossing: Immediately remove the TV from the mount. Re-check all mounting screws and bolts for tightness, both on the wall plate and the TV brackets. Ensure the wall anchors (if used) are properly seated and the wall material is suitable. If the issue persists, consult a professional installer. - Difficulty moving the articulating arm:
Oplossing: The arm joints are designed to hold the TV's position. If movement is too stiff, check for any overtightened bolts on the arm joints. If too loose, gently tighten the bolts at the pivot points. - TV pas nie op die montering nie:
Oplossing: Verify your TV's VESA pattern and weight against the specifications in Section 3. If they do not match, the mount is incompatible with your TV.
8. Waarborg en Ondersteuning
For warranty information or technical support, please refer to the documentation included with your purchase or contact CABLETECH customer service directly. Keep your proof of purchase for warranty claims.
CABLETECH is committed to providing high-quality products and support. If you have any questions or require assistance, do not hesitate to reach out to our support team.