Inleiding
This manual provides comprehensive instructions for the safe and efficient operation, maintenance, and troubleshooting of your SINGER 4423 Heavy Duty Sewing Machine and its compatible Extension Table. Please read this manual thoroughly before using the machine to ensure optimal performance and longevity.
Veiligheidsinstruksies
- Always unplug the machine from the electrical outlet when removing covers, lubricating, or when making any other user servicing adjustments mentioned in this instruction manual.
- Hou vingers weg van alle bewegende dele. Spesiale versigtigheid is nodig rondom die naaimasjiennaald.
- Use the proper needle plate. The wrong plate can cause the needle to break.
- Moenie aan die materiaal trek of stoot terwyl jy stik nie. Dit kan die naald afbuig en veroorsaak dat dit breek.
- Always use the foot controller to operate the machine.
- Never operate the machine with any air openings blocked. Keep ventilation openings of the sewing machine and foot controller free from lint, dust, and loose cloth.
- Hierdie toestel is nie bedoel vir gebruik deur persone (insluitend kinders) met verminderde fisiese, sensoriese of geestelike vermoëns, of 'n gebrek aan ervaring en kennis nie, tensy hulle toesig of instruksies oor die gebruik van die toestel gegee is deur 'n persoon wat verantwoordelik is vir hul veiligheid.
Pakketinhoud
Your SINGER 4423 Heavy Duty Sewing Machine package typically includes the following items:
- SINGER 4423 Heavy Duty Naaimasjien
- Voetbeheerder
- Standard Presser Foot (All-Purpose Foot)
- Ritsvoet
- Knoopsgatvoet
- Knoppie Naaldvoet
- Seam Ripper/Lint Brush
- Naaldpak
- Spoeltjies
- Spool Holders
- Hulpspoelpen
- Spool Pin Felt
- Skroewedraaier
- Soft-Sided Dust Cover
- SINGER Heavy Duty Sewing Machine Extension Table
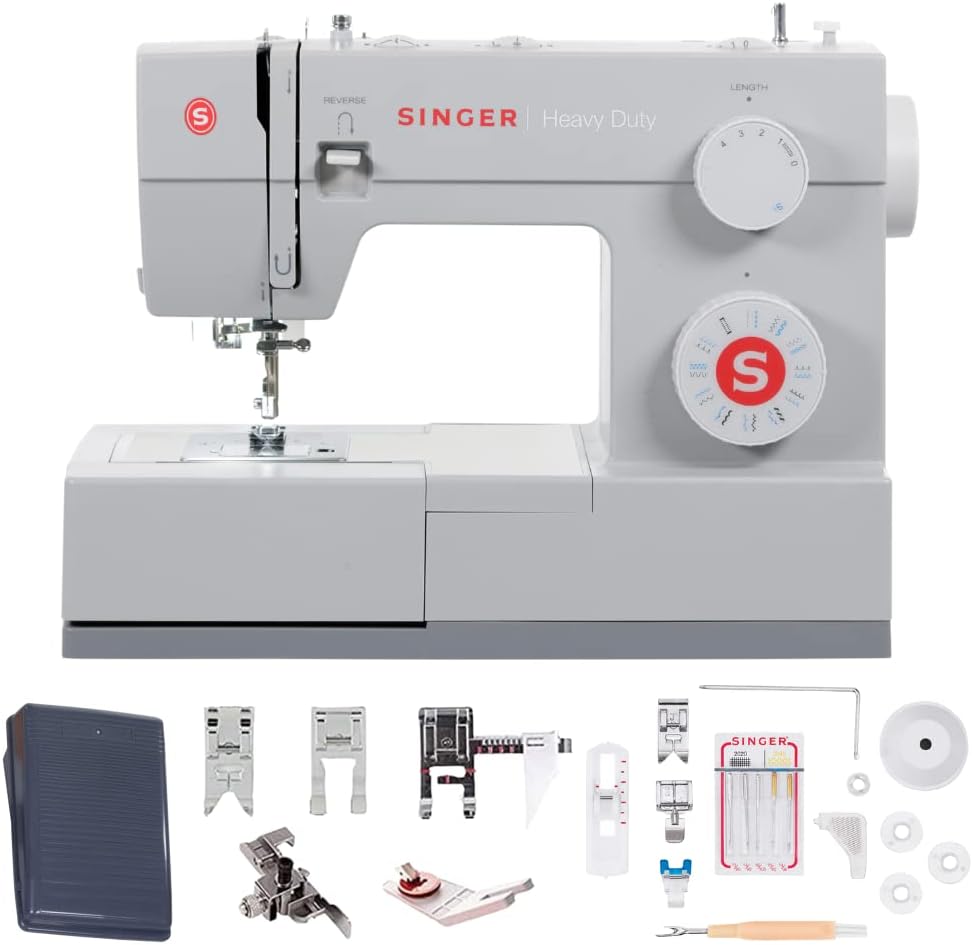
Image: SINGER 4423 Heavy Duty Sewing Machine with various presser feet, needles, bobbins, and a foot pedal.

Image: Close-up of SINGER sewing machine accessories, including different presser feet and a pack of universal needles. For more information on needles, visit https://uqr.to/hjvc.
Opstelling
1. Uitpak en Plasing
Carefully remove the machine from its packaging. Place the machine on a stable, flat surface. Ensure there is adequate space around the machine for comfortable operation.
2. Kragverbinding
Connect the foot controller plug into the machine's power socket. Then, plug the power cord into a suitable electrical outlet.

Beeld: Agter view of the SINGER 4423 sewing machine showing the power input and foot pedal connection point.
3. Attaching the Extension Table
To attach the extension table, slide it onto the free arm of the sewing machine until it clicks securely into place. The table provides an expanded work surface, useful for larger projects.

Image: The SINGER extension table, designed to provide a larger work area for sewing projects.

Beeld: Bo view of the SINGER extension table, featuring integrated measurement markings in inches and centimeters.
4. Die masjien inryg
Proper threading is crucial for good stitch quality. Follow these steps carefully:
- Spoelwikkeling: Place a spool of thread on the spool pin. Guide the thread through the bobbin winding tension disc and then around the bobbin several times. Place the bobbin onto the bobbin winder spindle and push it to the right. Press the foot controller to wind the bobbin. Stop when the bobbin is full and push the spindle to the left to disengage.
- Die spoel insit: Open the bobbin cover plate. Insert the wound bobbin into the bobbin case, ensuring the thread unwinds in the correct direction (usually counter-clockwise). Guide the thread through the tension spring and out the bobbin case opening. Close the bobbin cover.
- Boonste draadwerk: Raise the needle to its highest position using the handwheel. Place a spool of thread on the spool pin. Guide the thread through the upper thread guide, down into the tension discs, up and through the take-up lever, and then down to the needle. Thread the needle from front to back.
- Bringing Up the Bobbin Thread: Hold the upper thread lightly. Turn the handwheel towards you to lower and then raise the needle. The upper thread will catch the bobbin thread, bringing a loop up through the needle plate hole. Pull both threads under the presser foot and towards the back of the machine.
Die gebruik van die masjien
1. Steekkeuse
The SINGER 4423 offers 97 stitch applications. Use the stitch selector dial on the front of the machine to choose your desired stitch pattern. Refer to the stitch chart on the machine for available options.

Beeld: Nabyskoot view of the SINGER 4423 sewing machine's stitch selector dial, showing various stitch patterns.
2. Stitch Length and Width Adjustment
Adjust the stitch length using the upper dial and stitch width using the lower dial, as indicated on the machine. Experiment with different settings on a scrap piece of fabric to achieve the desired result for your project.
3. Using the Foot Pedal
The foot pedal controls the sewing speed. Press gently for slower speeds and apply more pressure for faster sewing. Release the pedal to stop.
4. Reverse Sewing
To reinforce stitches at the beginning and end of a seam, press and hold the reverse lever (usually located on the front of the machine) while sewing. Release the lever to resume forward stitching.
5. Needle and Presser Foot Replacement
Always use the correct needle type and size for your fabric. To replace the needle, loosen the needle clamp screw, remove the old needle, insert the new needle with the flat side facing the back, and tighten the screw. To change presser feet, raise the needle and presser foot lifter, then press the release button on the back of the presser foot holder. Attach the new foot by aligning it and lowering the presser foot lifter until it snaps into place.
Onderhoud
1. Skoonmaak
Regular cleaning helps maintain your machine's performance.
- Pluisverwydering: Unplug the machine. Remove the needle, presser foot, and needle plate. Use the provided lint brush to remove lint and dust from the bobbin area and feed dogs.
- Oppervlakte skoonmaak: Vee die buitekant van die masjien af met 'n sagte, droë lap. Moenie harde chemikalieë of skuurmiddels gebruik nie.
2. Olie
Your SINGER 4423 Heavy Duty Sewing Machine is designed to require minimal oiling. Refer to the full instruction manual for specific oiling points if necessary, or consult a qualified service technician. Over-oiling can attract lint and cause issues.
3. Berging
When not in use, cover the machine with the provided dust cover to protect it from dust and debris. Store in a dry, stable environment.
Probleemoplossing
Hierdie afdeling spreek algemene probleme aan wat u mag teëkom. Vir meer komplekse probleme, raadpleeg 'n gekwalifiseerde dienstegnikus.
| Probleem | Moontlike oorsaak | Oplossing |
|---|---|---|
| Steke oorgeslaan | Verkeerde naald, gebuigde naald, verkeerde ryging, verkeerde naaldgrootte vir materiaal. | Vervang naald, ryg masjien weer in, gebruik die korrekte naald vir die materiaaltipe. |
| Draad breek | Improper threading, tension too tight, damaged needle, poor quality thread. | Re-thread machine, adjust tension, replace needle, use good quality thread. |
| Stofplooiing | Spanning te styf, verkeerde steeklengte, verkeerde drukvoet. | Adjust tension, increase stitch length, use appropriate presser foot. |
| Masjien begin nie | Not plugged in, power switch off, foot controller not connected. | Check power connections, ensure switch is on. |
Spesifikasies
- Modelnommer: 4423
- Handelsmerk: SINGER
- Item gewig: 14.5 pond
- Materiaal: Metaal, vlekvrye staal
- Kragbron: Elektries met koord
- Stitch Applications: 97
- Kleur: Grys
Waarborg en Ondersteuning
For warranty information and customer support, please refer to the warranty card included with your product or visit the official SINGER webwebwerf. Bewaar u aankoopbewys as bewys van aankoop.