OFANTOP 52YFT-7068
OFANTOP 52-Inch Smart Ceiling Fan with Lights and Remote Control (Model: 52YFT-7068)
Instruksie Handleiding
1. Veiligheidsinligting
Read and understand all instructions before beginning installation. This product must be installed in accordance with the applicable installation code by a person familiar with the construction and operation of the product and the hazards involved. Failure to follow these instructions may result in electric shock, fire, or serious personal injury.
- Ontkoppel altyd die krag by die hoofstroombreker voor installasie of onderhoud.
- Ensure all electrical connections are in accordance with local codes, ordinances, and the National Electric Code.
- The fan must be mounted with a minimum of 7 feet (2.1 meters) clearance from the floor to the trailing edge of the blades.
- The fan must be mounted to a ceiling outlet box marked "Acceptable for Fan Support of 35 lbs (15.9 kg) or less."
- Moenie die waaier met beskadigde lemme gebruik nie. Vervang alle lemme as een beskadig is.
- Vermy om voorwerpe in die pad van die waaierblaaie te plaas.
- This fan is ETL Listed for indoor and outdoor use. Ensure proper sealing for outdoor installations to prevent water damage.
2. Pakketinhoud
Verifieer dat alle komponente teenwoordig is voordat u met die installasie begin.
- Motorbyeenkoms
- Fan lemme (3)
- Downrod (5" and 10" included for Downrod Mount)
- Montagebeugel
- Afdak
- Afstandbeheer met muurbevestiging
- Montering van ligkit
- Hardewarepak (skroewe, draadmoere, wassers)
- Instruksie Handleiding

Image: Main components of the OFANTOP 52-Inch Smart Ceiling Fan.
3. Produkspesifikasies
| Handelsmerk | OFANTOP |
| Model Naam | 52YFT-7068 |
| Grootte | 52 duim |
| Aantal lemme | 3 |
| Motor tipe | Borsellose DC-motor |
| Lugvloeikapasiteit | 6031 kubieke voet per minuut (CFM) |
| Kragbron | WS/GS (120 Volt WS) |
| Wattage | 35 Watt |
| Beheer metode | Remote, App (Smart Life), Voice (Alexa, Google Assistant) |
| Ligte kenmerke | Dimmable, 3 Color Temperature Options (3000K, 4500K, 6000K), Memory Function |
| Binne/buiteluggebruik | Yes (ETL Listed, IP44 for outdoor) |
| Montage tipe | Downrod Mount (5" and 10" downrods included) |
| Geraasvlak | 35dB (stil werking) |
| Energiedoeltreffendheid | 75% Less Energy than AC Fan |

Image: Energy Efficiency label for the ceiling fan.
4. Installasie-instruksies
4.1 Kontrolelys voor die installasie
- Maak seker dat die krag by die stroombreker afgeskakel is.
- Maak seker dat jy al die nodige gereedskap het (skroewedraaier, draadstripper, leer, ens.).
- Verify the mounting location can support the fan's weight (16.42 lbs).
- Choose the appropriate downrod length (5" or 10") for your ceiling height.
4.2 Montage-opsies
This fan supports both standard downrod mount and angled mount (up to 20 degrees).
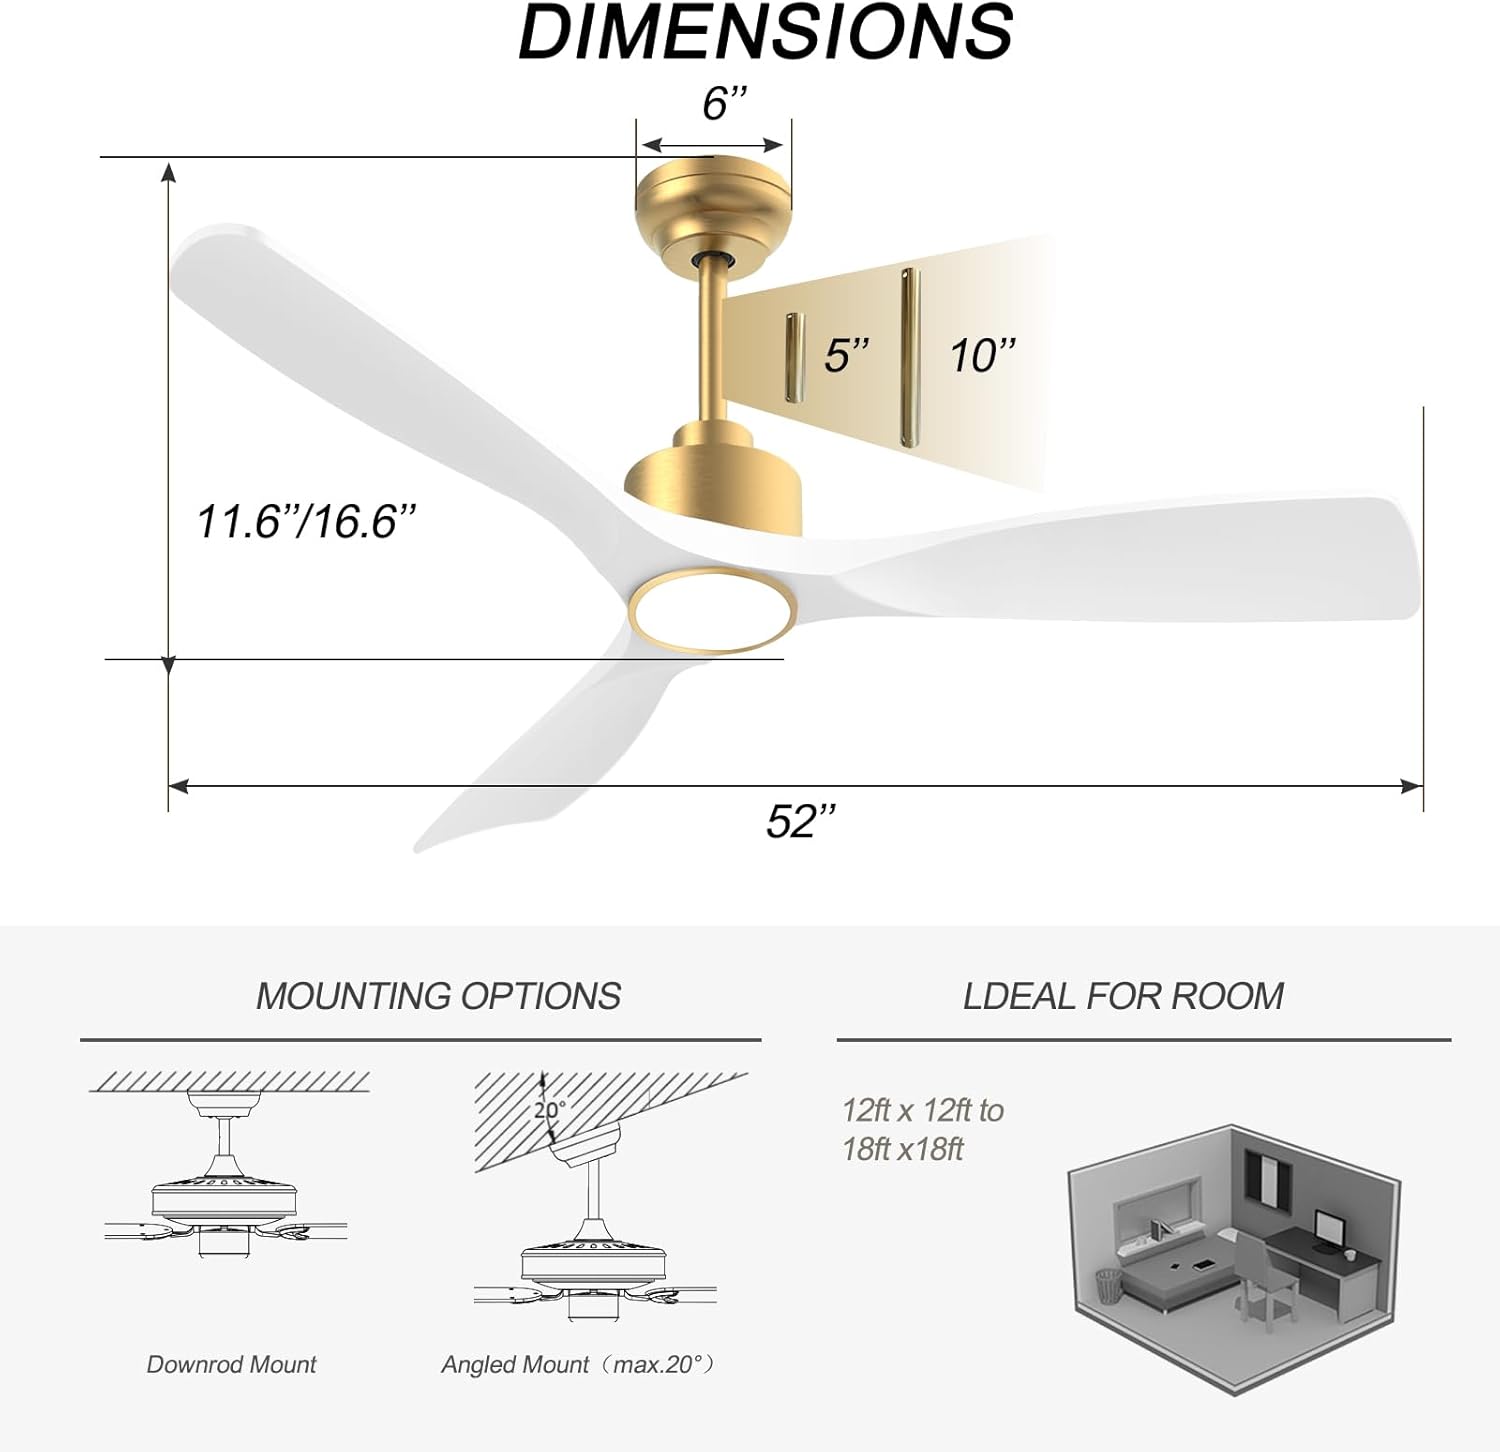
Image: Diagram showing fan dimensions and available downrod and angled mounting options.
- Attach the mounting bracket to the ceiling outlet box using the provided screws.
- Feed the electrical wires from the ceiling through the center hole of the mounting bracket.
- Assemble the downrod to the motor assembly, ensuring all screws are tightened securely.
- Lig die waaiereenheid versigtig op en hang dit aan die monteerbeugel.
4.3 Bedrading
The fan features quick connectors for simplified wiring.
- Connect the fan's wires to the household wiring according to the color codes (typically black to black, white to white, green/bare copper to ground).
- Maak seker dat alle verbindings stewig is met behulp van draadmoere.
- Steek al die drade netjies in die uitlaatkassie.
Video: A short demonstration of the fan's appearance and operation. This video is a 7-second preview and shows the fan spinning with its light on.
4.4 Blade Attachment
- Carefully attach each of the three fan blades to the motor housing using the provided screws.
- Ensure all screws are tightened evenly to prevent wobbling.
Video: 'n Oorview of the BOOSANT White and Gold Ceiling Fan, demonstrating its features and design. This video provides a general look at the fan's aesthetics and functionality.
4.5 Light Kit Installation
- Connect the light kit wires to the corresponding wires from the fan motor.
- Bevestig die ligstel-samestelling aan die onderkant van die waaiermotorbehuising.
5. Bedryfsinstruksies
5.1 Afstandbeheerfunksies
The included remote control allows for convenient operation of all fan and light functions.
- Krag aan/af: Skakel die waaier en lig aan of af.
- Fan Spoed: Select from 6 different fan speeds.
- Lig aan/af: Beheer die lig onafhanklik.
- Kleur temperatuur: Cycle through 3 color temperature options (3000K Warm White, 4500K Natural White, 6000K Cool White).
- Dowwer: Pas die helderheid van die lig aan.
- Omkeerbare motor: Wissel tussen somermodusse (afwaartse lugvloei) en wintermodusse (opwaartse lugvloei).
- Afteller: Set the fan to turn off automatically after a set period (e.g., 1H, 2H, 4H, 8H).
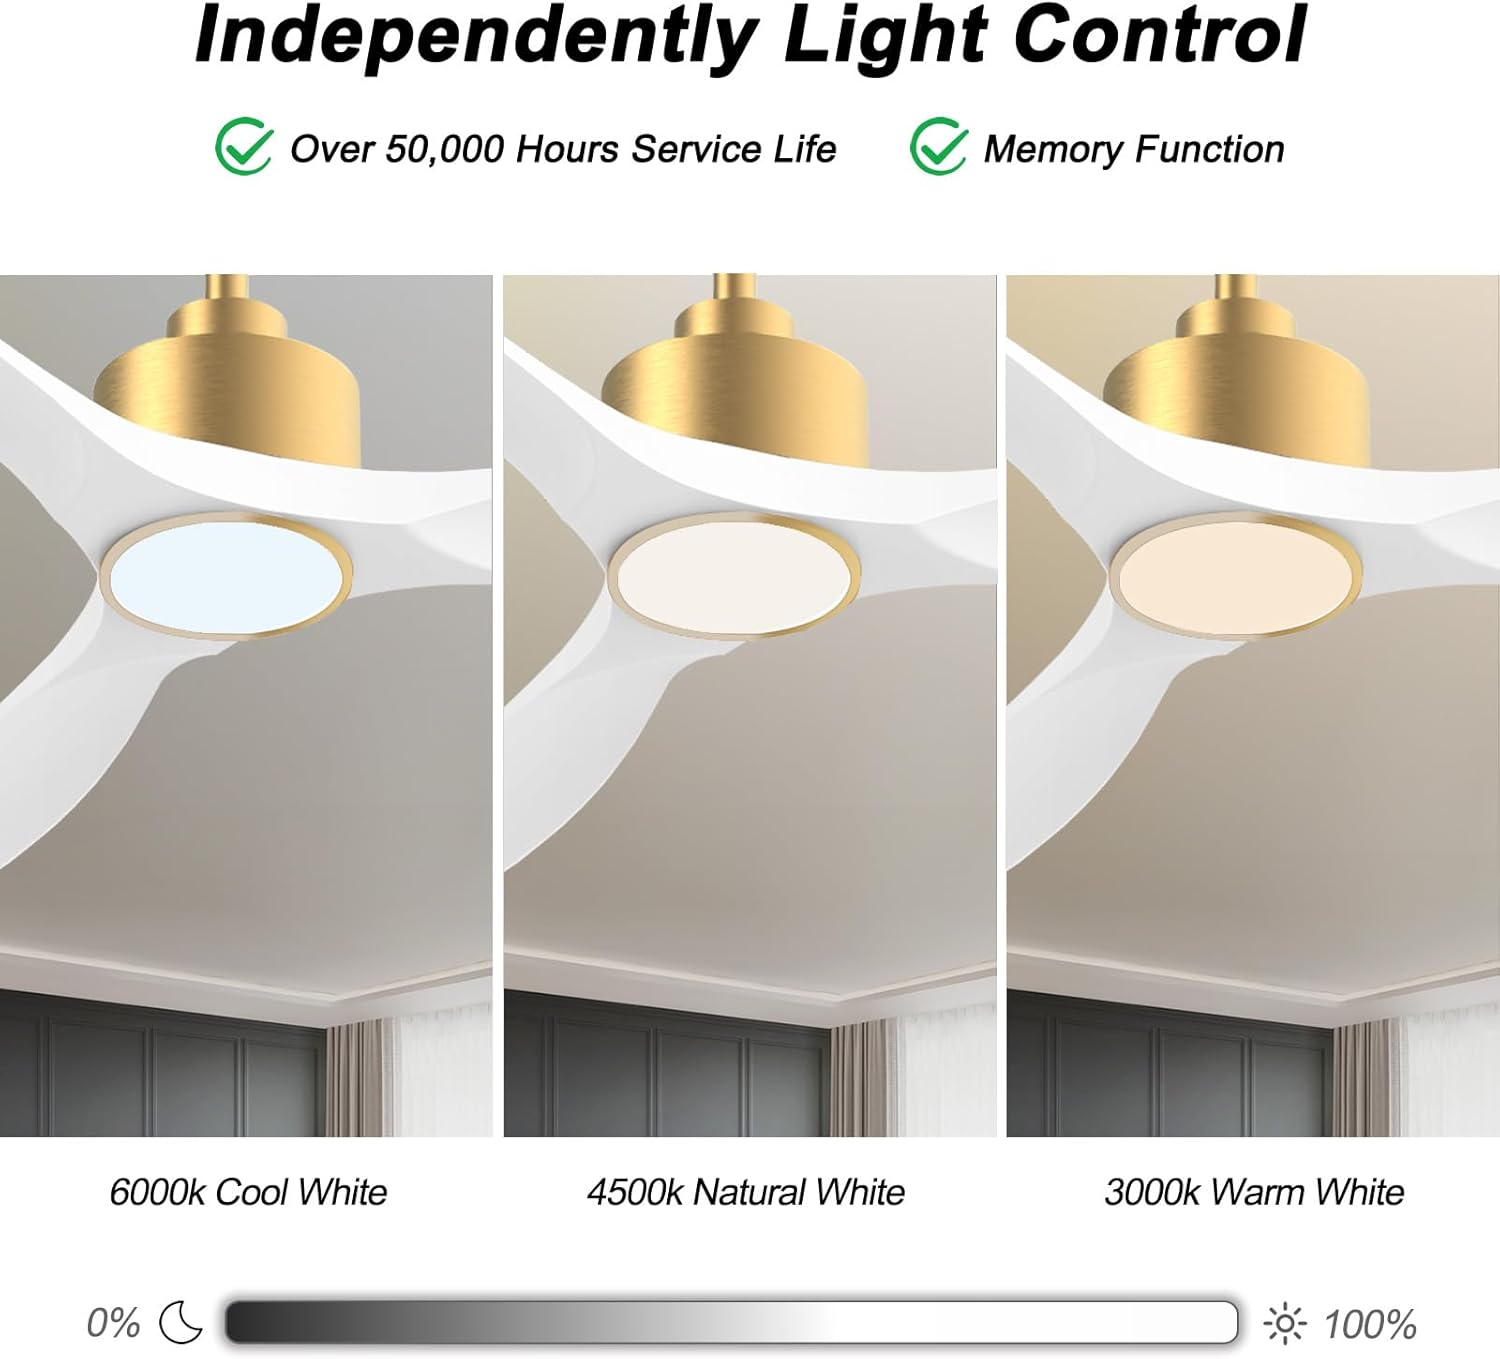
Image: Visual representation of the three adjustable light color temperatures (Warm, Natural, Cool White).

Image: Illustration of the reversible motor function for summer cooling and winter warm air circulation.
5.2 Smart Control (App/Voice)
The OFANTOP Smart Ceiling Fan can be controlled via the Smart Life app or voice assistants like Amazon Alexa and Google Assistant.
- App aflaai: Download the "Smart Life" app from your device's app store.
- Wi-Fi-paring:
- Maak seker dat jou Wi-Fi-netwerk 2.4GHz is.
- Turn the fan power off and back on at the switch.
- Within 10 seconds, press the "8H Fan Timer & Wi-Fi Pairing" button on the remote for 3 seconds to enter pairing mode.
- Open the Smart Life app, select "Add Device" or click the "+" in the upper right corner.
- Find the fan device and click "ADD".
- Fill in your 2.4GHz Wi-Fi name and password.
- Wait for the connection to complete. A beep from the fan indicates successful pairing.
- Stembeheer: Once paired with the Smart Life app, enable the Smart Life skill/action in your Amazon Alexa or Google Assistant app to control the fan with voice commands.

Image: Depiction of smart control features, including compatibility with Google Assistant and Amazon Alexa.
Video: Instructions on how to connect the BOOSANT 102 Series Smart Ceiling Fan to the Smart Life app for mobile control. This video details the Wi-Fi pairing process.
6. Onderhoud
- Skoonmaak: Om die waaier skoon te maak, vee dit af met 'n sagte, damp lap. Moenie skuur skoonmaakmiddels of oplosmiddels gebruik nie.
- Bladversorging: Periodically check blade screws for tightness. Loose blades can cause wobbling and noise.
- Ligbron: The integrated LED light source is designed for long life (over 50,000 hours) and is not user-replaceable.
- Motor: The DC motor is maintenance-free and does not require lubrication.
7. Probleemoplossing
| Probleem | Moontlike oorsaak | Oplossing |
|---|---|---|
| Waaier begin nie | Geen krag na die waaier nie; Los draadverbindings; Afstandbeheerder se battery is laag. | Kontroleer stroombreker; Verifieer alle draadverbindings; Vervang afstandbeheerbattery. |
| Fan wiebel | Los lemskroewe; Verkeerd gebalanseerde lemme; Los monteringsbeugel. | Tighten all blade screws; Use a balancing kit (not included) if necessary; Ensure mounting bracket is securely fastened. |
| Lig werk nie | Loose wire connection to light kit; LED driver failure; Remote control issue. | Check light kit wiring; Contact customer support if LED driver is suspected; Check remote battery/functionality. |
| Afstandbeheer werk nie | Battery depleted; Remote not paired with fan; Obstruction between remote and receiver. | Replace battery (23A 12V); Re-pair remote with fan (refer to pairing instructions); Ensure clear line of sight. |
| Wi-Fi-verbindingskwessies | Incorrect Wi-Fi password; 5GHz Wi-Fi network; Fan not in pairing mode. | Verify password; Ensure 2.4GHz network is used; Follow app pairing instructions carefully. |
8. Waarborg en Ondersteuning
OFANTOP products are manufactured to the highest quality standards. For specific warranty details and customer support, please refer to the warranty card included with your purchase or contact OFANTOP customer service directly. Keep your proof of purchase for warranty claims.
Kontakinligting: Refer to your product packaging or the official OFANTOP webwebwerf vir die mees onlangse kontakbesonderhede.
Ask a question about this manual
Ask about setup, troubleshooting, compatibility, parts, safety, or missing instructions. Manuals+ will review the question and use this page’s manual context to help answer it.