Cabletech URZ0336B
Cabletech URZ0336B DVB-T2 H.265 HEVC Digital Tuner
Gebruikershandleiding
1. Inleiding
This manual provides comprehensive instructions for the installation, operation, and maintenance of your Cabletech URZ0336B DVB-T2 H.265 HEVC Digital Tuner. Please read this manual thoroughly before using the device to ensure proper functionality and to prevent damage.
2. Veiligheidsinligting
Always observe the following safety precautions to avoid electric shock, fire, or damage to the device:
- Moenie die toestel aan reën of vog blootstel nie.
- Moenie die c oopmaak nieasing. Verwys alle diens na gekwalifiseerde personeel.
- Ensure proper ventilation around the device. Do not block ventilation openings.
- Gebruik slegs die kragadapter wat by die toestel voorsien is.
- Hou die toestel weg van hittebronne en direkte sonlig.
- Disconnect the power plug from the wall outlet if the device will not be used for a long period.
3. Pakketinhoud
Kontroleer asseblief die pakket vir die volgende items:
- Cabletech URZ0336B DVB-T2 H.265 HEVC Digital Tuner
- Afstandbeheer
- AAA-batterye (2x)
- Kragadapter
- Gebruikershandleiding (hierdie dokument)
4. Produk verbyview
Familiarize yourself with the main components and connections of your Cabletech URZ0336B tuner.
4.1. Device and Remote Control
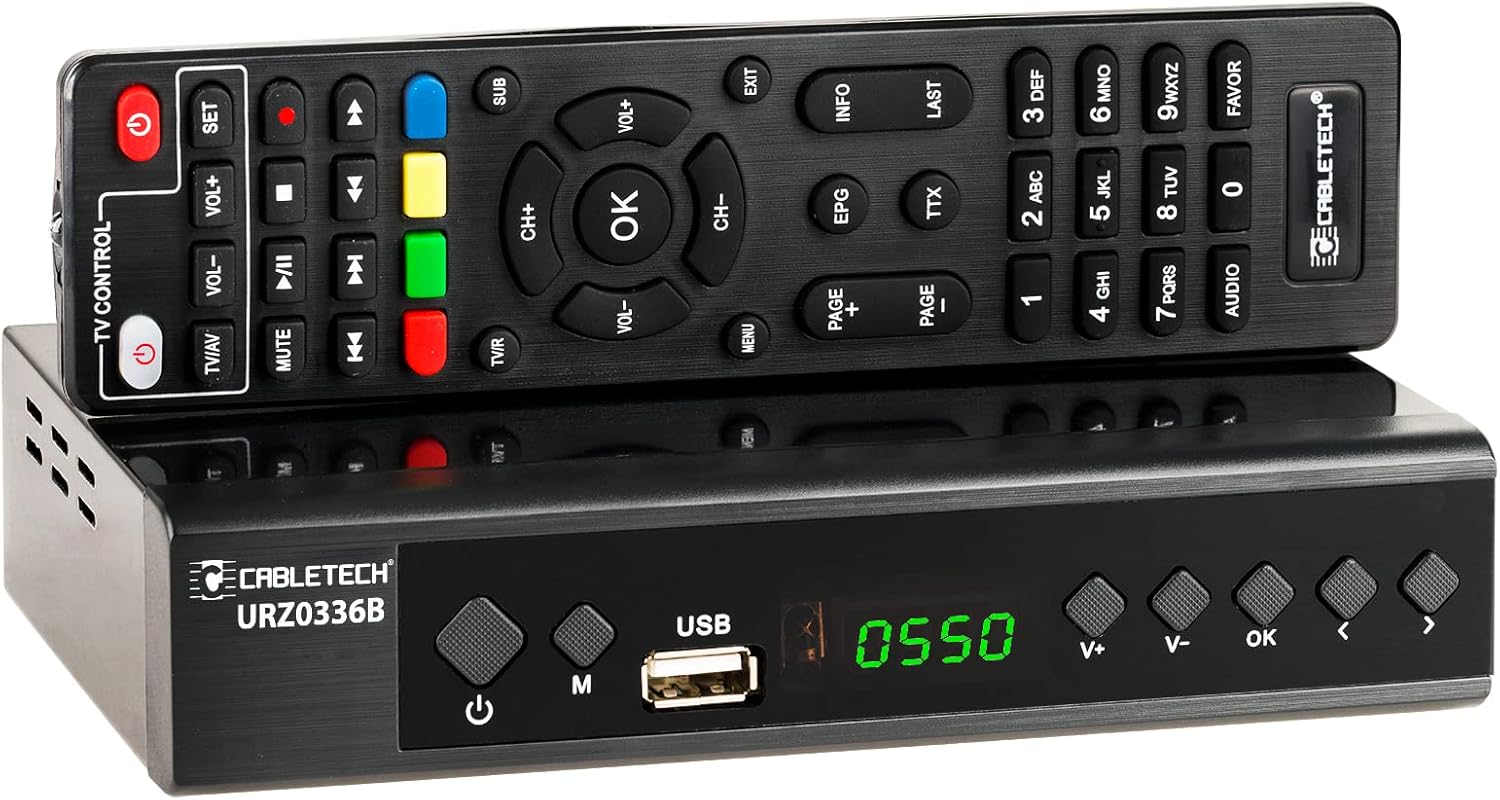
Image: The Cabletech URZ0336B DVB-T2 H.265 HEVC Digital Tuner shown with its accompanying remote control. The tuner is a compact black box, and the remote is also black with various control buttons.
4.2. Voorpaneel
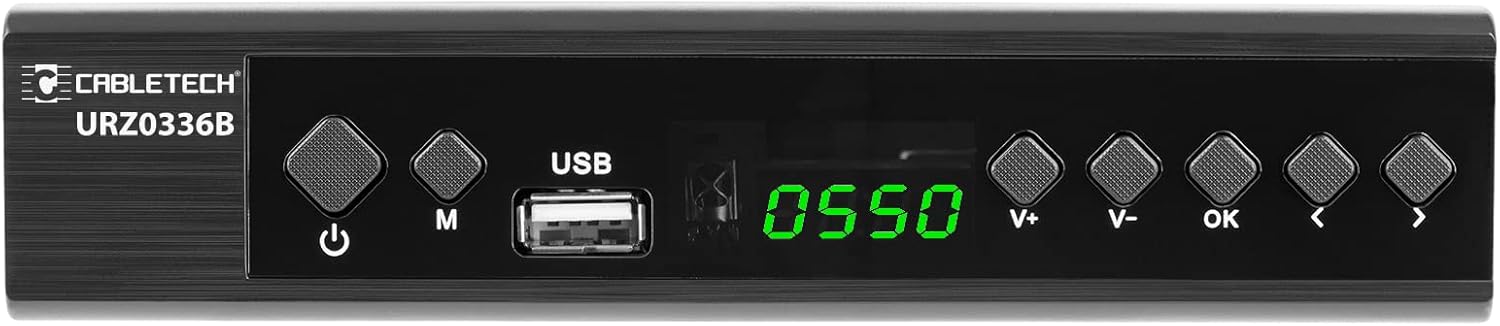
Image: Close-up of the Cabletech URZ0336B front panel, featuring a power button, menu button (M), USB 2.0 port, LED display showing "0550", and navigation/volume buttons (V+, V-, OK, <, >).
- Kragknoppie: Turns the device on/off or to standby.
- M (Menu)-knoppie: Verkry toegang tot die hoofkieslys.
- USB 2.0-poort: For software updates, PVR recording, and media playback.
- LED skerm: Shows channel number or time.
- V+/V- Buttons: Pas volume aan.
- OK knoppie: Bevestig keuses.
- </> Buttons: Navigates through menus or changes channels.
4.3. Agterpaneelverbindings

Image: The rear panel of the Cabletech URZ0336B, showing various input and output ports: ANT IN (IEC socket), COAXIAL, USB, HD OUT (HDMI), SCART, and the power input (110-240V~ 50/60Hz).
- MIER IN: Connects to your DVB-T/T2 antenna.
- KOAKSIALE: Digitale oudio-uitvoer.
- USB: Additional USB 2.0 port for external devices.
- HD OUT (HDMI): Connects to your TV for high-definition video and audio.
- SCART: Connects to older TVs or VCRs.
- Kragtoevoer: Koppel aan die kragadapter.
4.4. Uitleg van afstandbeheer

Beeld: Gedetailleerd view of the Cabletech URZ0336B remote control, showing buttons for power, TV/AV, volume, channel, mute, playback controls, EPG, TTX, INFO, numeric keypad, and special function buttons.
The remote control provides full functionality for operating your tuner. Insert 2x AAA batteries into the battery compartment before first use.
5. Opstelling
5.1. Connecting the Tuner
- Koppel Antenna: Connect your DVB-T/T2 antenna cable to the MIER IN port on the rear panel of the tuner.
- Koppel aan TV:
- For HD TVs: Connect an HDMI cable from the HD OUT (HDMI) port on the tuner to an HDMI input on your TV.
- For older TVs: Connect a SCART cable from the SCART port on the tuner to the SCART input on your TV.
- Koppel krag: Connect the power adapter to the tuner's power input and then plug it into a wall outlet.
- Plaas batterye in: Open the battery compartment on the remote control and insert 2x AAA batteries, observing polarity.
5.2. First-Time Installation and Channel Scan
- Turn on your TV and select the correct HDMI or SCART input source that the tuner is connected to.
- Power on the Cabletech URZ0336B tuner using the power button on the front panel or remote control.
- The first-time installation wizard should appear on your TV screen. Follow the on-screen prompts.
- Select your preferred language and country.
- Initiate an Outomatiese soektog for channels. The tuner will scan for all available DVB-T/T2 channels in your area. This process may take several minutes.
- Once the scan is complete, the tuner will save the found channels and display the first channel.
Note: If you experience poor signal quality, adjust your antenna position or consider using a signal amplewendiger.
6. Bedryfsinstruksies
6.1. Basiese funksies
- Krag aan/af: Druk die KRAG knoppie op die afstandbeheer.
- Kanaalverandering: Gebruik die CH + / CH- buttons or the numeric keypad to enter a channel number.
- Volumebeheer: Gebruik die VOL + / VOL- knoppies.
- Demp: Druk die DEM knoppie om die klank tydelik stil te maak.
- Spyskaart: Druk die SPYSKAART knoppie om toegang tot die hoofkieslys vir instellings en funksies te verkry.
- OK: Confirms selections in menus or displays the channel list.
- UITGANG: Verlaat die huidige kieslys of skerm.
6.2. Electronic Program Guide (EPG)
The 7-day EPG provides a schedule of current and upcoming programs.
- Druk die EPG knoppie op die afstandbeheer.
- Navigate through channels and program times using the arrow buttons.
- Druk OK aan view details about a selected program.
6.3. PVR (Program Recording) and Timeshift
Connect a USB storage device (e.g., USB flash drive or external hard drive) to one of the USB 2.0 ports to use PVR and Timeshift functions.
- PVR Recording:
- Druk die REC button (red circle) on the remote to start immediate recording of the current program. Press STOP (square) to end recording.
- Schedule recordings via the EPG: Select a program in the EPG and press OK, then choose the record option.
- Tydverskuiwing:
- Terwyl jy na 'n program kyk, druk die POUSE button. The tuner will begin recording the live broadcast to the USB device.
- Jy kan dan SPEEL, SPOORT VORENTOE, of SPOEL TERUG within the buffered content.
- Druk STOP to exit Timeshift and return to live TV.
6.4. Mediaterugspeel
The tuner supports playback of various media files vanaf 'n gekoppelde USB-bergingstoestel.
- Connect your USB device to a USB port on the tuner.
- Go to the main menu and select "Media" or "USB".
- Navigeer na die gewenste file type (MP3, WMA, JPEG, BMP, AVI) and select the file te speel.
6.5. Supported Applications
The tuner supports various online applications when connected to the internet via an external MT7601 Wi-Fi adapter (not included).
- Weer: View local weather forecasts.
- IPTV: Access Internet Protocol Television streams.
- YouTube: Watch videos from YouTube.
- RSS: Read RSS news feeds.
Note: An external MT7601 Wi-Fi adapter is required for internet connectivity and access to these applications.
6.6. Parental Control
Set up parental control to restrict access to certain channels or programs based on age ratings.
- Access the "Parental Control" section in the main menu.
- Enter your PIN (default is usually 0000 or 1234, check your device for specifics).
- Configure age restrictions or lock specific channels.
6.7. Tydfunksie
The timer function allows you to schedule the tuner to turn on/off at specific times or to switch to a particular channel.
- Navigate to the "Timer" section in the main menu.
- Set the event type (e.g., Power On, Power Off, Record), time, and duration.
7. Onderhoud
7.1. Skoonmaak
To clean the device, disconnect it from the power supply and wipe the exterior with a soft, dry cloth. Do not use liquid or aerosol cleaners.
7.2. Sagteware-opdatering
Software updates can improve performance and add new features. Updates are performed via the USB port.
- Laai die nuutste firmware af file from the official Cabletech support webwebwerf (indien beskikbaar).
- Kopieer die firmware file to the root directory of a USB flash drive.
- Connect the USB flash drive to the tuner's USB port.
- Go to the "System" or "Tools" menu, then select "Software Update" or "Upgrade by USB".
- Follow the on-screen instructions to complete the update. Do not power off the device during the update process.
8. Probleemoplossing
If you encounter issues with your tuner, refer to the following common problems and solutions:
| Probleem | Moontlike oorsaak | Oplossing |
|---|---|---|
| Geen beeld of klank nie | Incorrect TV input selected; Loose cable connections; Tuner not powered on. | Select correct TV input (HDMI/SCART); Check all cable connections; Ensure tuner is powered on. |
| "Geen sein"-boodskap | Antenna not connected; Poor antenna signal; No channels scanned. | Connect antenna properly; Adjust antenna position; Perform an automatic channel scan. |
| Afstandbeheer werk nie | Batteries are dead or inserted incorrectly; Obstruction between remote and tuner. | Replace batteries; Check battery polarity; Remove any obstructions; Point remote directly at the tuner. |
| Kan nie na USB opneem nie | USB device not connected or formatted incorrectly; Insufficient storage space. | Ensure USB device is connected; Format USB device to FAT32 or NTFS; Free up space on USB device. |
| No internet access for apps | No MT7601 Wi-Fi adapter connected; Network configuration issues. | Connect a compatible MT7601 Wi-Fi adapter; Check network settings in the tuner's menu. |
9. Spesifikasies
| Kenmerk | Detail |
|---|---|
| Modelnommer | URZ0336B |
| SVE | GX6702S5 |
| Interne geheue | 32 MB |
| RAM | 512 MB DDR2 |
| ANT Connector | IEC-sok |
| Frekwensiereeks | VHF: 170–230 MHz, UHF: 470–862 MHz |
| Demodulasie | QPSK, 16QAM, 64QAM, 256QAM |
| Bandwydte | 7 MHz, 8 MHz |
| Dekodering | MPEG-1, MPEG-2, MPEG-4, H.264, H.265, AAC, HE-AAC, AC-3, DD+ |
| Insette/uitsette | 2x USB 2.0, HDMI, SCART, COAXIAL |
| Aspekverhouding | Auto, 16:9 WS, 16:9 PB, 16:9 PS; 4:3 LB, 4:3 PS, 4:3 Full |
| Ondersteunde formate | MP3, WMA, JPEG, BMP, AVI |
| Skermresolusie | 480i, 480p, 576i, 576p, 720p, 1080i, 1080p |
| Video-resolusie | 1920 x 1080 piksels |
| Oudio-dekodering | MPEG-1 LayerI/II, Dolby-Downmix 2-Channel (License), AAC LC, HE-AAC v1/V2, PCM-Downmix, IEC958 SPDIF |
| File Stelsel | FAT32, NTFS |
| Verenigbaarheid | Fully compatible with DVB-T2/DVB-T |
| Afstandbeheer | Requires 2x AAA batteries |
| Kragverbruik | Max. 6 W (Operating), Max. 50/60 Hz (Standby) |
| Afmetings (B x H) | 168 mm x 36 mm |
| Wi-Fi Ondersteuning | Requires external MT7601 chip adapter |
| Tuner Bit Depth | 10 Bietjie |
10. Waarborg en Ondersteuning
This product comes with a standard manufacturer's warranty. For specific warranty terms and conditions, please refer to the documentation included with your purchase or contact Cabletech customer support.
For technical assistance, troubleshooting beyond this manual, or warranty claims, please contact your retailer or the official Cabletech support channels.
Verwante Dokumente - URZ0336B
 |
CABLETECH URZ0336B DVB-T2 HD Tuner Bedienungsanleitung Umfassende Bedienungsanleitung für den CABLETECH URZ0336B DVB-T2 HD Tuner. Enthält Informationen zu Installation, Bedienung, Sicherheitshinweisen, Fehlerbehebung und mehr. |
 |
Manuel d'utilisation APM Décodeur TNT Full HD DVB-T2 HEVC 265 Guide complet pour le Décodeur TNT Full HD DVB-T2 HEVC 265 d'APM. Apprenez à installer, configurer et utiliser votre appareil avec les télécommandes standard et senior. Manuel en français. |
 |
IMPERIAL T2 IR Bedienungsanleitung: Digitaler DVB-T/DVB-T2 Receiver Umfassende Bedienungsanleitung für den IMPERIAL T2 IR Digitalen DVB-T/DVB-T2 Receiver. Erfahren Sie alles über Installation, Konfiguration, Fehlerbehebung und technische Daten. Besuchen Sie www.digitalbox.de für weitere Informationen. |
 |
CABLETECH URZ0326 DVB-T2 HD Tuner User Manual Comprehensive user manual for the CABLETECH URZ0326 DVB-T2 HD tuner, covering installation, operation, features, troubleshooting, and specifications. Learn how to set up and use your digital TV tuner for ground-based television. |
 |
H.265 DVB-T2 TV-stokkie: Vinnige begingids en probleemoplossing Leer hoe om jou H.265 DVB-T2 TV-stokkie op te stel en te gebruik vir digitale terrestriële ontvangs. Sluit paklys, afstandbeheergids, outomatiese leeropstelling en probleemoplossingswenke in. |
 |
BEESHI U12 DVB-T2/DVB-C Satellite TV Receiver User Manual Comprehensive user manual for the BEESHI U12 DVB-T2/DVB-C Satellite TV Receiver, covering setup, system settings, remote control functions, and installation. |
Ask a question about this manual
Ask about setup, troubleshooting, compatibility, parts, safety, or missing instructions. Manuals+ will review the question and use this page’s manual context to help answer it.