1. Inleiding
This manual provides detailed instructions for the installation, operation, and troubleshooting of the VEDINDUST HDMI Splitter Extender 1x2. This device allows you to split one HDMI signal into two identical signals and extend them up to 50 meters (165 feet) over a single Cat5e/6/7 Ethernet cable, supporting 1080p resolution. It features EDID preset management and Power Over Cable (POC) technology, requiring power only at the Transmitter (TX) unit.
2. Pakketinhoud
Maak asseblief seker dat alle items teenwoordig en in 'n goeie toestand is wanneer u die pakkie oopmaak.
- 1x HDMI Extender Splitter (Transmitter Unit - TX)
- 2x HDMI Extender Receivers (RX Units)
- 1x 12V Power Adapter (for TX unit)
- 1x Pair of Fixed Hangers
- 1x Gebruikershandleiding

Image: Contents of the VEDINDUST HDMI Splitter Extender package, showing the main transmitter unit, two receiver units, power adapter, mounting brackets, and user manual.
3. Sleutel kenmerke
- HDMI Splitter Extender: Splits one HDMI signal to two outputs and extends up to 50m (165ft) over Cat5e/6/7 cable.
- EDID Preset Management: Supports various EDID presets to optimize compatibility between source and display.
- Power Over Cable (POC): Only the Transmitter (TX) unit requires a 12V power supply; Receiver (RX) units are powered via the Ethernet cable.
- No Compression Transmission: Supports resolutions up to 1920x1200@60Hz and 1080p@60Hz.
- Oudioformaat Ondersteuning: PCM / DTS / DSD.
- Auto EQ: Built-in automatic equalization algorithm for stable transmission over varying cable lengths.
- Recommended Cable Lengths: Cat6/7 - 50m, Cat5e - 40m, Cat5 - 30m.
4. Spesifikasies
| Kenmerk | Detail |
|---|---|
| Modelnommer | EX-HDMI |
| Handelsmerk | VEDINDUST |
| Connector Tipe | HDMI, RJ45 |
| Kabel tipe | Ethernet (Cat5e/6/7) |
| Aantal poorte | 1 HDMI In, 2 HDMI Out (local loop), 2 RJ45 Out |
| Maksimum resolusie | 1080p@60Hz, 1920x1200@60Hz |
| Transmissie afstand | Up to 50m (165ft) with Cat6/7, 40m with Cat5e, 30m with Cat5 |
| Kragtoevoer | 12V DC (for TX unit), POC (for RX units) |
| Versoenbare toestelle | PC, DVD Player, PlayStation, Television |
| Afmetings (Pakket) | 20.4 x 16.1 x 6.2 cm |
| Gewig (Pakket) | 580 gram |
| UPC | 798610311257 |
5. Product Diagrams

Beeld: Oorview of the VEDINDUST HDMI Splitter Extender system, showing the main transmitter unit and two compact receiver units.

Beeld: Gedetailleerd view of the Transmitter (TX) unit's front panel, indicating the ON/OFF switch, Power indicator, and HDMI input indicator.

Beeld: Gedetailleerd view of the Transmitter (TX) unit's rear panel, showing RJ45 outputs (CAT3, CAT4), HDMI loop-out ports (HDMI1, HDMI2), EDID DIP switch, HDMI input, and 12V DC power input.
6. Opstelinstruksies
- Connect HDMI Source to TX: Connect your HDMI source device (e.g., PC, DVD player, game console) to the HDMI-IN port on the Transmitter (TX) unit using a high-quality HDMI cable.
- Connect Local Displays (Optional): If you wish to use local displays, connect them to the HDMI 1 en HDMI 2 loop-out ports on the TX unit.
- Connect TX to RX Units: Koppel die KAT3 en KAT4 RJ45 outputs on the TX unit to the respective RJ45 inputs on the two Receiver (RX) units using Cat5e/6/7 Ethernet cables. Ensure the cable lengths are within the recommended limits (50m for Cat6/7, 40m for Cat5e, 30m for Cat5).
- Connect Remote Displays to RX Units: Connect your remote HDMI display devices (e.g., TVs, projectors) to the HDMI UIT ports on each RX unit using high-quality HDMI cables.
- Power On TX Unit: Connect the provided 12V power adapter to the DC12V input on the TX unit. The RX units will receive power via the Ethernet cables (POC).
- Select EDID Mode: Pas die EDID DIP-skakelaar on the TX unit according to your display and audio requirements. Refer to the EDID Mode section for detailed settings.
- Verifieer verbindings: Ensure all cables are securely connected. Power on all connected devices.
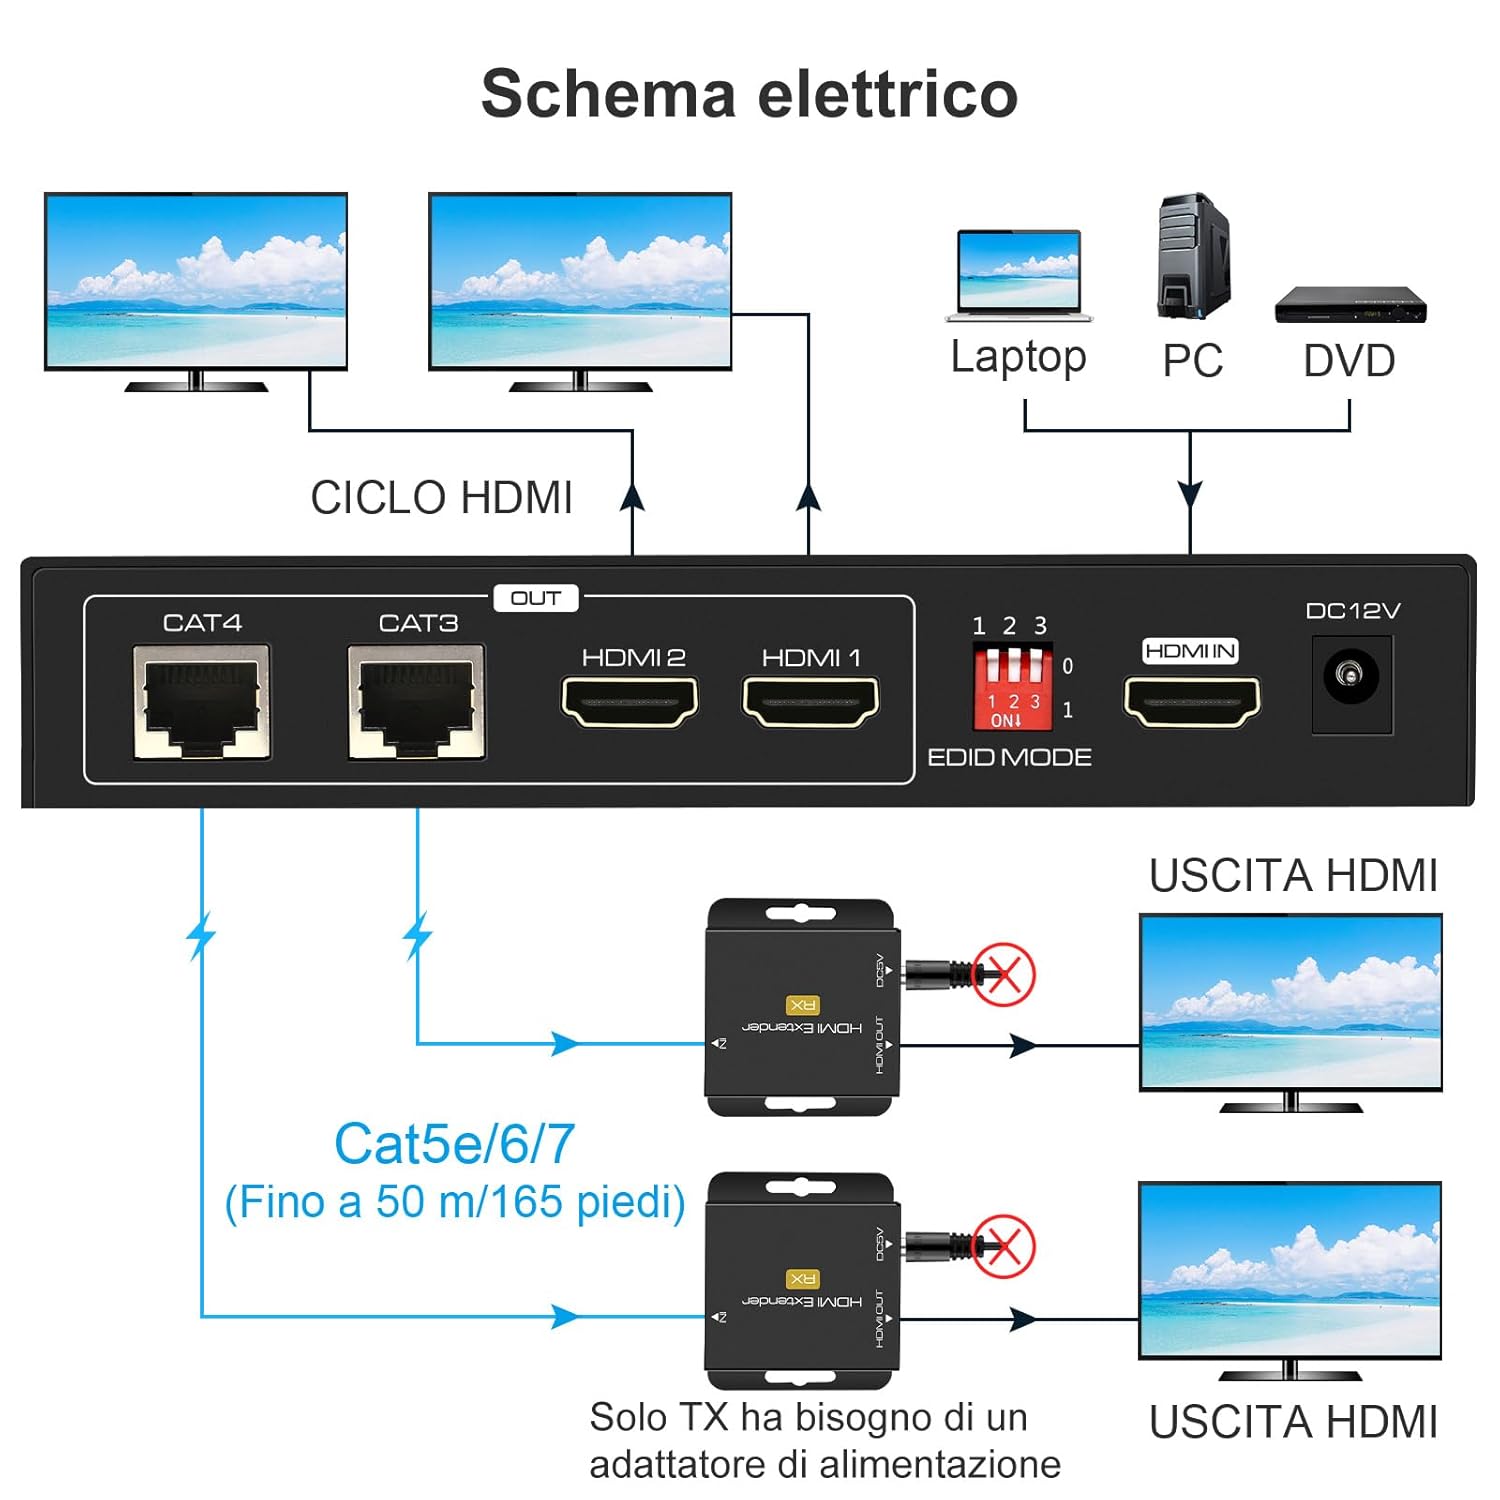
Image: A schematic diagram illustrating the connection process, showing an HDMI source connected to the TX unit, which then connects to two local displays and two remote RX units via Cat5e/6/7 cables, leading to two remote displays.

Beeld: 'n Eksample setup showing the VEDINDUST HDMI Splitter Extender used in a conference room environment, connecting a laptop to multiple displays via the extender system.
7. Bedryfsinstruksies
7.1 Krag aan/af
- Ensure the 12V power adapter is connected to the TX unit.
- Gebruik die AAN/AF switch on the front panel of the TX unit to power the system on or off.
- The Power indicator LED on the TX unit will illuminate when powered on.
7.2 EDID Mode Selection
The EDID (Extended Display Identification Data) DIP switch allows you to select the optimal video and audio format for your connected displays. This helps ensure compatibility and the best possible output quality.
Image: Close-up of the EDID DIP switch on the Transmitter unit, showing the three switches labeled 1, 2, 3 and their ON/OFF positions.
Refer to the table below for common EDID settings:
| DIP Switch Setting (1-2-3) | EDID-modus |
|---|---|
| 000 | 1080p 2CH Audio |
| 001 | 1080p 5.1CH Audio |
| 010 | 1080p 7.1CH Audio |
| 011 | 1080p 3D 2CH Audio |
| 100 | 1080p 3D 5.1CH Audio |
| 101 | 1080p 3D 7.1CH Audio |
| 110 | 1920x1200 2CH Audio |
| 111 | Copy HDMI OUT 1 EDID |
Note: "0" typically means the switch is in the OFF/down position, and "1" means the ON/up position. If you experience display issues, try different EDID settings or use the "Copy HDMI OUT 1 EDID" mode if a local display is connected to HDMI OUT 1.
8. Onderhoud
- Hou die toestel op 'n koel, droë plek, weg van direkte sonlig en hittebronne.
- Vermy om die toestel aan vog of uiterste temperature bloot te stel.
- Maak die toestel skoon met 'n sagte, droë lap. Moenie vloeibare of aërosol skoonmaakmiddels gebruik nie.
- Verseker behoorlike ventilasie rondom die eenhede om oorverhitting te voorkom.
9. Probleemoplossing
- Geen Beeld/Sein:
- Ensure all HDMI and Ethernet cables are securely connected.
- Verify the TX unit is powered on and the power indicator is lit.
- Check the length and quality of your Ethernet cables. Ensure they meet the recommended specifications (Cat5e/6/7).
- Try adjusting the EDID DIP switch settings on the TX unit to match your display's capabilities.
- Test with a different HDMI source or display to rule out device incompatibility.
- Flikkerende of onderbroke sein:
- This can often be resolved by adjusting the EDID settings.
- Ensure Ethernet cables are not running near strong electromagnetic interference sources.
- Kontroleer vir beskadigde kabels.
- Geen oudio nie:
- Verify the EDID setting supports the desired audio format (e.g., 2CH, 5.1CH, 7.1CH).
- Gaan die klankinstellings op jou brontoestel en skerm na.
- POC Not Working (RX unit not powering on):
- Ensure the TX unit is powered by a 12V adapter. The RX units draw power from the TX unit via the Ethernet cable.
- Check the Ethernet cable for damage or improper termination.
10. Waarborg en Ondersteuning
For warranty information or technical support, please refer to the contact details provided with your purchase or visit the VEDINDUST official webwerf. Hou jou aankoopkwitansie vir waarborgeise.