1. Inleiding
The Yorbay Greenhouse Model G42 is designed to provide an optimal growing environment for your plants. This outdoor greenhouse features a durable PE mesh cover and a sturdy steel frame, offering protection against various weather conditions and pests. It is suitable for cultivating a wide range of vegetables, herbs, and flowers, and can also be used for overwintering sensitive plants.
This manual provides essential information for the safe assembly, operation, and maintenance of your greenhouse. Please read it thoroughly before setup and retain it for future reference.

Image 1.1: The Yorbay Greenhouse Model G42, showcasing its assembled structure with various potted plants and a wooden shelf inside.
2. Veiligheidsinligting
- Ensure the greenhouse is assembled on a level, stable surface to prevent tipping.
- Securely anchor the greenhouse using the provided ground nails and wind ropes, especially in windy conditions.
- Do not hang heavy objects from the frame or cover, as this may compromise stability.
- Keep children and pets away during assembly to prevent injury.
- Regularly check for damage to the frame or cover and repair as necessary to maintain structural integrity and protective qualities.
- Avoid using open flames or heating devices inside the greenhouse without proper ventilation and supervision.
3. Pakketinhoud
Voor montering, verifieer dat alle komponente teenwoordig en onbeskadig is. Indien enige onderdele ontbreek of beskadig is, kontak asseblief kliëntediens.
- Plastic-coated iron pipes (various lengths for frame construction)
- Connectors (for assembling frame pipes)
- PE mesh cover (140 g/m², UV-resistant, waterproof)
- "7"-shaped ground nails (for anchoring)
- "U"-shaped ground pegs (for additional anchoring)
- Wind ropes (for securing against strong winds)
- Monteringsinstruksies (hierdie handleiding)

Image 3.1: Illustration of the "7"-shaped ground nails and "U"-shaped ground pegs, along with wind ropes, used for securing the greenhouse to the ground.
4. Monteer-instruksies
Montering vereis gewoonlik twee mense. Volg hierdie stappe noukeurig:
- Berei die webwerf voor: Choose a flat, sheltered location for your greenhouse. Clear any debris or sharp objects from the area.
- Monteer die basisraam: Connect the appropriate frame pipes using the connectors to form the rectangular base of the greenhouse. Ensure all connections are secure.
- Construct the Vertical Supports: Attach the vertical pipes to the base frame, followed by the horizontal pipes that form the side and roof structure. Refer to the included diagram for specific pipe and connector placement.
- Install the Roof Structure: Assemble the sloped roof frame. The sloped design helps prevent water and snow accumulation.
- Secure Frame Connections: Double-check all pipe connections to ensure they are fully inserted and stable. The frame pipes have a diameter of approximately 16 mm and a thickness of 0.4 mm for durability.
- Drape the Cover: Carefully drape the PE mesh cover over the assembled frame. Ensure the door and window openings align correctly.
- Heg die omslag aan: Secure the cover to the frame using the integrated ties or straps. Ensure the cover is taut to prevent flapping in the wind.
- Anker die kweekhuis: Use the "7"-shaped ground nails and "U"-shaped ground pegs to firmly anchor the base of the greenhouse to the ground. Attach the wind ropes to the designated points on the frame and secure them to the ground using additional pegs or heavy objects.

Image 4.1: A diagram illustrating the robust metal frame structure, highlighting the 16mm diameter and 0.4mm thickness of the pipes.

Beeld 4.2: Gedetailleerd view of the frame connectors, showing how the pipes interlock to form the greenhouse structure.
5. Bedryfsinstruksies
The Yorbay Greenhouse is designed for year-round plant protection and cultivation.
- Temperatuurbeheer: The greenhouse features two windows with mosquito nets and a large zippered door. To regulate internal temperature and facilitate air circulation, open and roll up the door or windows as needed. This is particularly important on warm days to prevent overheating.
- Seisoenale gebruik:
- Winter: Primarily used for frost protection, heat retention, and rain protection.
- Other Seasons: Helps maintain humidity and protects plants from excessive rain, wind, and insects, providing a stable growing environment.
- Plantplasing: Arrange plants inside to maximize sunlight exposure and allow for adequate air circulation. Consider using shelves for tiered planting.

Beeld 5.1: Gedetailleerd view of the greenhouse's functional elements, including the mesh windows, the roll-up door/curtain mechanism, and the robust zipper closure.

Image 5.2: Visual representation of the greenhouse's performance in various weather conditions, demonstrating its protection against sun, wind, rain, and snow.
6. Onderhoud
- Skoonmaak: Periodically clean the PE mesh cover with mild soap and water to remove dirt, dust, and algae buildup. Avoid harsh chemicals that could damage the material.
- Raaminspeksie: Regularly inspect the steel frame for any signs of rust, bending, or loose connections. Tighten any loose parts and treat rust spots to prolong the life of the frame.
- Omslaginspeksie: Check the PE cover for tears or punctures. Small damages can often be repaired with greenhouse repair tape to prevent them from worsening.
- Ankertoets: After strong winds or heavy rain, verify that the ground nails, pegs, and wind ropes are still securely in place. Re-secure if necessary.
- Winter voorbereiding: In areas with heavy snowfall, it is advisable to regularly clear snow from the roof to prevent excessive weight from damaging the frame.
7. Probleemoplossing
- Greenhouse unstable: Ensure all frame connections are tight. Verify that ground anchors and wind ropes are properly installed and secured. Consider adding additional weights to the base in extremely windy areas.
- Waterpoel op dak: The sloped roof design is intended to prevent this. Ensure the cover is taut and properly aligned with the frame. If pooling persists, check for any sagging in the frame structure.
- Temperature too high/low: Adjust ventilation by opening or closing the door and windows. For colder periods, consider adding a small, safe heater (with proper ventilation) or additional insulation. For hotter periods, increase ventilation and consider shading.
- Bedek trane: Small tears can be repaired using specialized greenhouse repair tape. For large tears, consider replacing the cover.
8. Spesifikasies
| Kenmerk | Spesifikasie |
|---|---|
| Handelsmerk | Yorbay |
| Modelnommer | G42 |
| Algehele afmetings (L x B x H) | 150 x 70 x 190 cm |
| Raammateriaal | Plastic-coated Metal (Iron) |
| Raampypdiameter | 16 mm |
| Raampypdikte | 0.4 mm |
| Omslagmateriaal | Polyethylene (PE) Mesh |
| Cover Density | 140 g/m² |
| Cover Properties | UV-resistant, Waterproof |
| Aantal deure | 1 (Ritssluiter) |
| Vensters | 2 (with Mosquito Nets) |
| Kleur | Groen |
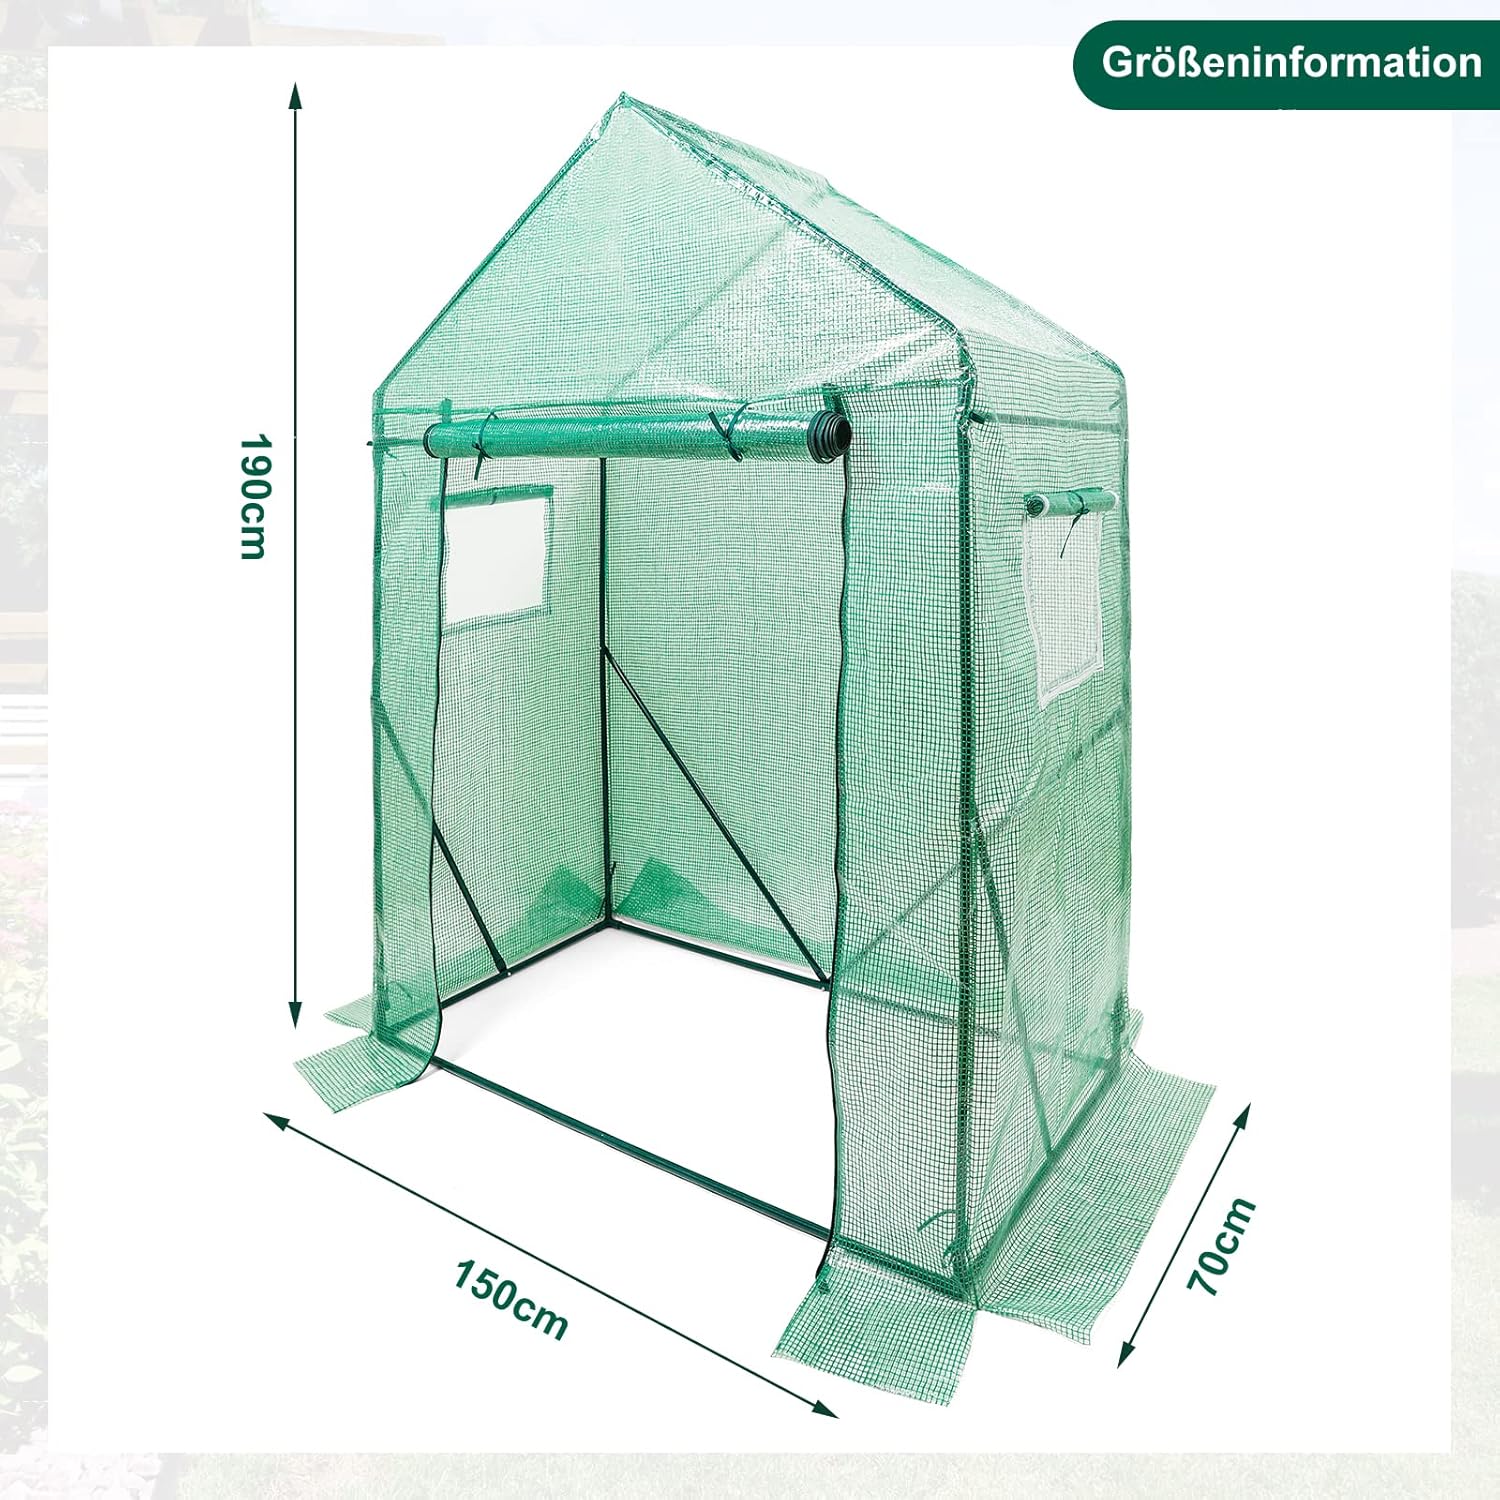
Beeld 8.1: Dimensionaal oorview of the greenhouse, indicating its height of 190 cm, width of 150 cm, and depth of 70 cm.
9. Waarborg en Ondersteuning
For warranty information or technical support, please refer to the retailer where you purchased this product or visit the official Yorbay webwebwerf. Bewaar u aankoopbewys as bewys van aankoop.
If you encounter any issues not covered in the troubleshooting section, please contact our customer service for assistance.