
1. Inleiding
This manual provides detailed instructions for the assembly, operation, and maintenance of your MUSETEX G05MN6-HW ATX Mid-Tower PC Gaming Case. Designed for optimal airflow and aesthetic appeal, this case features pre-installed ARGB fans, tempered glass panels, and efficient cable management solutions. Please read this manual thoroughly before beginning installation to ensure proper setup and safe operation.
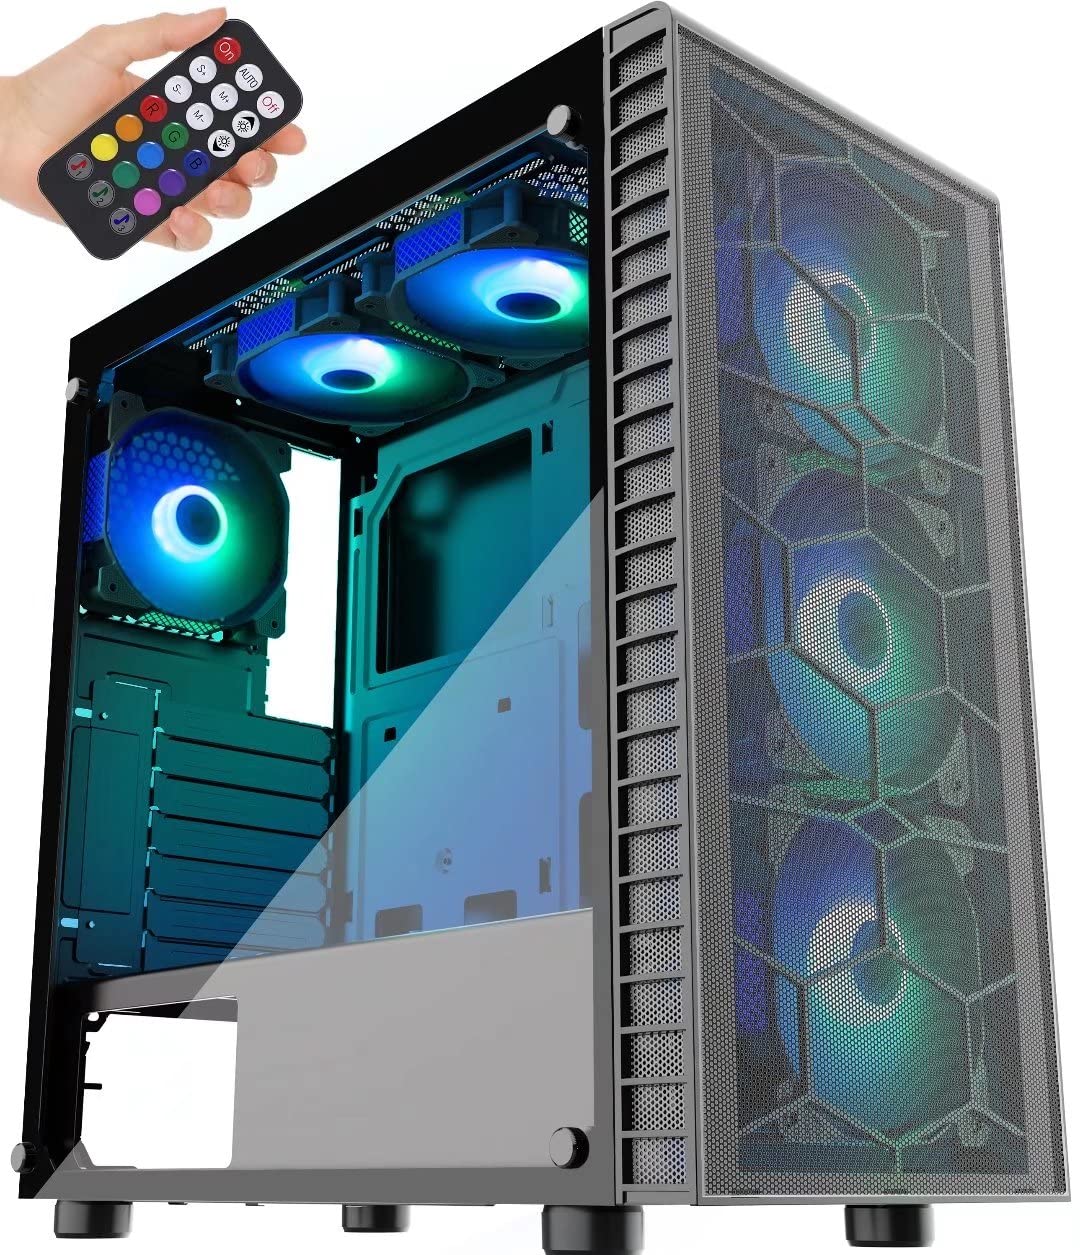
2. Sleutel kenmerke
- Outstanding Airflow: Equipped with a large front panel metal mesh and 6 pre-installed 120mm ARGB fans to ensure efficient cooling and lighting.
- Multiple ARGB Modes: Features button control with 19 lighting modes. Supports motherboard control via a 5V 3-PIN header for expanded ARGB fan modes. Note: 12V 4-PIN motherboards are not compatible with motherboard control mode; use button control only.
- Ruim binnekant: Two 4mm-thick tempered glass full-view side panels. Supports ATX, Micro ATX, and ITX motherboards. Accommodates 120mm water cooling, GPUs up to 380mm, CPU air coolers up to 160mm, and PSUs up to 245mm (with removable hard disk holders).
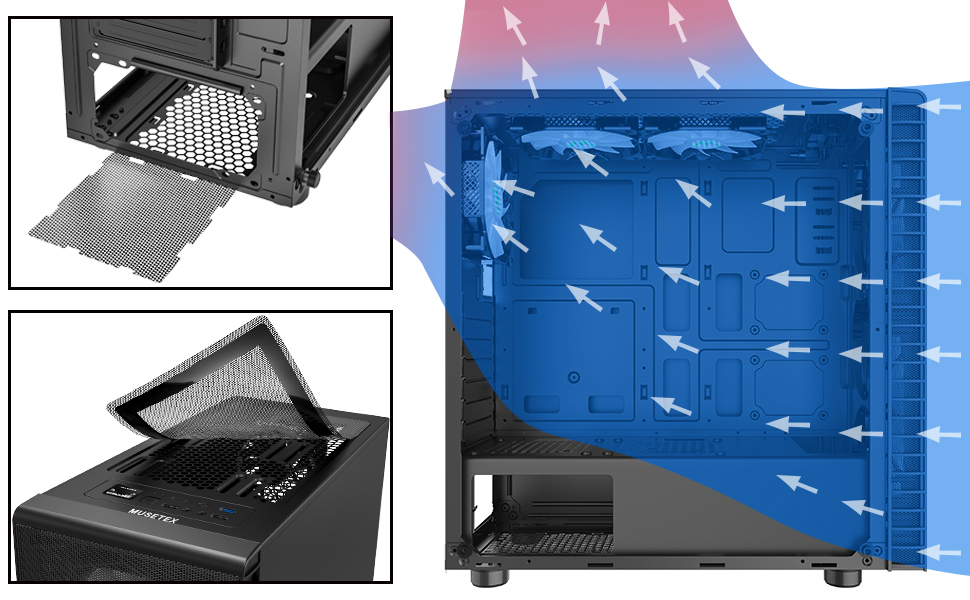
- Dust-proof Design: Includes two dust filters; a top magnetic strip dust filter and a bottom PSU dust filter for easy installation and cleaning.
- Convenient Top I/O Panel: Features 1 x USB 3.0 Port, 2 x USB 2.0 Ports, 1 x HD Audio jack, LED Button, and Power/Reset buttons. The USB cable is shielded for interference-free data transmission.

3. Pakketinhoud
Please verify that all components are present and undamaged upon opening the package. If any items are missing or damaged, contact MUSETEX customer support.
- MUSETEX G05MN6-HW ATX Mid-Tower PC Gaming Case
- 6 x 120mm ARGB Fans (pre-installed)
- 2 x Tempered Glass Side Panels (pre-installed)
- 1 x Remote Control for ARGB Lighting
- 1 x Accessory Box (containing screws, cable ties, and other small parts)
- 1 x Gebruikershandleiding (hierdie dokument)

4. Opstelling en Installasie
Before starting, ensure you have a clean, static-free workspace. Refer to your component manuals for specific installation instructions.
4.1 Voorbereiding van die Saak
- Carefully remove the tempered glass side panels by unscrewing the thumb screws. Place them on a soft, flat surface to prevent scratches or damage.
- Identify the accessory box inside the case, which contains all necessary screws and mounting hardware.
4.2 Moederbord installasie
- Installeer die I/O-skerm (indien dit nie vooraf aan jou moederbord geheg is nie) in die agterste opening van die kas.
- Align your ATX, Micro ATX, or ITX motherboard with the standoffs inside the case. Ensure all standoffs match the screw holes on your motherboard.
- Bevestig die moederbord met die toepaslike skroewe uit die bykomstigheidsboks.
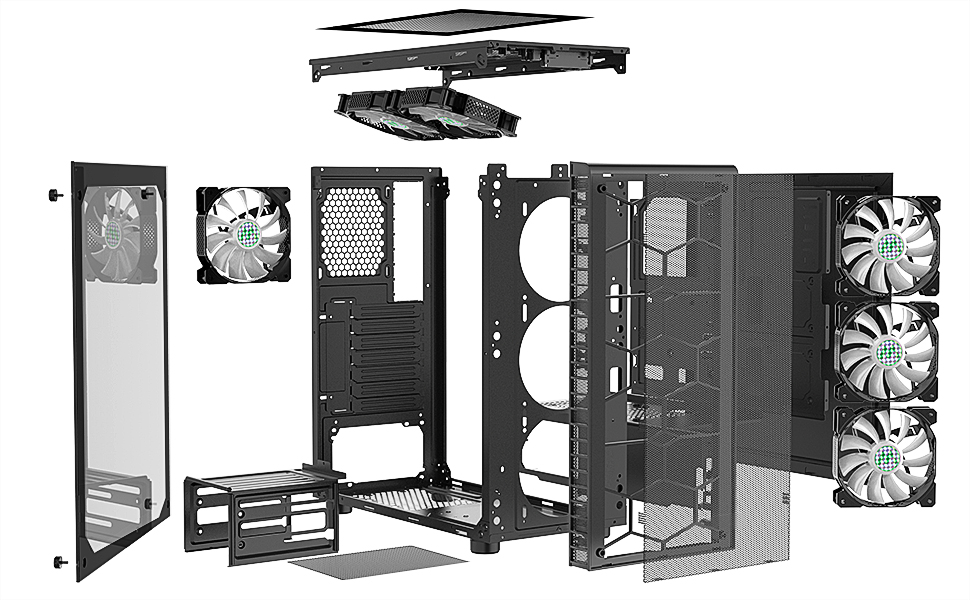
4.3 Installasie van kragtoevoereenheid (PSU).
- Skuif die PSU in sy aangewese kompartement aan die onderkant van die agterkant van die kas.
- Bevestig die PSU met skroewe van die agterkant van die kas.
- Route PSU cables through the cable management cutouts to the motherboard and other components.
4.4 Storage Drive Installation (SSDs/HDDs)
- 2.5" SSD's: Mount SSDs to the dedicated SSD trays or mounting points as shown in Figure 4.
- 3.5" HDD's: Install HDDs into the removable hard disk holders located in the PSU shroud area. These holders can be removed to accommodate longer PSUs.
4.5 Grafiese Kaart (GPU) Installasie
- Verwyder die nodige uitbreidingsgleufdeksels aan die agterkant van die kas.
- Insert your GPU into the appropriate PCIe slot on the motherboard.
- Secure the GPU with screws. The case supports GPUs up to 380mm in length.
4.6 Connecting Front Panel I/O and ARGB Fans
- Connect the front panel cables (Power SW, Reset SW, HDD LED, Power LED) to the corresponding pins on your motherboard. Refer to your motherboard manual for pin layout.
- Verbind die USB 3.0-kabel met die USB 3.0-kopstuk op u moederbord.
- Connect the USB 2.0 cables to the USB 2.0 headers on your motherboard.
- Connect the HD Audio cable to the audio header on your motherboard.
- The pre-installed ARGB fans are connected to a central controller. For motherboard ARGB control, connect the controller's 5V 3-PIN ARGB cable to your motherboard's 5V 3-PIN ARGB header. Do not connect to a 12V 4-PIN RGB header, as this can damage the fans.


4.7 Kabelbestuur
Gebruik die kabelgeleidingsuitsparings en vasmaakpunte agter die moederbordbak om kabels te organiseer. Dit verbeter lugvloei en estetika.

5. Operasie
5.1 Aanskakel
After all components are securely installed and cables connected, replace the side panels. Connect your power cable to the PSU and press the power button on the top I/O panel to start your system.
5.2 ARGB Fan Control
- Knoppiebeheer: Use the dedicated LED button on the top I/O panel to cycle through 19 pre-set ARGB lighting modes.
- Motherboard Control: If the ARGB controller is connected to a 5V 3-PIN ARGB header on your motherboard, you can use your motherboard's RGB software (e.g., ASUS Aura Sync, MSI Mystic Light Sync, Gigabyte RGB Fusion) to customize fan lighting. This offers a wider range of lighting effects.
- Afstandbeheer: The included remote control provides additional options for changing lighting modes, colors, and fan speed.
6. Onderhoud
Gereelde onderhoud help om optimale werkverrigting en lang lewensduur van jou rekenaarkomponente te verseker.
- Skoonmaak van stoffilter: The case is equipped with a top magnetic dust filter and a bottom PSU dust filter. Regularly remove and clean these filters to prevent dust buildup inside the case, which can hinder airflow and component cooling.
- Binne skoonmaak: Periodically open the side panels and use compressed air to remove dust from internal components and fans. Ensure the system is powered off and unplugged before cleaning.
- Versorging van gehard glas: Clean tempered glass panels with a soft, lint-free cloth and a mild glass cleaner. Avoid abrasive materials that could scratch the surface.
7. Probleemoplossing
Hierdie afdeling spreek algemene probleme aan wat jy mag teëkom.
- Q: Fans are not lighting up or spinning.
- A: Check all fan power connections to the ARGB controller and ensure the controller is receiving power from the PSU. If using motherboard control, verify the 5V 3-PIN ARGB cable is correctly connected and your motherboard's RGB software is configured.
- Q: Front panel USB ports are not working.
- A: Ensure the USB 3.0 and USB 2.0 cables from the front panel are securely connected to the correct headers on your motherboard.
- Q: Audio jacks on the front panel are not working.
- A: Verify that the HD Audio cable from the front panel is correctly connected to the audio header on your motherboard.
- Q: System does not power on.
- A: Check that the PSU is switched on and properly connected to the wall outlet. Ensure the power button cable from the front panel is correctly connected to the motherboard's power switch pins. Verify all internal power connections (24-pin ATX, CPU, GPU, etc.) are secure.
- Q: ARGB lighting is not syncing with my motherboard.
- A: Confirm that your motherboard has a 5V 3-PIN ARGB header and that the controller is connected to it. This case is not compatible with 12V 4-PIN RGB headers for motherboard control. If connected correctly, ensure your motherboard's RGB software is installed and updated.
8. Spesifikasies
| Kenmerk | Detail |
|---|---|
| Model Naam | G05MN6-HW |
| Soort saak | Mid Tower |
| Moederbordversoenbaarheid | ATX, Micro ATX, ITX |
| Afmetings (LxBxH) | 17.7 x 17.6 x 8.3 duim (449.58 x 447.04 x 210.82 mm) |
| Item gewig | 16.02 pond (7.27 kg) |
| Materiaal | Acrylonitrile Butadiene Styrene (ABS), Metal, Tempered Glass |
| Vooraf geïnstalleerde waaiers | 6 x 120 mm ARGB-waaiers |
| Verkoelingsmetode | Lug |
| Maksimum GPU-lengte | 380 mm |
| Max CPU Cooler Hoogte | 160 mm |
| Maksimum PSU-lengte | 245mm (with HDD cage removed) |
| Uitbreidingsgleuwe | 7 |
| Voorste I / O-poorte | 1 x USB 3.0, 2 x USB 2.0, 1 x HD Audio, LED Button, Power/Reset |

9. Waarborg en ondersteuning
MUSETEX products are designed and manufactured to the highest quality standards. For specific warranty information regarding your G05MN6-HW PC case, please refer to the warranty card included with your purchase or visit the official MUSETEX webwebwerf.
If you encounter any issues or have questions not covered in this manual, please contact MUSETEX customer support through their official website or the retailer where you purchased the product. Please have your model number (G05MN6-HW) and proof of purchase ready when contacting support.
Aanlyn hulpbronne: For additional support, FAQs, and driver downloads (if applicable), please visit the MUSETEX official webwebwerf: MUSETEX Store on Amazon