1. Inleiding
This manual provides detailed instructions for the installation, operation, and maintenance of the Aideepen PWM DC Motor Speed Controller, Model BLM-30A. This device is designed to control the speed of DC motors by adjusting the Pulse Width Modulation (PWM) signal. It features a wide input voltage range, high current capacity, and a clear LED display for precise speed monitoring.
Sleutel kenmerke:
- Duursame konstruksie: Manufactured from robust materials for enhanced durability and wear resistance.
- Maklike installasie: Equipped with screw terminals for convenient and quick wiring.
- LED digitale skerm: Toon die motorspoed as 'n persentasietage of the maximum speed, allowing for easy data reading.
- Wye Voltage reeks: Supports DC input voltages from 6V to 60V, compatible with 12V, 24V, 36V, and 48V power supplies.
- High Output Current: Provides an adjustable output current from 0A to 30A.
- Stabiele prestasie: Features an instant start/stop switch and a rotary potentiometer for reliable and precise speed control.
2. Veiligheidsinligting
Please read and understand all safety instructions before installing or operating this device. Failure to follow these instructions may result in electric shock, fire, or serious injury.
- Ensure the power supply is disconnected before making any wiring connections.
- Verifieer dat die invoer voltage and current ratings match the specifications of the controller and your motor.
- Do not exceed the maximum rated current of 30A.
- Install the controller in a dry, well-ventilated area, away from flammable materials.
- Avoid short circuits during wiring and operation.
- This device is intended for DC motors only. Do not connect to AC power.
3. Produk verbyview
The Aideepen PWM DC Motor Speed Controller features a compact design with an intuitive interface.

Figuur 3.1: Voorkant view of the speed controller, highlighting the LED display, SET button, PWM OUT indicator, and the multi-function rotary knob for speed adjustment and start/stop control.

Figure 3.2: Close-up of the LED digital display, which indicates the motor speed as a percentage.

Figure 3.3: Close-up of the rotary knob, used for adjusting speed and initiating motor start/stop functions.
4. Spesifikasies
| Parameter | Waarde |
|---|---|
| Modelnommer | BLM-30A (A7XI0023) |
| Invoer Voltage Reeks | GS 6V - 60V |
| Uitsetstroom | 0A - 30A (Continuous current: 20A) |
| Spoedreeks | 0% - 100% |
| Tipe beheer | Beheer stroom |
| Beheer frekwensie | 15 kHz |
| Aanpassingsmetode | Potentiometer (Rotary Knob) |
| Tipe bedrading | Skroefterminal |
| Produkafmetings (L x B x H) | 9 x 6 x 3.5 cm (ongeveer 3.54 x 2.36 x 1.38 duim) |
| Gewig | 100 gram |
5. Opstelling en installering
Follow these steps to correctly install and wire your motor speed controller.
Bedradingsinstruksies:

Figure 5.1: Wiring diagram illustrating the connection points for power input and motor output.
- Kragtoevoer: Connect your DC power supply to the terminals labeled 'Input positive 6-60V' (positive) and 'negative power supply' (negative). Ensure the voltage is within the 6V-60V DC range.
- Motor uitset: Connect your DC motor to the terminals labeled 'motor positive' (positive) and 'motor negative' (negative).
- Veilige verbindings: Tighten all screw terminals to ensure a secure and stable connection. Loose connections can cause overheating or malfunction.
Always double-check your wiring before applying power to prevent damage to the controller or motor.
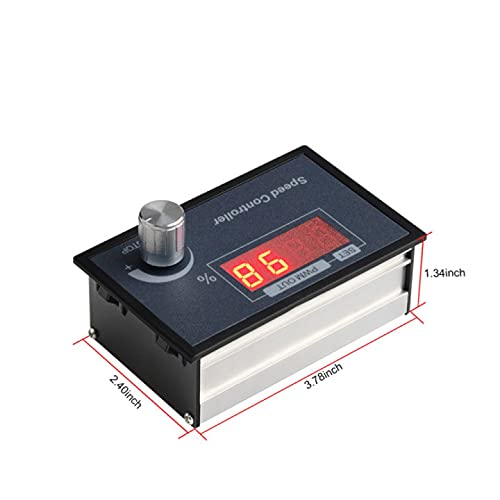
Figure 5.2: Detail of the screw terminals for power and motor connections.
6. Bedryfsinstruksies
Once the controller is correctly wired and powered on, you can begin operating your DC motor.
- Krag aan: Apply power to the controller. The LED display will illuminate, showing the current speed percentage.
- Begin/Stop-funksie: The rotary knob also functions as a start/stop switch. A short press of the knob will start or stop the motor.
- Spoedverstelling: Rotate the knob clockwise to increase the motor speed and counter-clockwise to decrease it. The LED display will show the speed as a percentage (0-100%).
- Setting Mode (Advanced): A long press of the rotary knob will enter the setting mode for advanced parameters. Refer to specific product documentation or manufacturer support for details on advanced settings if needed.

Figure 6.1: Controller interface with labels for function, parameter value, and rotary knob operation.
7. Onderhoud
To ensure the longevity and optimal performance of your Aideepen PWM DC Motor Speed Controller, follow these maintenance guidelines:
- Skoonmaak: Periodically clean the exterior of the controller with a soft, dry cloth. Do not use liquid cleaners or solvents.
- Inspeksie: Regularly inspect the wiring connections for any signs of looseness, corrosion, or damage. Tighten connections as needed.
- Ventilasie: Maak seker dat die ventilasie-openinge nie geblokkeer word om oorverhitting te voorkom nie.
- Berging: If storing the controller for an extended period, keep it in a dry, dust-free environment.
8. Probleemoplossing
If you encounter issues with your motor speed controller, refer to the following troubleshooting guide:
| Probleem | Moontlike oorsaak | Oplossing |
|---|---|---|
| Motor begin nie | No power supply; Incorrect wiring; Motor in stop mode; Faulty motor. | Check power connections and supply voltage; Verify wiring according to Figure 5.1; Short press the rotary knob to start the motor; Test motor independently. |
| Motor speed cannot be adjusted | Rotary knob malfunction; Controller fault. | Ensure the knob rotates freely; If issue persists, contact support. |
| LED display is off or flickering | No power; Low input voltage; Loose connection. | Check power supply; Ensure input voltage is within 6-60V; Inspect and tighten all wiring connections. |
| Beheerder oorverhit | Overload; Poor ventilation; Short circuit. | Reduce motor load; Ensure adequate airflow around the controller; Check for short circuits in wiring. |
9. Waarborg en Ondersteuning
Information regarding specific warranty terms and conditions for the Aideepen PWM DC Motor Speed Controller is not available in this document. For warranty claims, technical support, or further assistance, please contact your retailer or the manufacturer directly through their official support channels.
Please have your product model (BLM-30A) and purchase details ready when contacting support.