1. Belangrike veiligheidsinstruksies
Read and understand all safety instructions before operating the generator. Failure to follow these instructions can result in serious injury or death.
- Koolstofmonoksiedgevaar: Generators produce carbon monoxide, an odorless, colorless, poisonous gas. Operate the generator outdoors in a well-ventilated area, far from windows, doors, and vents. Never operate indoors or in partially enclosed spaces.
- Elektriese skokgevaar: Do not operate the generator in wet conditions. Ensure all electrical connections are dry and properly grounded. Use only approved extension cords that are rated for outdoor use and the generator's power output.
- Brandgevaar: Gasoline is highly flammable. Refuel in a well-ventilated area with the engine off and cool. Do not smoke or allow open flames near the generator or fuel. Store gasoline in an approved container in a safe location.
- Warm oppervlaktes: The generator engine and muffler become very hot during operation and remain hot for a period after shutdown. Avoid contact with hot surfaces to prevent burns.
- Kinders en Troeteldiere: Hou kinders en troeteldiere weg van die kragopwekker, veral tydens werking.
2. Komponente verbyview
Familiarize yourself with the main components of your Husky HKG3000 portable gasoline generator.
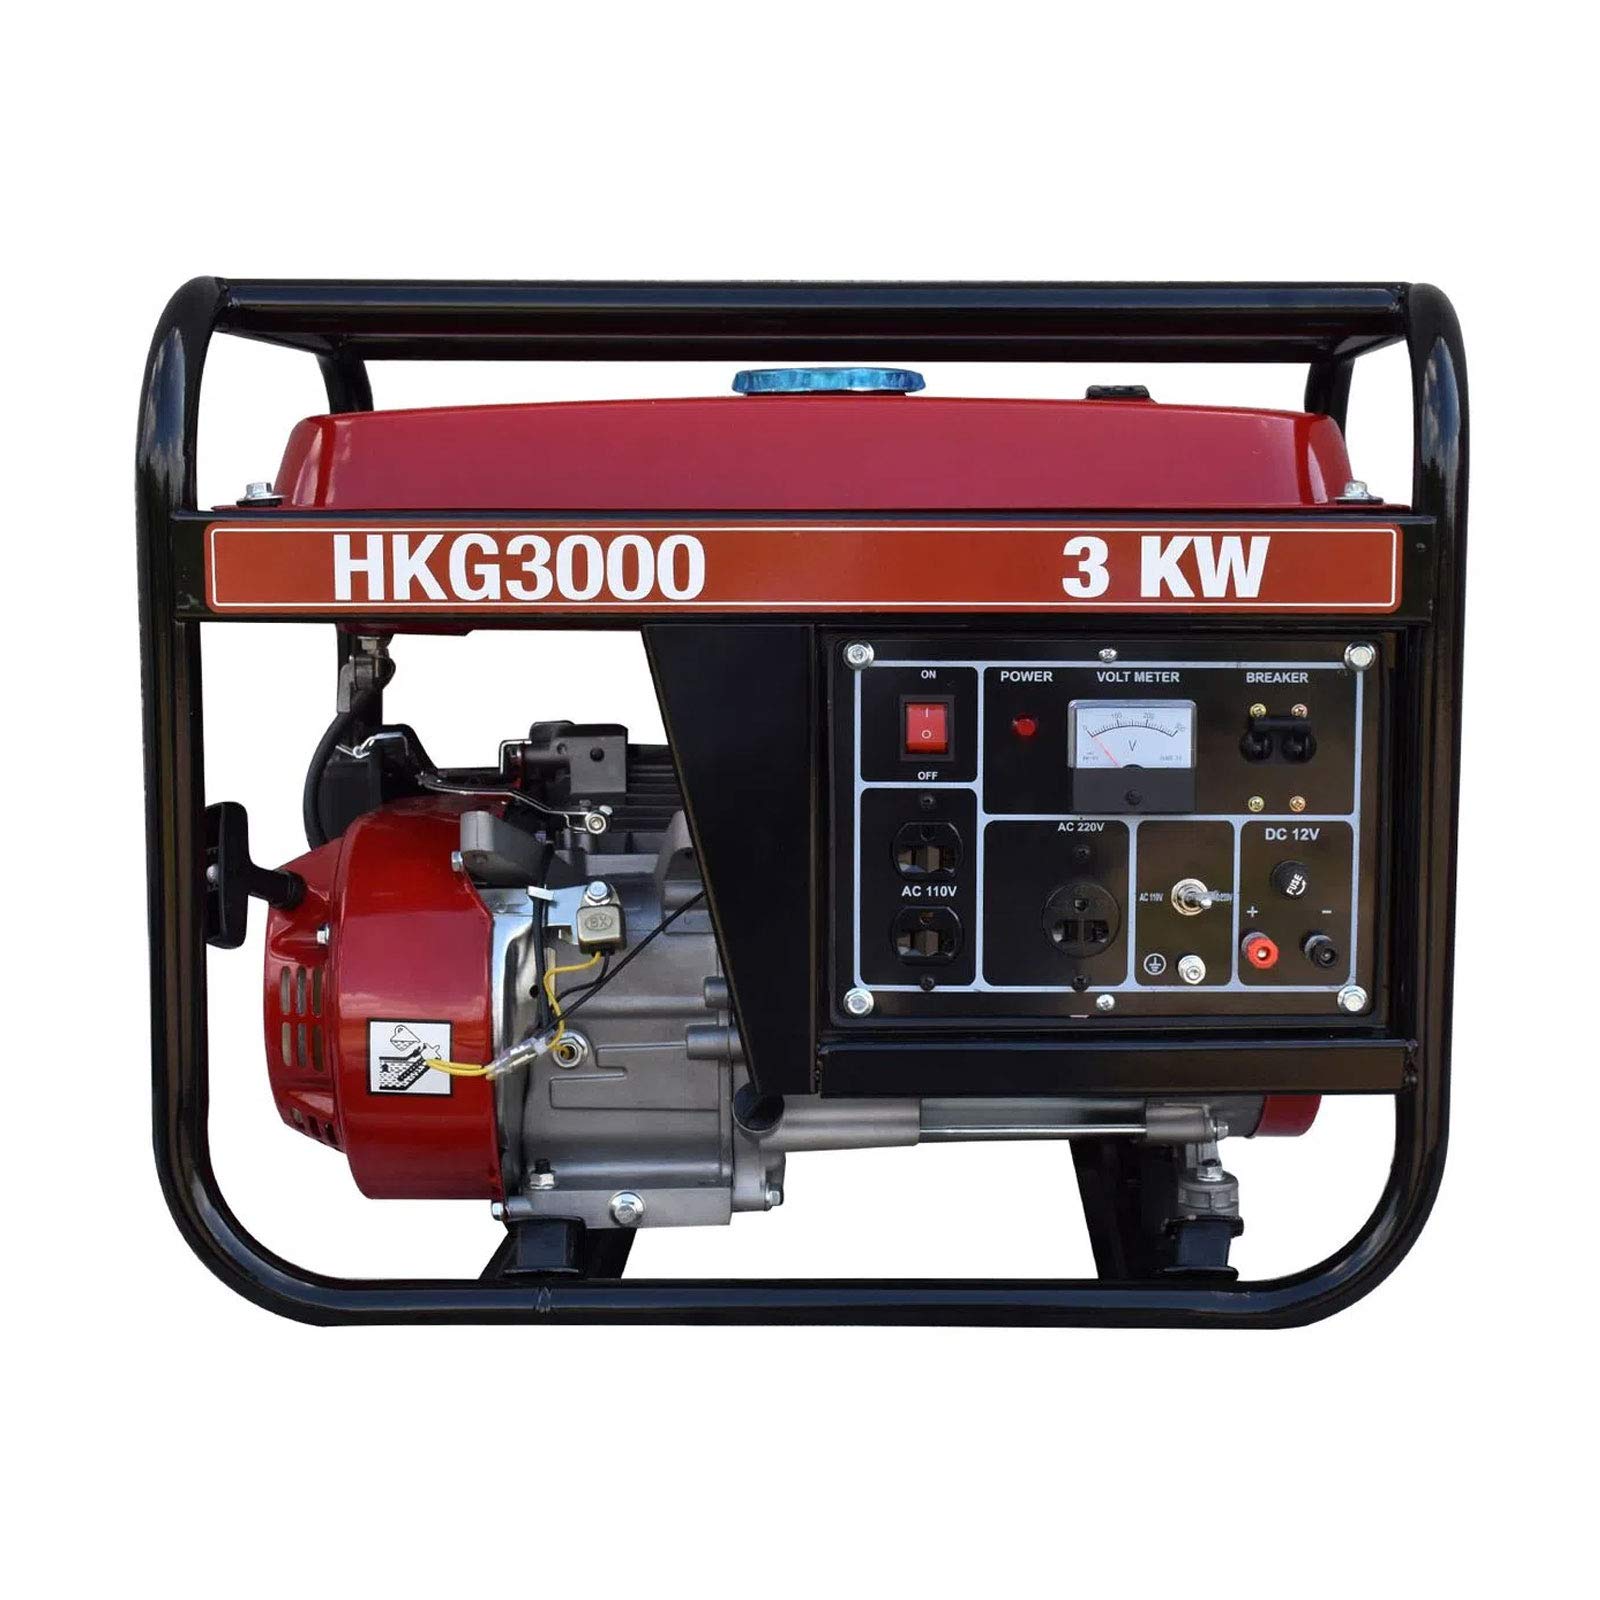
Figuur 2.1: Algehele view of the Husky HKG3000 Portable Gasoline Generator, showcasing sy robuuste raam en beheerpaneel.

Figuur 2.2: Voorkant view of the Husky HKG3000 Portable Gasoline Generator, highlighting the control panel with power outlets, voltmeter, and circuit breakers.

Figuur 2.3: Kant view of the Husky HKG3000 Portable Gasoline Generator, showing the 4-stroke engine, air filter housing, and fuel valve.

Figure 2.4: Included accessories for the Husky HKG3000 Portable Gasoline Generator, featuring the user manual, power plugs, and a spark plug wrench.
Sleutelkomponente:
- Brandstoftenk: Stores gasoline.
- Brandstofdop: Seals the fuel tank.
- Brandstofklep: Beheer brandstofvloei na die enjin.
- Choke hefboom: Gebruik vir die aanskakel van 'n koue enjin.
- Recoil Starter: Manual pull-cord for starting the engine.
- Motor skakelaar: Turns the engine ignition ON/OFF.
- Lugfilter: Beskerm die enjin teen stof en puin.
- Olievuldop/Peilstok: Vir die byvoeging en kontrolering van enjinolie.
- AC Outlets (110V/220V): For connecting electrical devices.
- GS 12V-uitlaat: Vir die laai van 12V-batterye.
- Voltmeter: Vertoon uitset voltage.
- Stroom breker: Protect the generator and connected devices from overload.
- Demper: Verminder enjingeraas en rig uitlaatgasse.
3. Opstelling
Before first use, perform the following setup steps:
3.1 Uitpak
- Carefully remove the generator from its packaging.
- Inspect for any shipping damage. Contact your dealer if damage is found.
- Ensure all included accessories (power plugs, spark plug wrench, manual) are present.
3.2 Byvoeging van enjinolie
The generator is shipped without engine oil. Operating without oil will cause severe engine damage.
- Plaas die kragopwekker op 'n gelyk oppervlak.
- Unscrew the oil fill cap/dipstick.
- Slowly add the recommended engine oil (e.g., SAE 10W-30) to the crankcase until it reaches the upper mark on the dipstick. Do not overfill.
- Plaas die olievuldop/peilstok stewig terug.
3.3 Brandstof byvoeg
Gebruik slegs vars, loodvrye petrol met 'n oktaangradering van 87 of hoër.
- Ensure the generator engine is off and cool.
- Maak die brandstofdop oop.
- Carefully pour gasoline into the fuel tank, avoiding spills. Do not fill above the red indicator or the bottom of the filler neck.
- Maak die brandstofdop stewig toe. Vee enige gemorste brandstof onmiddellik op.
3.4 Aarding van die kragopwekker
Behoorlike aarding is noodsaaklik om elektriese skok te voorkom.
- Connect a heavy-gauge copper wire from the generator's grounding terminal to an approved ground source, such as a ground rod driven into the earth.
- Consult a qualified electrician for local grounding requirements.
4. Bedryfsinstruksies
4.1 Voorbeginkontroles
- Gaan enjin olievlak na.
- Gaan brandstofvlak na.
- Ensure all electrical loads are disconnected from the generator.
- Verify the generator is on a level surface and in a well-ventilated outdoor area.
4.2 Starting the Engine (Manual Start)
- Draai die brandstofklep na die ON posisie.
- Beweeg die smoorhendel na die GESLUIT (start) position if the engine is cold. If the engine is warm, set the choke to the OOP posisie.
- Draai die enjinskakelaar na die ON posisie.
- Firmly grasp the recoil starter handle and pull it slowly until resistance is felt, then pull quickly and smoothly.
- Once the engine starts, slowly move the choke lever to the OOP (run) position.
- Laat die enjin vir 'n paar minute warm word voordat elektriese laste gekoppel word.
4.3 Verbinding van elektriese laste
- Maak seker dat die kragopwekker glad loop.
- Koppel jou elektriese toestelle een op 'n slag aan, begin met die hoogste watt.tage toestel.
- Moenie die kragopwekker se gegradeerde watt oorskry nietage (2.8 kW nominal, 3 kW maximum). Overloading will trip the circuit breakers.
4.4 Stop die enjin
- Ontkoppel alle elektriese ladings van die kragopwekker.
- Draai die enjinskakelaar na die AF posisie.
- Draai die brandstofklep na die AF posisie.
5. Onderhoud
Gereelde onderhoud verseker optimale werkverrigting en verleng die lewensduur van u kragopwekker. Voer altyd onderhoud uit met die enjin afgeskakel en afgekoel.
5.1 Enjin Olie Vervanging
- Change the engine oil after the first 20 hours of operation, then every 50-100 hours or annually.
- Drain old oil while the engine is warm. Refill with recommended oil type and quantity.
5.2 Skoonmaak van die lugfilter
- Inspect the air filter every 50 hours or more frequently in dusty conditions.
- Maak die skuimelement skoon met warm seepwater, spoel af en laat dit heeltemal droog word. Smeer die skuimelement liggies met olie voor jy dit weer installeer.
5.3 Vonkprop-inspeksie
- Inspect the spark plug every 100 hours or annually.
- Clean carbon deposits and adjust the gap if necessary. Replace if electrodes are worn or insulation is cracked.
5.4 Brandstofstelselonderhoud
- If storing the generator for more than 30 days, drain the fuel tank and carburetor, or use a fuel stabilizer.
- Regularly check fuel lines for cracks or leaks.
5.5 Berging
- Maak die buitekant van die kragopwekker skoon.
- Store in a clean, dry, well-ventilated area, away from direct sunlight and extreme temperatures.
- Bedek die kragopwekker om dit teen stof te beskerm.
6. Probleemoplossing
Hierdie afdeling bied oplossings vir algemene operasionele probleme.
6.1 Enjin sal nie begin nie
- Geen brandstof: Check fuel level and add fresh gasoline if needed.
- Fuel Valve OFF: Draai brandstofklep na ON.
- Enjinskakelaar AF: Turn engine switch to ON.
- Improper Choke Position: Adjust choke lever as per starting instructions (Section 4.2).
- Lae olievlak: Check oil level and add oil if necessary. The generator may have a low-oil shutdown feature.
- Fouled Spark Plug: Inspekteer en maak die vonkprop skoon of vervang dit.
6.2 Geen kraglewering nie
- Stroombreker afgeskakel: Reset the AC or DC circuit breaker on the control panel. Reduce load if it trips again.
- Oorlading: Disconnect some electrical devices. Do not exceed the generator's rated capacity.
- Faulty Connection: Check all power cords and connections.
6.3 Enjin loop swak
- Ou brandstof: Dreineer ou brandstof en vul weer met vars petrol.
- Verstopte lugfilter: Maak die lugfilter skoon of vervang dit.
- Fouled Spark Plug: Inspekteer en maak die vonkprop skoon of vervang dit.
7. Spesifikasies
| Spesifikasie | Waarde |
|---|---|
| Handelsmerk | Husky |
| Model | HKG3000 |
| Enjin tipe | 4-slag |
| Enjin perdekrag | 7.5 pk |
| Brandstof tipe | Petrol |
| Begin Stelsel | Manual (Recoil) |
| Maksimum kraguitset | 3 kW (3000 Watt) |
| Gegradeerde kraglewering | 2.8 kW (2800 Watt) |
| Frekwensie | 60 Hz |
| Voltage | 110V / 220V |
| Aanbevole gebruik | Kommersieel |
| Item gewig | 70 kilogram |
| Draagbaarheid | Draagbaar |
8. Waarborg en Ondersteuning
This Husky generator is covered by a manufacturer's warranty. Please refer to the warranty card included with your product for specific terms and conditions.
For technical assistance, parts, or warranty claims, please contact Husky customer support through their official webwebwerf of die kontakinligting wat in u produkdokumentasie verskaf word.
Always provide your model number (HKG3000) and serial number when contacting support to ensure efficient service.