1. Inleiding
This manual provides detailed instructions for the proper installation, operation, and maintenance of your Gravity G3-12D4 12-inch car audio subwoofer and Gravity WZ3000.1D Class D amplifier, along with the included 4-gauge amplifier installation kit. Please read this manual thoroughly before beginning installation to ensure correct setup and optimal performance.
2. Veiligheidsinligting
Neem altyd die volgende veiligheidsmaatreëls in ag tydens installasie en werking:
- Disconnect the vehicle's negative battery terminal before any wiring to prevent electrical shorts.
- Maak seker dat alle bedrading behoorlik gerig en vasgemaak is om skade deur skerp kante of bewegende dele te voorkom.
- Use appropriate gauge wiring as specified in this manual to handle current loads and prevent overheating.
- Install fuses at the battery and near the amplifier as instructed to protect against power surges.
- Avoid mounting components in locations that obstruct vehicle operation or safety features.
- Do not expose components to excessive moisture or extreme temperatures.
- Soek professionele hulp as u onseker is oor enige installasiestappe.
3. Pakketinhoud
Verifieer dat alle items in jou pakket teenwoordig is:
- Gravity G3-12D4 12-inch Car Audio Subwoofer
- Gravity WZ3000.1D Class D Amplewendiger
- 4 Gauge Amplifier Installation Kit, including:
- 17 ft. 4 Gauge Power Cable
- 3 ft. 4 Gauge Ground Cable
- Inline AGU Fuse Holder with 80A + 100A Fuses
- 17 ft. Double Shielded RCA Cable
- 17 ft. 18 Gauge Turn-On Cable
- 20 ft. 16 Gauge Speaker Wire
- All necessary accessories and terminals
- Remote Bass Control Knob
4. Produkkenmerke
Gravity G3-12D4 Subwoofer
- Dual 4 Ohm Voice Coil Configuration
- Competition Grade Pressed Paper Cone
- Hoë Rol Skuim Omringing
- Advanced Air Flow Cooling System
Gravity WZ3000.1D Amplewendiger
- Class D MOSFET Power Amplewendiger
- Stable at 1 Ohm, 2 Ohm, and 4 Ohm loads
- High and Low Level Inputs
- Variable Low Pass Crossover (LPF)
- Veranderlike basversterking
- Subsoniese filter
4 Gauge Ampverligter Installasie Kit
- High Quality Thick 4 Gauge Power and Ground Cables
- Inline AGU Fuse Holder with multiple fuses for protection
- True Sound Double Shielded RCA Cable for clear signal transmission
- Complete set of accessories and terminals for a professional installation
5. Opstelling en installering
Proper installation is crucial for performance and safety. If you are not confident in your ability to install this system, please consult a professional installer.
5.1. Montering van die subwoofer
The G3-12D4 subwoofer requires a suitable enclosure (not included) for optimal performance. Ensure the enclosure is properly sealed and sized according to subwoofer specifications. Mount the subwoofer securely to the enclosure using appropriate screws, ensuring a tight seal around the mounting flange.

Beeld: Voorkant view of the Gravity G3-12D4 12-inch subwoofer, showing the black cone with a red Gravity logo and red stitching on the foam surround.

Beeld: Agter view of the Gravity G3-12D4 12-inch subwoofer, displaying the magnet structure and speaker terminals.
5.2. Montering van die Amplewendiger
Select a mounting location for the WZ3000.1D amplifier that is dry, well-ventilated, and protected from physical damage. Common locations include under a seat, in the trunk, or mounted to a custom amplifier rack. Ensure there is sufficient airflow around the amplifier for cooling. Secure the amplifier firmly using screws.

Beeld: Sykant view of the Gravity WZ3000.1D amplifier, showing the heat sink fins for cooling.
5.3. Bedrading van die stelsel
Follow these steps carefully for wiring the amplifier and subwoofer:
- Power Cable (Red 4 Gauge): Run the 17 ft. 4 gauge power cable from the vehicle's positive battery terminal to the amplifier location. Install the inline AGU fuse holder within 18 inches (45 cm) of the battery. Do not insert the fuse until all wiring is complete.
- Ground Cable (Black 4 Gauge): Connect the 3 ft. 4 gauge ground cable from the amplifier's ground terminal to a clean, unpainted metal surface on the vehicle chassis. Ensure a solid, low-resistance connection. The ground point should be as short as possible.
- Remote Turn-On Cable (Blue 18 Gauge): Connect the 17 ft. 18 gauge turn-on cable from the amplifier's REM terminal to the remote turn-on output of your head unit. This cable signals the ampverligter om aan en af te skakel met die hoofeenheid.
- RCA Signal Cables: Connect the 17 ft. double shielded RCA cable from the RCA outputs of your head unit to the RCA INPUTs on the WZ3000.1D amplewendiger.
- Speaker Wiring (16 Gauge): Connect the 20 ft. 16 gauge speaker wire from the amplifier's speaker output terminals to the G3-12D4 subwoofer. Ensure correct polarity (+ to + and - to -). For a single G3-12D4 (dual 4-ohm voice coils), you can wire the voice coils in parallel for a 2-ohm load or in series for an 8-ohm load. The WZ3000.1D amplifier is stable down to 1 ohm, so a 2-ohm parallel configuration is recommended for maximum power output.
- Afgeleë basbeheer: Connect the remote bass control knob to the dedicated REMOTE port on the amplifier. Mount the knob in an accessible location for easy adjustment.
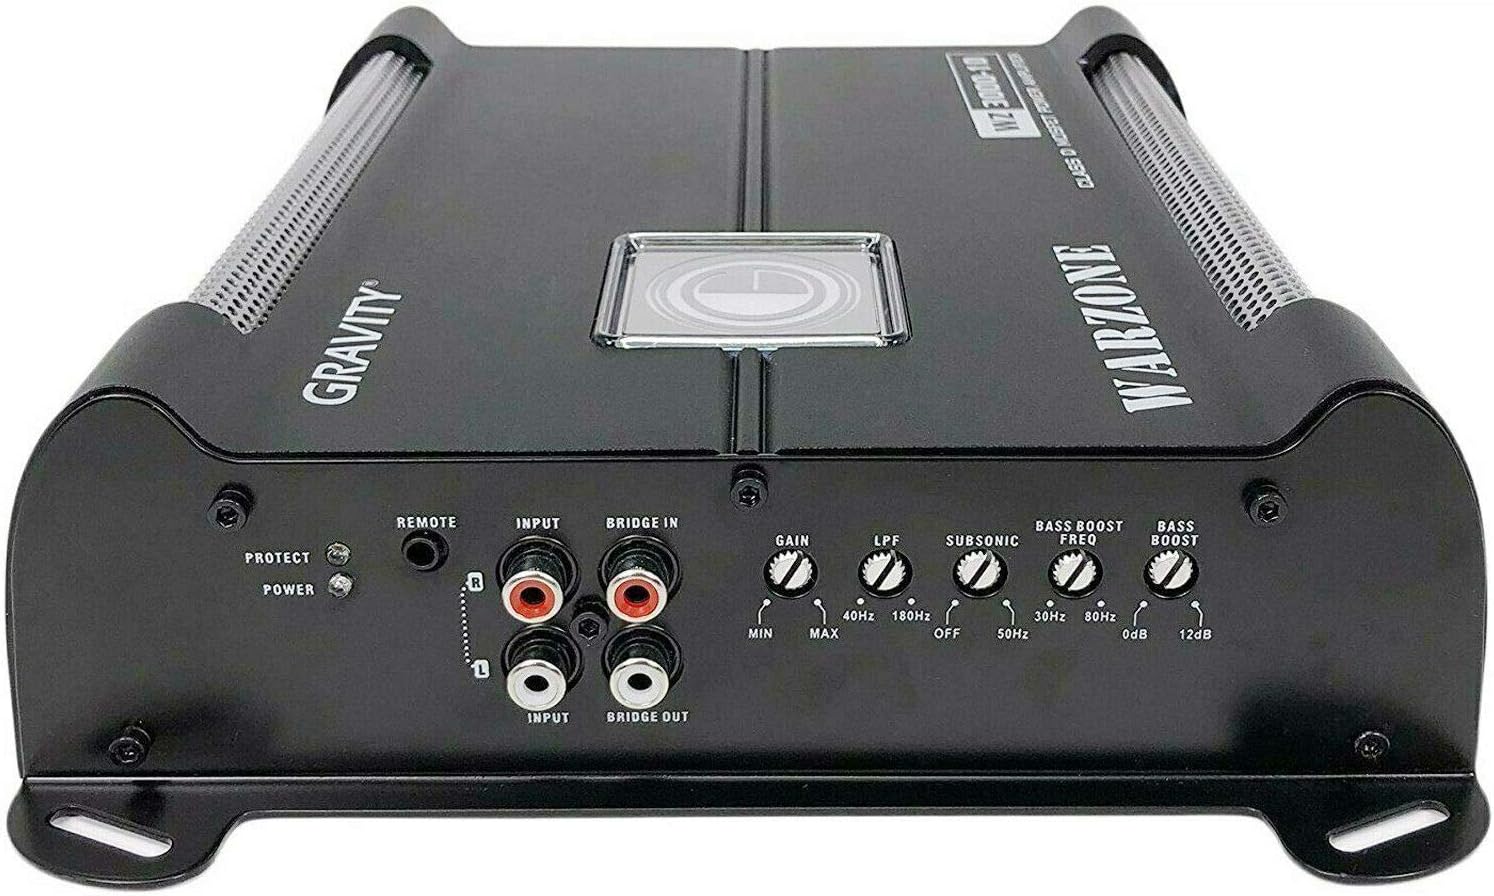
Image: Front panel of the Gravity WZ3000.1D amplifier, displaying RCA inputs, remote control port, and various adjustment knobs.

Image: Rear panel of the Gravity WZ3000.1D amplifier, showing the power input terminals (+12V, GND, REM) and speaker output terminals.

Image: The remote bass control knob, used for adjusting subwoofer output level from the driver's seat.
5.4. Final Connection
Once all wiring is securely connected and checked for shorts, insert the appropriate fuse (80A or 100A, depending on your system's power draw) into the inline AGU fuse holder near the battery. Reconnect the vehicle's negative battery terminal.
6. Bedryfsinstruksies
After installation, power on your head unit. The amplifier should turn on automatically (indicated by a power LED). Adjust the amplifier settings as follows:
- WINS (Invoervlak): Start with the GAIN control at minimum. Play a familiar track with strong bass at about 75% of your head unit's maximum volume. Slowly increase the GAIN until you hear distortion, then back off slightly. This sets the ampdie insetgevoeligheid van die versterker om by jou hoofeenheid se uitset te pas.
- LPF (laagdeurlaatfilter): This control filters out high frequencies, allowing only low frequencies to pass to the subwoofer. Set the LPF between 40 Hz and 180 Hz. A common starting point is 80 Hz, but adjust to blend smoothly with your main speakers.
- SUBSONIC Filter: This filter removes extremely low frequencies below the audible range that can cause damage to the subwoofer. Set it between 0 Hz and 50 Hz. A setting around 25-30 Hz is often suitable for ported enclosures, while sealed enclosures may not require it as much.
- BASS BOOST FREQ: This selects the frequency at which the bass boost will be applied. Adjust this to enhance a specific bass frequency range.
- BAS HUPSTOOT: This control increases the output level at the selected bass boost frequency (0-12 dB). Use sparingly to avoid distortion and potential speaker damage.
- Afgeleë basbeheer: This knob allows you to adjust the subwoofer's output level conveniently from your listening position without affecting other ampverligter instellings.
7. Onderhoud
To ensure longevity and optimal performance of your car audio system:
- Regularly check all wiring connections for tightness and corrosion.
- Hou die amplifier and subwoofer free from dust and debris. Use a soft, dry cloth for cleaning.
- Verseker die ampDie koelvinne van die verkoeler word nie geblokkeer om oorverhitting te voorkom nie.
- Avoid exposing the subwoofer cone to direct sunlight for extended periods, as UV rays can degrade materials.
8. Probleemoplossing
Indien u probleme ondervind, verwys na die volgende algemene probleme en oplossings:
| Probleem | Moontlike oorsaak | Oplossing |
|---|---|---|
| Geen krag / Ampverligter skakel nie aan nie | Gebreekte lont Swak krag- of grondverbinding Geen afstandaanskakelsein nie | Check and replace fuse in fuse holder Verifieer dat alle krag- en aardverbindings veilig is Check remote wire connection to head unit and amplewendiger |
| Geen klank van subwoofer nie | RCA-kabels ontkoppel of foutief Luidsprekerdrade ontkoppel of kortgesluit Amplifier gain too low Hoofeenheidvolume te laag | Gaan RCA-verbindings na Verify speaker wire connections and check for shorts Pas aan ampverligter wins Verhoog die volume van die hoofeenheid |
| Verwronge klank | Wins te hoog gestel Damaged speaker or amplewendiger Incorrect LPF or Bass Boost settings | Verminder ampverligter wins Inspect speaker and amplifier for damage Adjust LPF and Bass Boost settings |
| AmpOorverhitting van die verligter | Onvoldoende ventilasie Improper impedance load Wins te hoog gestel | Verseker behoorlike lugvloei rondom amplewendiger Verifieer luidsprekerimpedansie-ooreenstemmings amplifier's stable load Verminder ampverligter wins |
9. Spesifikasies
Gravity G3-12D4 Subwoofer
- Speaker Size: 12 Inches
- Voice Coil Configuration: Dual 4 Ohm
- Peak Power: 2000 Watts (each)
- RMS Power: 1000 Watts (each)
- Frequency Response: 30 - 500 Hz
- Sensitiwiteit: 87 dB
Gravity WZ3000.1D Amplewendiger
- Max Power: 3000W @ 1 Ohm
- Klas: D
- Stable Impedance: 1 Ohm, 2 Ohm, 4 Ohm
- Signal-to-Noise Ratio (S/N): 70 dB
- Frekwensierespons: 8 Hz ~ 180 XNUMX Hz
- Totale harmoniese vervorming (THD): 0.2%
- Bass Boost Level: 0 ~ 12 dB
- Low Pass Filter (LPF): 40 Hz ~ 180 Hz
- Subsonic Filter: 0 ~ 50 Hz
- Dimensions (L×W×H): 223.5mm (8.8 in) × 211mm (8.3 in) × 64.5 mm (2.5 in)
4 Gauge Ampverligter Installasie Kit
- Power Cable: 17 ft. 4 Gauge
- Ground Cable: 3 ft. 4 Gauge
- Fuse Holder: Inline AGU with 80A + 100A Fuses
- RCA Cable: 17 ft. Double Shielded
- Turn-On Cable: 17 ft. 18 Gauge
- Speaker Wire: 20 ft. 16 Gauge
10. Waarborg en Ondersteuning
Gravity products are designed for reliability and performance. For specific warranty terms and conditions, please refer to the warranty card included with your product or contact Gravity customer support. Keep your purchase receipt as proof of purchase for any warranty claims.
For technical support or inquiries, please visit the official Gravity webwebwerf of kontak hul kliëntediensafdeling.