PROVISION ISR B08P4QLQNM
VOORSIENING ISR Webcam met ligte gebruikershandleiding
Model: B08P4QLQNM
1. Inleiding
This manual provides comprehensive instructions for the setup, operation, and maintenance of your PROVISION ISR Webcam with Light. Please read this manual thoroughly before using the device to ensure optimal performance and longevity.
The PROVISION ISR Webcam with Light is designed to offer a superior video streaming experience with its Full HD 1080p resolution, adjustable integrated lighting, and a built-in noise-reduction microphone. It is ideal for various applications including live streaming, video conferencing, online classes, and content creation.
2. Sleutel kenmerke
- Professioneel Webcam with Adjustable Light: Features an innovative design with an integrated LED light offering 3 adjustable brightness levels for optimal illumination in any environment.
- Full HD 1080p-resolusie: Delivers crystal-clear images and high color reproduction with a 1080p resolution and a 100-degree wide viewing angle for a natural, undistorted picture.
- Built-in Noise-Canceling Microphone: Equipped with a microphone that reduces background noise and echoes, ensuring clear audio during calls and recordings.
- Veelsydige toepassing: Suitable for live streaming, video conferences, online courses, vlogging, and gaming.
- Plug and Play Installasie: Requires no driver installation; simply connect the USB cable to your device. Compatible with most popular operating systems.
3. Pakketinhoud
Maak asseblief seker dat alle items teenwoordig en in 'n goeie toestand is wanneer u die pakkie oopmaak.
- VOORSIENING ISR Webkamera met lig
- Geïntegreerde USB-kabel
- Gebruikershandleiding (hierdie dokument)
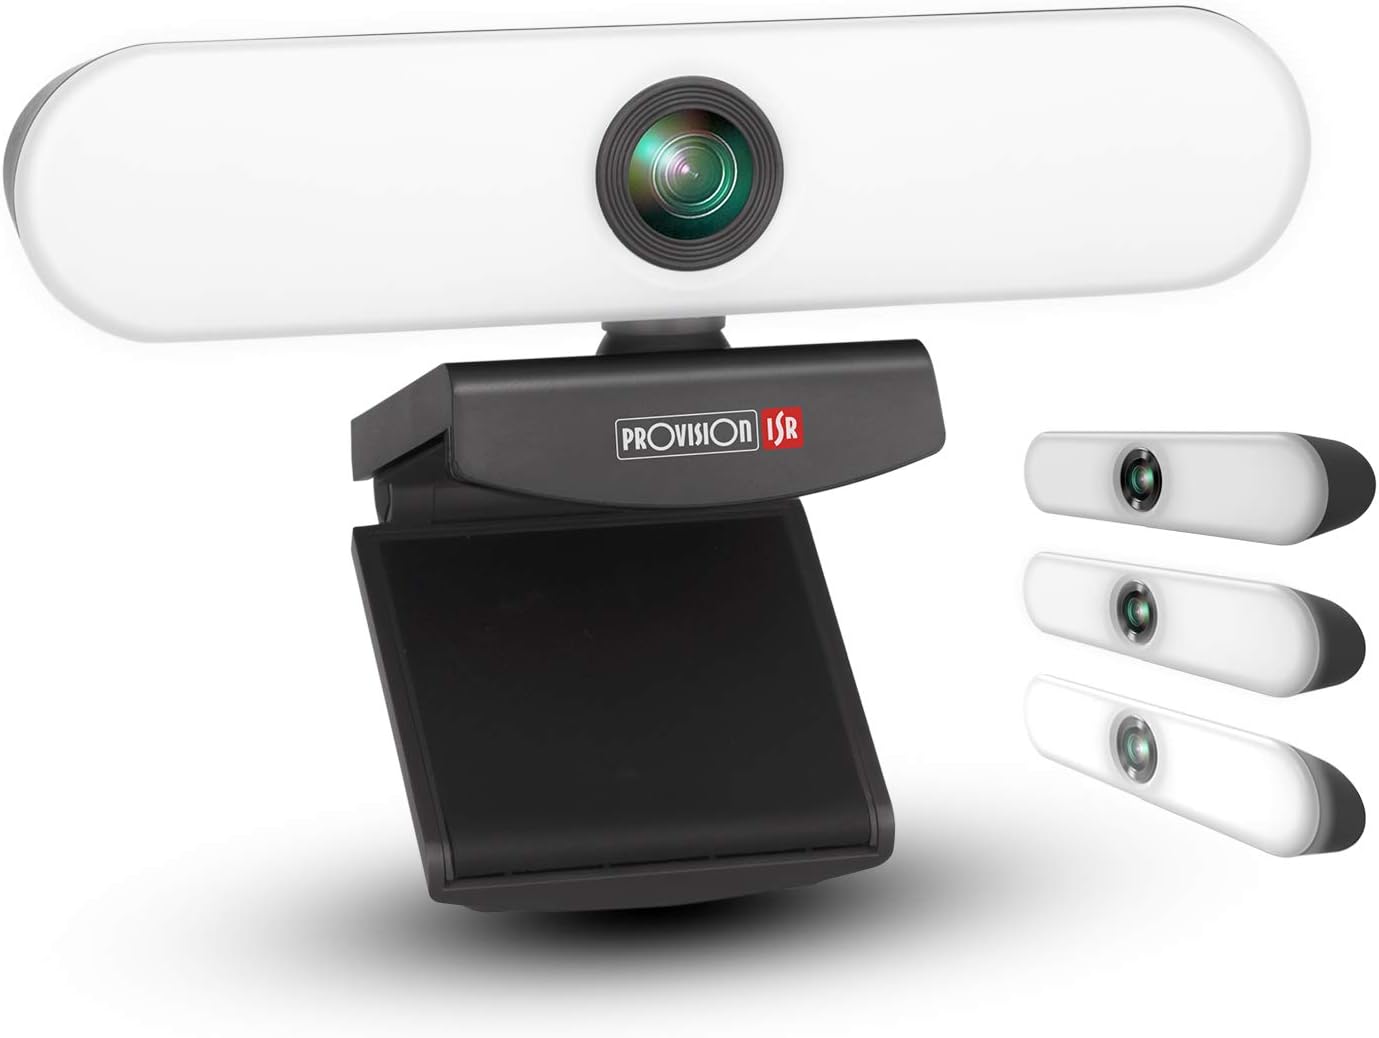
Image: The PROVISION ISR Webcam with Light, showing its integrated light bar and adjustable clip.
4. Opstelgids
4.1 Verbind die Webnok
- Pak uit: Verwyder die webkamera uit sy verpakking.
- Monteer: Open the adjustable clip base and securely place the webcam on top of your computer monitor, laptop screen, or a flat surface. Ensure the webDie nok is stabiel en wys in die verlangde rigting.
- Koppel: Plug the integrated USB cable from the webcam na 'n beskikbare USB-poort op jou rekenaar.

Beeld: Die webcam shown with its USB cable, illustrating its plug-and-play compatibility with Windows, Mac OS, and Android devices.
4.2 Driver Installation (Plug & Play)
The PROVISION ISR Webcam is designed for plug-and-play operation. Your operating system (Windows, macOS, Linux, Android) should automatically detect and install the necessary drivers upon connection. No manual driver installation is typically required.
- Wait a few moments after connecting the USB cable for your system to recognize the device.
- You may see a notification indicating that a new device has been detected and is ready for use.
4.3 Initial Setup in Applications
Once connected, you can select the webcam and its microphone within your preferred video conferencing or streaming application (e.g., Zoom, Skype, Microsoft Teams, OBS Studio).
- Open your desired application.
- Navigate to the application's settings or preferences, usually under "Audio" or "Video" settings.
- Select "PROVISION ISR Webcam" as jou video-invoertoestel.
- Select "PROVISION ISR Webcam Microphone" (or similar) as your audio input device.
- Adjust video and audio settings as needed within the application.

Image: A woman on a video call, demonstrating the webcam's clear image and sound quality when used with a laptop.
5. Bedryfsinstruksies
5.1 Adjusting the Integrated Light
Die webcam features an integrated LED light with three brightness levels. To adjust the light:
- Locate the touch button on the top of the webkam.
- Tap the button once to cycle through the brightness levels: Low, Medium, High, and Off.
- Select the level that provides optimal illumination for your environment.

Image: Illustration showing the webcam and three examples of lighting levels (Low, Medium, High) on a person's face.
5.2 Aanpassing Viewing Hoek
Die webcam's clip base allows for flexible positioning and angle adjustment.
- Gently tilt the webcam up or down to adjust the vertical viewing hoek.
- Draai die webcam left or right on its base to adjust the horizontal viewing hoek.
- Verseker die webcam is securely positioned after adjustment.

Image: Diagram illustrating the 90-degree wide-angle view van die webcam, showing it capturing a group meeting.
6. Onderhoud
Behoorlike onderhoud verseker die lang lewensduur en optimale prestasie van u webkam.
- Maak die lens skoon: Gebruik 'n sagte, pluisvrye lap wat spesifiek vir optiese lense ontwerp is om die webnoklens. Vermy skuurmiddels of harde chemikalieë.
- Maak die liggaam skoon: Vee die liggaam van die webcam with a soft, dry cloth. If necessary, a slightly damp ’n Lap kan gebruik word, maar maak seker dat geen vog die toestel binnedring nie.
- Berging: Wanneer dit nie vir lang tye gebruik word nie, bêre die webkamera op 'n skoon, droë plek weg van direkte sonlig en uiterste temperature.
- Kabelversorging: Avoid bending or kinking the USB cable excessively. Do not pull the cable to disconnect the webcam; always grasp the plug.
7. Probleemoplossing
| Probleem | Moontlike oorsaak | Oplossing |
|---|---|---|
| Webkamera nie bespeur nie | Loose USB connection, faulty USB port, driver issue, application not recognizing device. | Ensure USB cable is fully inserted. Try a different USB port. Restart your computer. Check device manager for driver status. Select the webcam in your application settings. |
| Geen video-uitvoer nie | Webcam not selected in application, privacy settings blocking camera, lens cap (if applicable). | Verifieer webcam selection in application settings. Check operating system privacy settings (e.g., Windows Camera Privacy). Ensure nothing is obstructing the lens. |
| Swak video kwaliteit | Insufficient lighting, dirty lens, low bandwidth, application settings. | Adjust the integrated light to a higher brightness level. Clean the webcam lens. Ensure stable internet connection. Check application video resolution settings. |
| Microphone not working or poor audio | Microphone not selected, privacy settings, background noise. | Kies die webcam's microphone in your application's audio settings. Check operating system microphone privacy settings. Reduce ambient noise. |
| Integrated light not working | Not turned on, faulty unit. | Tap the touch button on top of the webcam to cycle through brightness levels. If still not working, contact customer support. |
8. Spesifikasies
| Kenmerk | Detail |
|---|---|
| Modelnommer | B08P4QLQNM |
| Video-opname-resolusie | 1080p Full HD |
| Fotosensortegnologie | CMOS |
| Verbindingstegnologie | USB |
| Spesiale kenmerk | Integrated Adjustable Light (3 Levels), Low Light Performance |
| Mikrofoon | Built-in Noise-Reduction Microphone |
| Viewing Hoek | 100-degree (approx.) |
| Afmetings (ongeveer) | 15.9 x 7.1 x 6.3 cm |
| Gewig (ongeveer) | 237 g |
| Verenigbaarheid | Windows, macOS, Android (Plug & Play) |
9. Waarborg en Ondersteuning
PROVISION ISR products are manufactured to high quality standards. For specific warranty information, please refer to the warranty card included with your purchase or visit the official PROVISION ISR webwebwerf. Bewaar u aankoopbewys as bewys van aankoop.
For technical support, troubleshooting assistance beyond this manual, or warranty claims, please contact PROVISION ISR customer service through their official channels. Contact information can typically be found on the product packaging or the brand's official webwebwerf.
Let wel: Waarborgvoorwaardes en ondersteuningsbeskikbaarheid kan per streek verskil.