Inleiding
This manual provides detailed instructions for the setup, operation, and maintenance of your BUFFBEE Glow Alarm Clock HRS-BLACK. Please read this manual thoroughly before using the product to ensure proper function and longevity.
Produk verbyview
The BUFFBEE Glow Alarm Clock is a versatile device combining a digital alarm clock, FM radio, and a 7-color night light. It is designed to enhance your sleep and wake-up experience with customizable features.
Sleutel kenmerke:
- 3-in-1-funksionaliteit: Digital alarm clock, FM radio, and night light.
- 7-kleur naglig: Adjustable with 5 brightness levels.
- Dubbele alarms: Set two independent alarms with choice of FM radio, built-in beep, or bird sounds.
- Adjustable Display Dimmer: 0-100% brightness control for the time display.
- Verligte knoppies: For easy operation in low light conditions.
- Slaap timer: Quick nap setting from 10 to 120 minutes.
- Auto-Off Sleep Timer: Automatically turns off night light and FM radio after a set duration.
- USB-laaipoort: Vir die laai van eksterne elektroniese toestelle.
- Kragopsies: AC powered with AAA battery backup (batteries not included).
Pakketinhoud:
- 1 x BUFFBEE Glow Alarm Clock
- 1 x kragadapter
- 1 x Gebruikershandleiding
Komponentidentifikasie:
Verwys na die onderstaande beeld vir 'n oorsigview of the alarm clock's buttons and display.

Beeld: Voorkant view of the BUFFBEE Glow Alarm Clock, showing the digital time display, alarm indicators, and control buttons on the top panel. The top edge features a light strip.
Opstelling
1. Kragverbinding:
- Koppel die meegeleverde kragadapter aan die GS-invoerpoort aan die agterkant van die wekker.
- Steek die adapter in 'n standaard stopcontact.
2. Battery Backup (Optional):
Vir ononderbroke werking tydens kragonderbrekingtages, install 3 AAA batteries (not included) into the battery compartment on the bottom of the unit. The clock will maintain time and alarm settings, and the alarm will still function, but the display and night light may be limited to conserve power.

Beeld: Agter view of the alarm clock showing the power input and battery compartment, alongside a power adapter and three AAA batteries (not included).
3. Aanvanklike tydinstelling:
- When first powered on, the display will show a default time.
- Druk en hou die TYD BEREIK button (usually located on the top panel) until the hour digits flash.
- Gebruik die +/- buttons (or similar navigation buttons) to adjust the hour.
- Druk TYD BEREIK again to confirm the hour and move to minute adjustment.
- Gebruik die +/- knoppies om die minute aan te pas.
- Druk TYD BEREIK nog een keer om te bevestig en die tydinstellingsmodus te verlaat.
- Om tussen 12-uur en 24-uur formaat te wissel, druk die 12/24H button (if available, often combined with time set or a dedicated button).
Bedryfsinstruksies
1. Setting Alarms (Alarm 1 & Alarm 2):
The clock supports two independent alarms.
- Druk die ALARM 1 knoppie (of ALARM 2) once to display the current alarm time.
- Druk en hou die ALARM 1 (of ALARM 2) button until the hour digits flash.
- Gebruik die +/- knoppies om die uur aan te pas.
- Druk die ALARM knoppie weer om die uur te bevestig en na die minuut-aanpassing oor te skakel.
- Gebruik die +/- knoppies om die minute aan te pas.
- Druk die ALARM button again to select the alarm sound: FM radio, built-in beep, or bird sounds. Use +/- om deur opsies te blaai.
- Druk die ALARM knoppie nog een keer om die alarm te bevestig en te aktiveer. 'n Alarmikoon sal op die skerm verskyn.
- To turn off an active alarm, press the corresponding ALARM button. The alarm icon will disappear.
2. Snooze Function:
Wanneer 'n alarm afgaan, druk die groot knoppie SNOOZE / LIG button on top to temporarily silence the alarm for 9 minutes. The alarm will sound again after the snooze period.
3. Night Light Operation:
The alarm clock features a 7-color night light with adjustable brightness.

Image: The alarm clock shown with its top light strip illuminated in various colors, demonstrating the 7-color night light feature.
- Druk die LIG button (often combined with SNOOZE or a dedicated button) to turn the night light on/off.
- When the night light is on, press the LIG button repeatedly to cycle through the 7 available colors.
- To adjust the brightness, use the +/- buttons while the night light is active. There are 5 brightness levels.
4. FM-radio:
The built-in FM radio allows you to listen to your favorite stations.
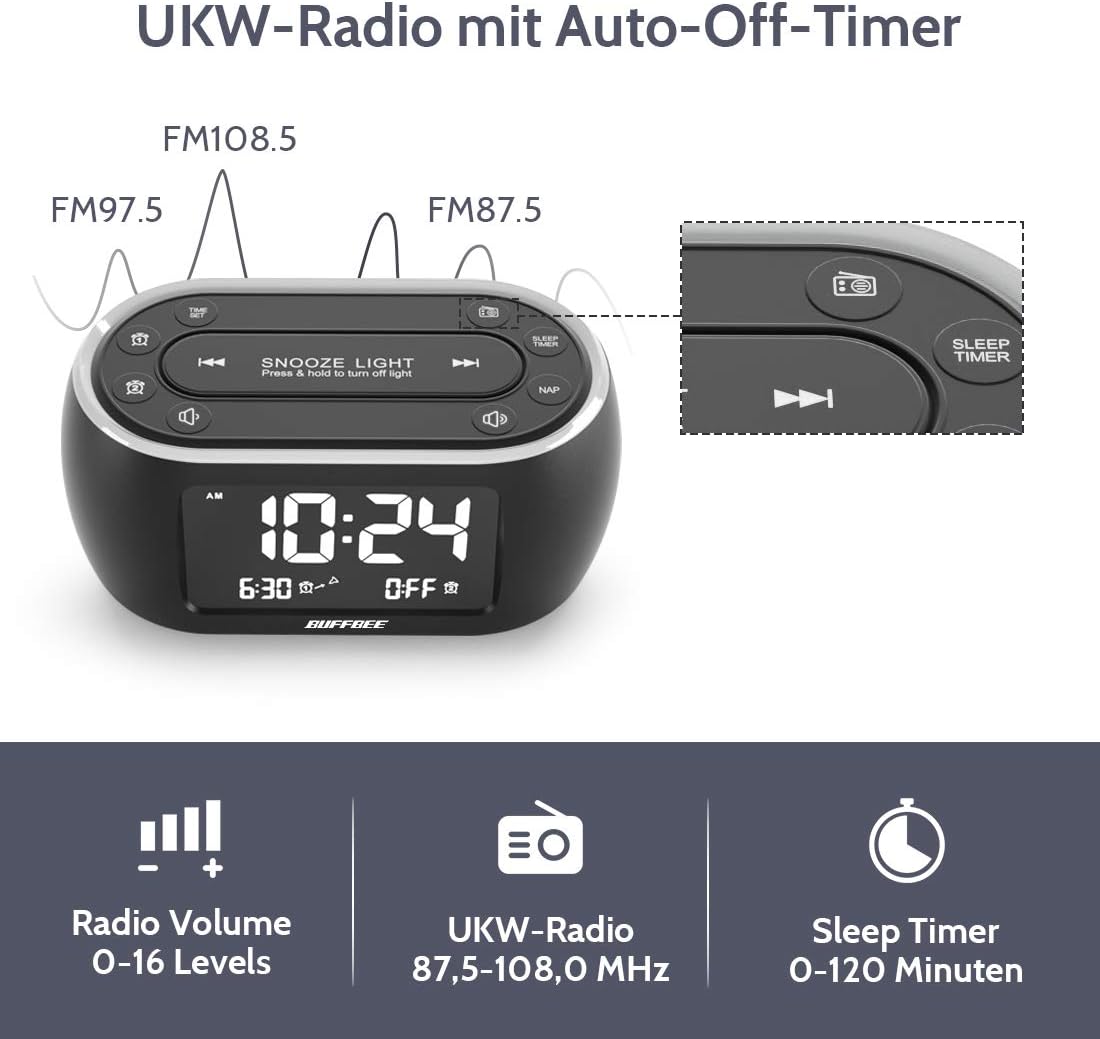
Image: The alarm clock display showing FM radio frequencies (FM108.5, FM97.5, FM87.5) and icons for radio volume and sleep timer.
- Druk die RADIO button to turn the FM radio on/off.
- Druk die SKANDEER button (or similar) to automatically scan and save available FM stations.
- Gebruik die VORIGE/VOLGENDE buttons to navigate through saved stations or manually tune.
- Stel die volume aan met die VOLUME +/- buttons. The volume can be set from 0 to 16 levels.
5. Nap Timer:
The nap timer allows for quick, short sleep periods without affecting regular alarm settings.
- Druk die NAP button. The display will show the default nap time (e.g., 10 minutes).
- Druk die NAP button repeatedly to cycle through preset nap durations (e.g., 10, 20, 30, 60, 90, 120 minutes).
- The nap timer will start automatically after selection.
- To cancel the nap timer, press the NAP knoppie totdat "AF" vertoon word.
6. Auto-Off Sleep Timer:
Set a timer for the night light and/or FM radio to automatically turn off after a specified duration.
- While the night light or FM radio is active, press the SLAAP TIMER knoppie.
- Druk die SLAAP TIMER button repeatedly to cycle through available durations (e.g., 15, 30, 60, 90, 120 minutes, or OFF).
- The selected duration will be displayed, and the timer will begin. The night light and/or FM radio will turn off automatically when the timer expires.
7. Display Dimmer:
Adjust the brightness of the main time display from 0% to 100%.

Image: Six different views of the alarm clock display, illustrating the range of brightness from very dim to fully bright, and also showing the night light dimmer.
Gebruik die toegewyde DOWWER skakel of DIMMER +/- buttons (if available) to adjust the display brightness to your preference. This allows for comfortable viewin enige beligtingstoestand.
8. USB Charging Port:
A USB port is located on the back of the unit for charging small electronic devices.

Image: The alarm clock with a smartphone plugged into its side USB port, indicating the charging function.
Connect your device's USB charging cable to the port. The clock must be powered by the AC adapter for the USB charging function to work.
Onderhoud
To ensure the longevity and optimal performance of your BUFFBEE Glow Alarm Clock, follow these maintenance guidelines:
- Skoonmaak: Wipe the unit with a soft, dry cloth. Do not use abrasive cleaners, waxes, or solvents as they may damage the surface.
- Krag: Always disconnect the power adapter from the wall outlet before cleaning or if the unit will be unused for an extended period.
- Omgewing: Keep the alarm clock away from direct sunlight, heat sources, and excessive moisture.
- Battery vervanging: If using battery backup, replace AAA batteries annually or when the battery indicator suggests low power. Ensure correct polarity when inserting new batteries.
Probleemoplossing
If you encounter issues with your BUFFBEE Glow Alarm Clock, refer to the following common problems and solutions:
| Probleem | Moontlike oorsaak | Oplossing |
|---|---|---|
| Clock display is blank or flickering. | No power or loose connection. Low battery backup. | Ensure the power adapter is securely plugged into the clock and the wall outlet. Check if AAA batteries are installed correctly and have sufficient charge. |
| Die alarm lui nie. | Alarm nie geaktiveer nie. Alarmvolume te laag. | Verify that the alarm icon is displayed. Check the alarm volume setting. Ensure the correct alarm time is set. |
| FM-radio-ontvangs is swak. | Weak signal. Antenna not extended. Interference. | Extend the FM antenna fully. Try repositioning the clock. Perform an auto-scan for stations again. |
| Night light is not working. | Light function turned off. | Press the LIGHT button to turn it on. Check if the brightness is set to 0%. |
| USB-laai werk nie. | Clock not connected to AC power. Device not compatible. | Ensure the clock is powered by the AC adapter. Check if your device is compatible with standard USB charging. |
Spesifikasies
| Kenmerk | Detail |
|---|---|
| Handelsmerk | BUFFEBEE |
| Modelnommer | HRS-BLACK |
| Afmetings (L x B x H) | 12 x 3.81 x 6 cm (4.72 x 1.5 x 2.36 duim) |
| Gewig | 330 gram (0.73 lbs) |
| Krag Invoer | AC 100-240V, 50/60Hz |
| Battery-rugsteun | 3 x AAA-batterye (nie ingesluit nie) |
| Tipe vertoon | Digitaal |
| Vertoon helderheid | 0-100% verstelbaar |
| Nagligkleure | 7 kleure |
| Night Light Brightness | 5 vlakke verstelbaar |
| FM-radiofrekwensie | 87.5-108.0 MHz |
| Alarmvolume | 0-16 vlakke verstelbaar |
| Spesiale kenmerke | Ambient light, Dual Alarm, Nap Timer, Sleep Timer, USB Charging Port |
Waarborg en Ondersteuning
BUFFBEE products are designed for reliability and performance. For specific warranty information, please refer to the documentation included with your purchase or contact BUFFBEE customer support.
If you require technical assistance or have questions regarding your BUFFBEE Glow Alarm Clock, please visit the official BUFFBEE website or contact their customer service department. Contact details are typically found on the product packaging or the manufacturer's webwebwerf.