iKonix DDL 8700
Instruction Manual: iKonix Juki DDL-8700 Industrial Lockstitch Sewing Machine
Model: DDL-8700 Standard
1. Inleiding
This manual provides comprehensive instructions for the assembly, operation, and maintenance of your iKonix Juki DDL-8700 Industrial Lockstitch Sewing Machine. This machine is designed for professional apparel sewing, offering high-speed and precise stitching for various fabric types. Please read this manual thoroughly before operating the machine to ensure safe and efficient use.
The Juki DDL-8700 is a single-needle lockstitch industrial sewing machine, known for its reliability and performance in demanding environments. It features an auto-lubricating full rotary hook and a powerful electronic DC Servo Motor for consistent operation.
2. Belangrike veiligheidsinstruksies
- Always disconnect the power supply before performing any maintenance, cleaning, or when the machine is not in use.
- Keep hands and fingers away from the needle, presser foot, and other moving parts during operation.
- Dra gepaste oogbeskerming wanneer u die masjien gebruik.
- Maak seker dat die masjien op 'n stabiele, gelyk oppervlak geplaas is om te verhoed dat dit kantel.
- Moenie die masjien gebruik as enige onderdele beskadig of vermis is nie.
- Hou kinders en troeteldiere weg van die masjien tydens gebruik.
- Gebruik slegs opregte vervangingsonderdele en bykomstighede.
- Moenie probeer om die masjien te wysig nie.
3. Pakketinhoud
Your iKonix Juki DDL-8700 Industrial Lockstitch Sewing Machine package includes the following components:
- Juki DDL-8700 Masjienkop
- Naaimasjientafel (ongemonteer)
- Electronic DC Servo Motor (550 watts, 110V)
- Bobbin Winder
- Draadstaander
- Masjienolie
- Instructiehandleiding (hierdie dokument)
- Oliepan
- Knie lifter
- V-band
- Laaie
- Gereedskap
- LED Lamp

Figuur 3.1: Assorted assembly components and accessories included with the machine.
4. Opstelling en samestelling
Note: Professional assembly may be required. The machine comes unassembled.
4.1. Uitpak en inspeksie
Carefully unpack all components from their sealed boxes. Verify that all items listed in the "Package Contents" section are present and undamaged. Report any discrepancies or damage to your supplier immediately.

Figuur 4.1: The Juki DDL-8700 machine head.

Figuur 4.2: Voorkant view of the machine head.
4.2. Tafelversameling
Assemble the sewing machine table according to the included diagram (refer to the separate assembly diagram if provided). Ensure all bolts are securely tightened for stability.

Figuur 4.3: Assembled machine with table.
4.3. Motor installasie
Mount the Electronic DC Servo Motor (550 watts, 110V) to the underside of the table. Connect the V-belt between the motor pulley and the machine head's handwheel. Ensure the belt tension is appropriate – not too tight, not too loose.

Figuur 4.4: The iKonix 550W DC Servo Motor.
Figuur 4.5: Motor and foot pedal linkage installed under the table.
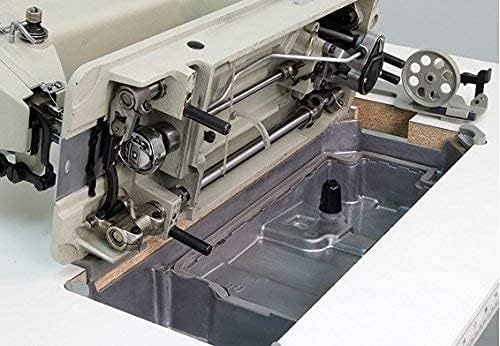
4.4. Oil Pan and Lubrication
Install the oil pan beneath the machine head. Fill the oil pan with the provided machine oil to the indicated level. The machine features an auto-lubricating full rotary hook system, which requires proper oil levels for optimal performance.

Figuur 4.6: View of the oil pan and internal components.
4.5. LED Lamp Installasie
Heg die LED l aanamp to the machine table or head, positioning it to illuminate the sewing area effectively. Plug the lamp in 'n geskikte kragbron.

Figuur 4.7: Included LED Lamp.
5. Bedryfsinstruksies
5.1. Skakel aan/af
Connect the machine's power cord to a grounded 110V AC outlet. Use the power switch on the servo motor to turn the machine ON or OFF.
5.2. Die masjien inryg
Follow the threading path indicated on the machine head and in the detailed threading diagram (refer to the separate threading guide if provided). Ensure the thread passes through all tension discs, guides, and the needle eye correctly. Improper threading can lead to skipped stitches or thread breakage.
5.3. Winding the Bobbin
Place an empty bobbin onto the bobbin winder spindle. Guide the thread from the spool through the tension disc of the bobbin winder and then around the bobbin. Engage the bobbin winder mechanism and press the foot pedal lightly to wind the bobbin. Stop when the bobbin is full but not overfilled.
5.4. Steeklengte aanpas
The maximum stitch length is 5 mm. Adjust the stitch length dial located on the machine head to achieve the desired stitch length. A higher number typically indicates a longer stitch.
5.5. Aanpassing van die persvoetligging
The presser foot can be lifted by hand (max. 5.5 mm) or by using the knee lifter (max. 13 mm). Use the knee lifter for thicker materials or when you need both hands free to manipulate fabric.
5.6. Sewing Speed
The maximum sewing speed is 5,500 stitches per minute (spm). The electronic DC Servo Motor allows for precise speed control via the foot pedal. Press the pedal gently for slower speeds and more control, and press further for higher speeds.
5.7. Naaldseleksie
Use needles of size 9-18 (DBX1, 16x231) for general sewing. Needles up to size 19 can be used for heavier materials. Always use the correct needle type and size for your fabric to prevent damage to the needle, fabric, or machine.
6. Onderhoud
6.1. Smering
The Juki DDL-8700 features an auto-lubricating full rotary hook. Regularly check the oil level in the oil pan and replenish as needed with high-quality sewing machine oil. Ensure the oil is clean and free of debris.
6.2. Skoonmaak
Regularly clean lint and dust from the bobbin case area, feed dogs, and tension discs using a small brush or vacuum cleaner. Accumulation of lint can affect stitch quality and machine performance.
6.3. Naaldvervanging
Replace the needle frequently, especially if it becomes bent, dull, or if you notice skipped stitches. A worn needle can damage fabric and cause machine issues. Ensure the needle is inserted correctly with the flat side facing the back.
6.4. Belt Inspection
Periodically inspect the V-belt for wear, cracks, or looseness. Replace the belt if it shows signs of damage or if it slips during operation.
7. Probleemoplossing
| Probleem | Moontlike oorsaak | Oplossing |
|---|---|---|
| Steke oorgeslaan | Verkeerde naald, gebuigde naald, onbehoorlike inryging, verkeerde spanning. | Vervang naald, ryg masjien weer in, pas spanning aan. |
| Draadbreuk | High tension, burr on needle plate, poor quality thread, incorrect needle. | Reduce tension, check for burrs, use quality thread, replace needle. |
| Masjien begin nie | No power, motor switch off, V-belt disengaged. | Check power connection, turn on motor switch, check V-belt. |
| Lawaaierige werking | Lack of lubrication, loose parts, lint accumulation. | Check oil level, tighten loose screws, clean machine. |
8. Spesifikasies
| Kenmerk | Detail |
|---|---|
| Model | DDL-8700 Standard |
| Masjien tipe | Enkelnaald-sluitsteek Industriële Naaimasjien |
| Motor tipe | Elektroniese GS-servomotor |
| Motor Krag | 550 watts, 3/4 H.P. |
| Voltage | 1 Phase, 110 Volt |
| Sewing Speed (max.) | 5 500 spm (steke per minuut) |
| Stitch Length (max.) | 5 mm |
| Stitches per Inch (max.) | 6 stitches per inch |
| Presser Foot Lift (hand) | maks. 5.5 mm |
| Presser Foot Lift (knee) | maks. 13 mm |
| Naaldstaafberoerte | 30.7 mm |
| Tipe haak | Outomatiesmerende volle roterende haak |
| Naalde | 9-18 DBX1 (16x231) up to size 19 |
| Arm Space to Right of Needle | 11 duim |
| Produk afmetings | 15 x 13 x 11 inches (machine head only) |
| Item gewig | 229 pounds (total assembled weight) |
| Vervaardiger | iKonix |
| UPC | 880753771071 |
9. Waarborg en Ondersteuning
For specific warranty information, please refer to the documentation provided at the time of purchase or contact your retailer. iKonix offers various protection plans for extended coverage.
For technical support, troubleshooting assistance beyond this manual, or to inquire about replacement parts, please contact iKonix customer service or your authorized dealer. Keep your purchase receipt and model number (DDL-8700) ready when contacting support.
Protection plans available for purchase:
- 3-jaar beskermingsplan
- 4-jaar beskermingsplan
Vir meer inligting, besoek die iKonix Brand Store on Amazon.
Ask a question about this manual
Ask about setup, troubleshooting, compatibility, parts, safety, or missing instructions. Manuals+ will review the question and use this page’s manual context to help answer it.