1. Inleiding
This manual provides detailed instructions for the installation, operation, and maintenance of your Epman EPXX707 2-inch (52mm) Car Turbo Boost Gauge. Please read this manual thoroughly before installation and use to ensure proper function and safety.
The Epman EPXX707 is a high-performance automotive gauge designed to accurately display turbo boost pressure. It features a multi-color backlight, adjustable settings, and a durable design suitable for various vehicle applications.
2. Produkkenmerke
- Gauge Diameter: 2-inch (52mm) standard size.
- Vertoon: Black dial face when ignition is off for a clean look.
- Agterlig: Selectable 10-color backlight with memory function for both day and night modes.
- Helderheid: 6-level adjustable brightness with memory function for day and night modes.
- Buzzer Types: 3 selectable buzzer types (slow, fast, continuous).
- Buzzer Levels: 4 selectable buzzer levels (from silent to resounding).
- Open Ceremonies: 5 different selectable open ceremonies upon startup.
- Waarskuwingsfunksie: Adjustable warning value with 3 buzzer options or the ability to turn off the buzzer.
- Datalogging: Records the highest value and warning value. The highest value can be checked and cleared.
- Sigbaarheid: Flat glass, high-resolution scale, and a long, narrow pointer ensure accurate indication and high visibility.
- Motor: Brushless stepper motor provides smooth, instant, and high-performance response.

Image: The Epman EPXX707 gauge showcasing different backlight color options, demonstrating its customizable display features.

Image: The Epman EPXX707 gauge illuminated with an orange backlight, displayed alongside its various installation components.
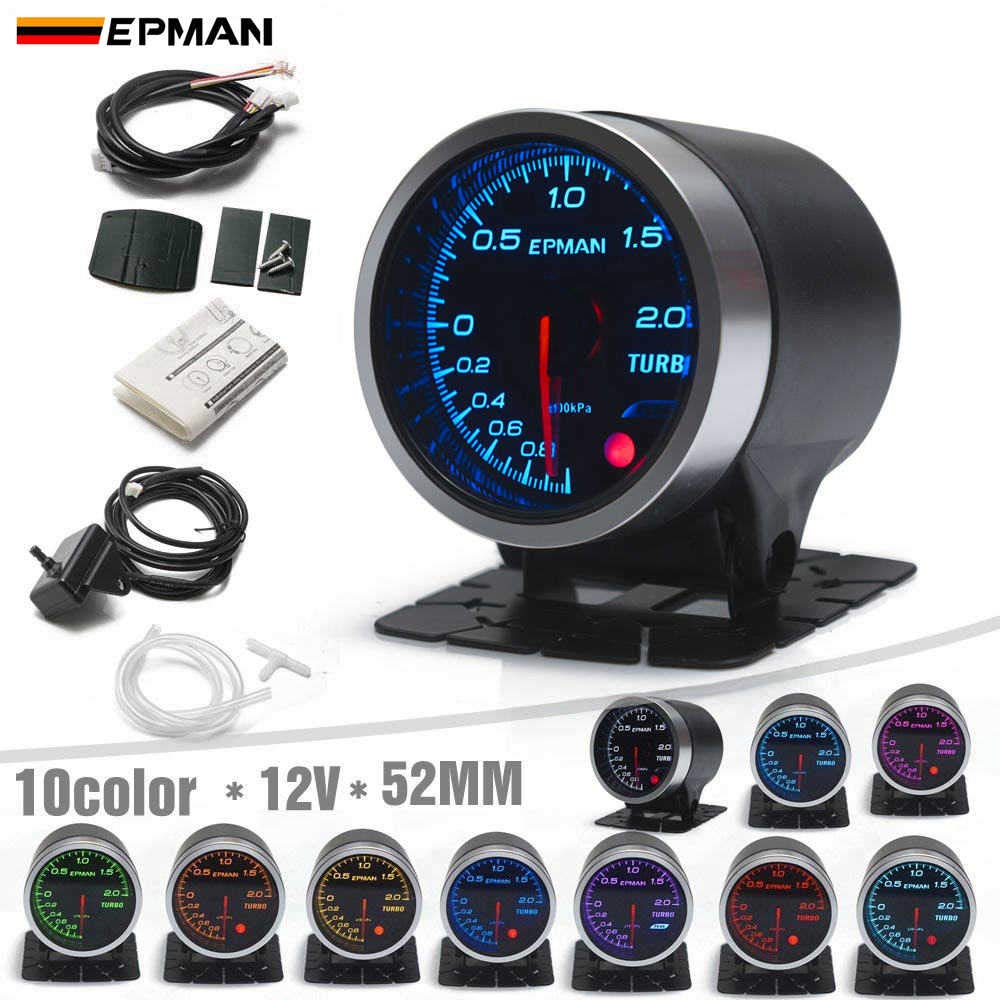
Image: The Epman EPXX707 gauge illuminated with a blue backlight, displayed alongside its various installation components.
3. Pakketinhoud
Verifieer asseblief dat al die items wat hieronder gelys word, in u pakket ingesluit is:
- 1 x Boost Gauge
- 1 x Montagebeugel
- 1 x Gauge Cable
- 1 x Kragkabel
- 1 x Boost Sensor Cable
- 1 x ID 4mm Three-way Connector
- 1 x ID 4mm Rubber Hose
- 1 x Dubbelzijdige kleefband
- 2 x Buffer
- 1 x Engelse instruksiehandleiding

Beeld: 'n Oorview of the Epman EPXX707 Turbo Boost Gauge and its complete set of components, including wiring, sensor, and mounting hardware.

Image: The Epman EPXX707 Turbo Boost Gauge with a red backlight, its retail packaging box, and the included mounting cup.
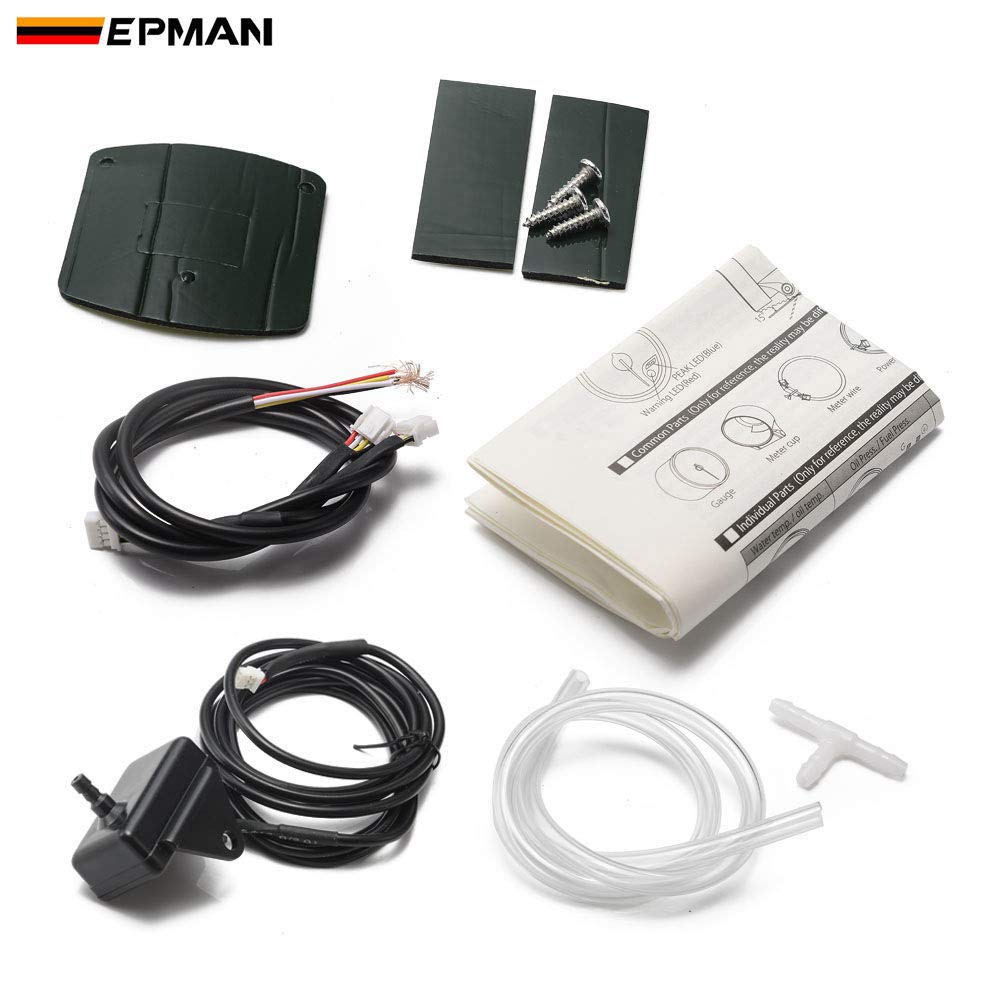
Beeld: 'n Gedetailleerde view of the individual components supplied with the Epman EPXX707 gauge, such as wiring harnesses, boost sensor, vacuum hose, and the instruction manual.
4. Opstelling en installering
Professional installation is recommended for this product. Incorrect installation may lead to damage to the product or vehicle. Ensure the vehicle's ignition is off and the battery is disconnected before beginning installation.
4.1 Mounting the Gauge
- Select a suitable location on your dashboard or A-pillar for the mounting bracket. Ensure it does not obstruct your view of inmeng met voertuigkontroles.
- Secure the mounting bracket using the provided screws or double-sided tape.
- Insert the gauge into the mounting cup/bracket.
4.2 Elektriese verbindings
- Connect the power cable to the vehicle's electrical system. Typically, this involves connecting to a switched 12V ignition source (IGN), a constant 12V source (for memory functions), and a ground connection. Refer to your vehicle's wiring diagram for appropriate connection points.
- Connect the gauge cable from the main wiring harness to the back of the boost gauge.
4.3 Boost Sensor and Vacuum Line Connection
- Locate a suitable vacuum/boost source on your engine's intake manifold.
- Install the provided three-way connector into the vacuum line.
- Connect one end of the ID 4mm rubber hose to the three-way connector and the other end to the boost sensor.
- Connect the boost sensor cable to the boost sensor and route it to the main wiring harness connected to the gauge.
- Maak seker dat alle verbindings stewig en vry van lekkasies is.
After all connections are made, reconnect the vehicle's battery and turn on the ignition to test the gauge.
5. Bedryfsinstruksies
The Epman EPXX707 gauge features a single button on the back for all settings and adjustments. Familiarize yourself with its operation:
5.1 Basic Button Operation
- Kort druk: Used to cycle through different function settings or options within a setting mode.
- Lang pers: Press and hold the button until the buzzer sounds to enter the setting mode for the currently displayed function. The gauge will return to its normal operating state if the button is released after approximately 5 seconds without further input.
5.2 Aanpassing van instellings
To adjust specific settings such as backlight color, brightness, buzzer type, buzzer level, warning value, or open ceremony:
- With the ignition on, observe the gauge.
- Voer a kort druk to cycle through the available functions (e.g., backlight color, brightness, warning setting).
- Once the desired function is displayed or indicated, perform a lang druk until the buzzer sounds to enter the adjustment mode for that function.
- While in adjustment mode, use short presses to select the desired option or value.
- To save the setting and exit the adjustment mode, perform another lang druk until the buzzer sounds, or simply wait for 5 seconds without any button input.
5.3 Checking and Clearing Peak Values
The gauge records the highest boost pressure achieved. To check and clear this value:
- Voer uit short presses until the peak value display mode is active.
- The gauge will show the recorded highest boost pressure.
- To clear this value, perform a lang druk while the peak value is displayed. The value will reset.
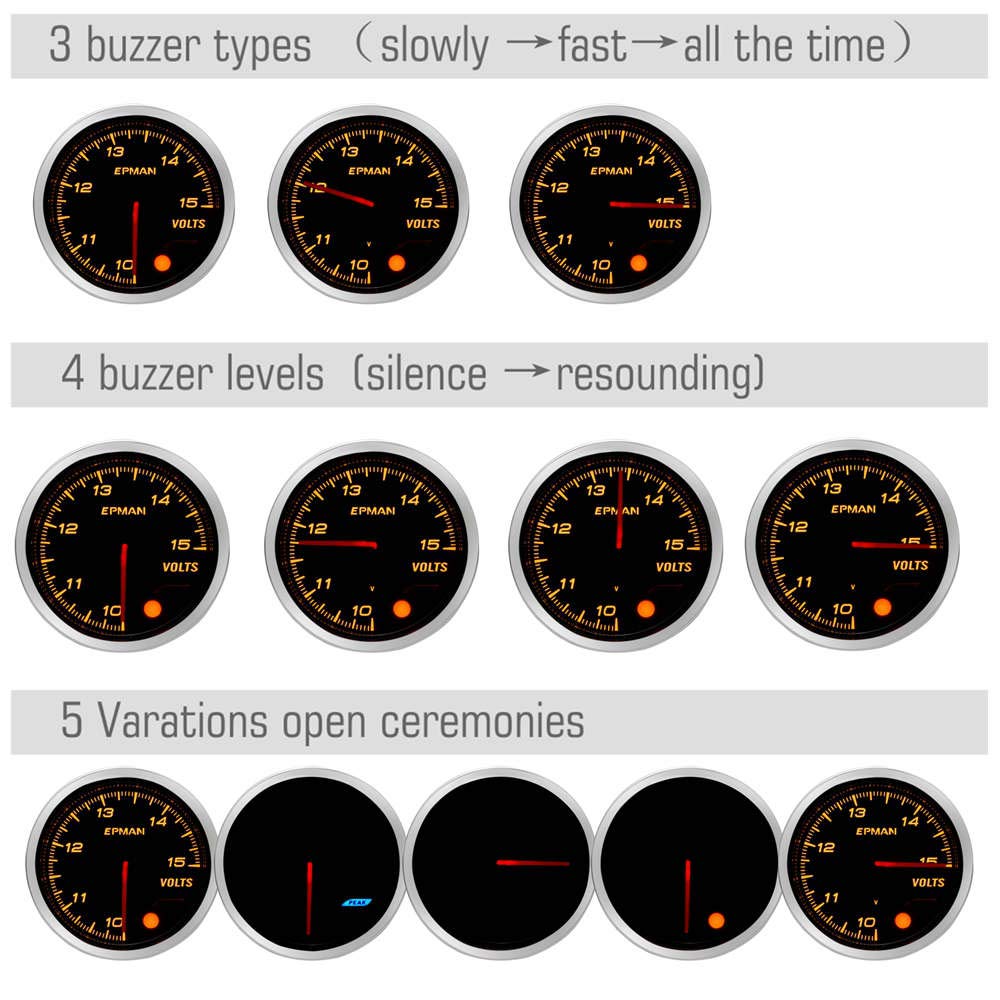
Image: Visual representation of the three selectable buzzer types, four buzzer levels, and five different open ceremonies available for customization on the gauge.
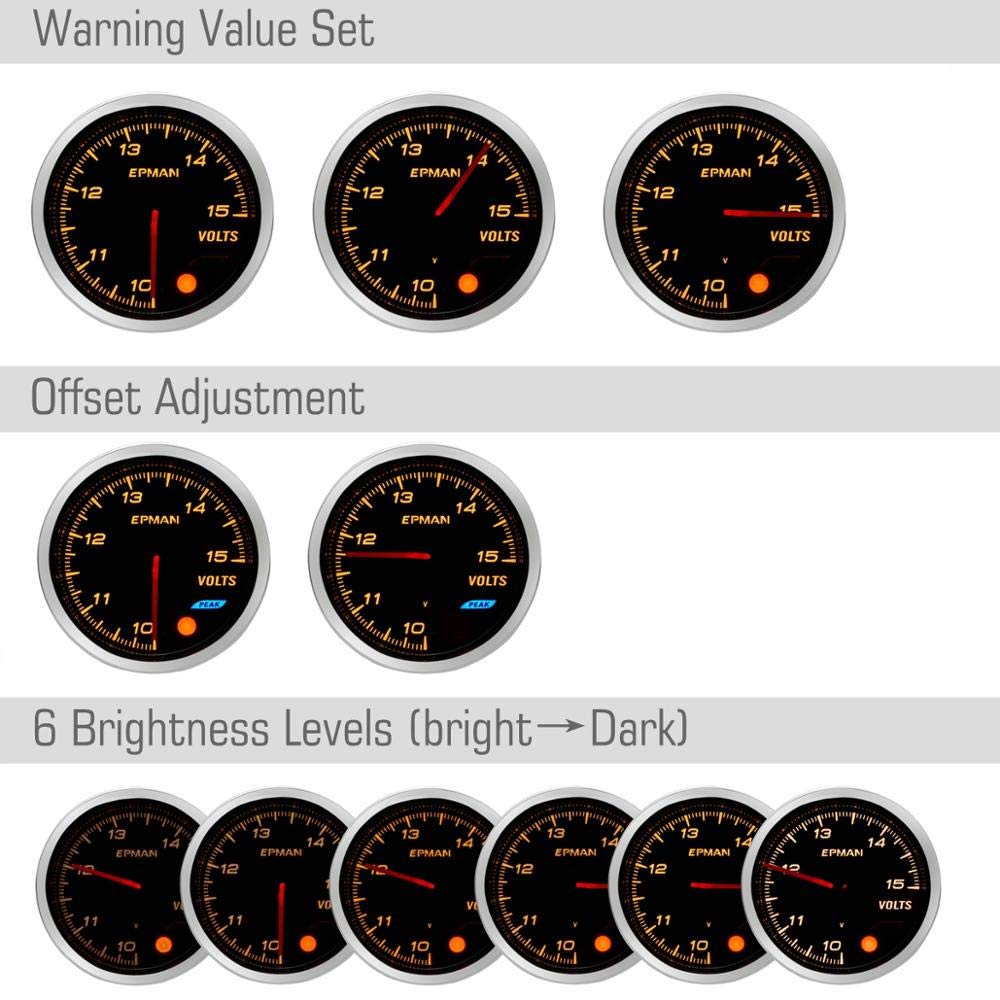
Image: Visual guide illustrating how to set warning values, perform offset adjustments, and select from six different brightness levels for the gauge display.
6. Onderhoud
To ensure the longevity and accurate performance of your Epman EPXX707 Turbo Boost Gauge, follow these maintenance guidelines:
- Skoonmaak: Use a soft, dry cloth to clean the gauge face and body. Avoid abrasive cleaners or solvents that could damage the display or finish.
- Verbindingskontroles: Periodically inspect all electrical and vacuum connections to ensure they are secure and free from corrosion or damage. Loose connections can lead to inaccurate readings or intermittent operation.
- Slang inspeksie: Check the rubber vacuum hose for cracks, kinks, or signs of wear. Replace if necessary to prevent boost leaks.
- Omgewingsbeskerming: While designed for automotive use, avoid exposing the gauge to extreme temperatures or direct moisture for extended periods.
7. Probleemoplossing
If you encounter issues with your Epman EPXX707 Turbo Boost Gauge, refer to the following troubleshooting steps:
7.1 Gauge Does Not Power On
- Check all power connections (12V ignition, constant 12V, ground) for proper contact and voltage.
- Verify that the vehicle's fuse for the connected circuit is intact.
- Ensure the gauge cable is securely connected to the gauge.
7.2 Inaccurate or No Boost Reading
- Inspect the vacuum hose for any leaks, cracks, or disconnections.
- Ensure the three-way connector is properly installed and sealed.
- Check the boost sensor cable for secure connections at both the sensor and the main harness.
- Verify the boost sensor itself is functioning correctly.
- Confirm the gauge is calibrated correctly (if applicable, though this model primarily uses a sensor).
7.3 Warning Buzzer Not Functioning
- Check the warning value setting in the operating instructions to ensure it is set correctly and the buzzer is enabled.
- Verify the buzzer level is not set to 'silent'.
7.4 Probleme met agtergrondbeligting
- If the backlight is not working or is stuck on one color, check the brightness and color settings using the button on the back of the gauge.
- Ensure the constant 12V power connection (for memory) is secure.
Indien hierdie stappe nie die probleem oplos nie, kontak kliëntediens vir verdere hulp.
8. Spesifikasies
| Kenmerk | Spesifikasie |
|---|---|
| Meter deursnee | 2 duim (52 mm) |
| Huidige trekking | IGN MAX 0.3A, ILM 0.3A |
| Kragvereiste | DC (10-15V) 12V Professional |
| Leesreeks | -1 to 2 x100 kpa |
| Sensor Thread Size | 1/8" NPT |
| LED Kleure | 7 colors + 3 color lights (10-color backlight options) |
| Materiaal | Glass, Acrylonitrile Butadiene Styrene (ABS) Terpolymer, Plastic |
| Deelnommer | EPXX707 |
| UPC | 782903491412 |
| ASIN | B08DR46WKB |
9. Waarborg en Ondersteuning
This product is covered by a standard manufacturer's warranty against defects in materials and workmanship. The specific terms and duration of the warranty may vary by region and retailer. Please retain your proof of purchase for warranty claims.
For technical support, warranty inquiries, or replacement parts, please contact the retailer where you purchased the product or refer to the manufacturer's official webwebwerf vir kontakinligting.