RS PRO RSDS 1052 DL+
RS PRO RSDS 1052 DL+ Digitale Stoor Ossilloskoop Gebruikershandleiding
Model: RSDS 1052 DL+
1. Inleiding
This manual provides comprehensive instructions for the safe and effective operation, maintenance, and troubleshooting of the RS PRO RSDS 1052 DL+ Digital Storage Oscilloscope. Please read this manual thoroughly before using the device to ensure proper functionality and to prevent damage or injury.
The RS PRO RSDS 1052 DL+ is a versatile 2-channel digital storage oscilloscope with a 50 MHz bandwidth, designed for precise signal analysis. It features a 7-inch TFT LCD display for clear waveform visualization and supports various measurement parameters and mathematical operations.
2. Veiligheidsinligting
Always adhere to the following safety precautions to prevent electric shock, fire, or damage to the instrument.
- Kragbron: Ensure the oscilloscope is connected to a power source within the specified voltage range (100-240V AC, 50/60Hz).
- Aarding: The instrument must be properly grounded to prevent electric shock. Do not defeat the grounding plug.
- Omgewing: Operate the oscilloscope in a dry, well-ventilated area, away from direct sunlight, high temperatures, and excessive dust.
- probes: Use only probes supplied or recommended by RS PRO. Ensure probes are correctly rated for the voltage gemeet word.
- Onderhoud: Refer all servicing to qualified service personnel. Do not attempt to open the instrument casing unless explicitly instructed.
- Veiligheidskategorie: This device is rated CAT I, CAT II. Observe all safety warnings on the device and in this manual.
3. Produk verbyview en komponente
Hierdie afdeling bied 'n oorview of the RS PRO RSDS 1052 DL+ oscilloscope and its main components.
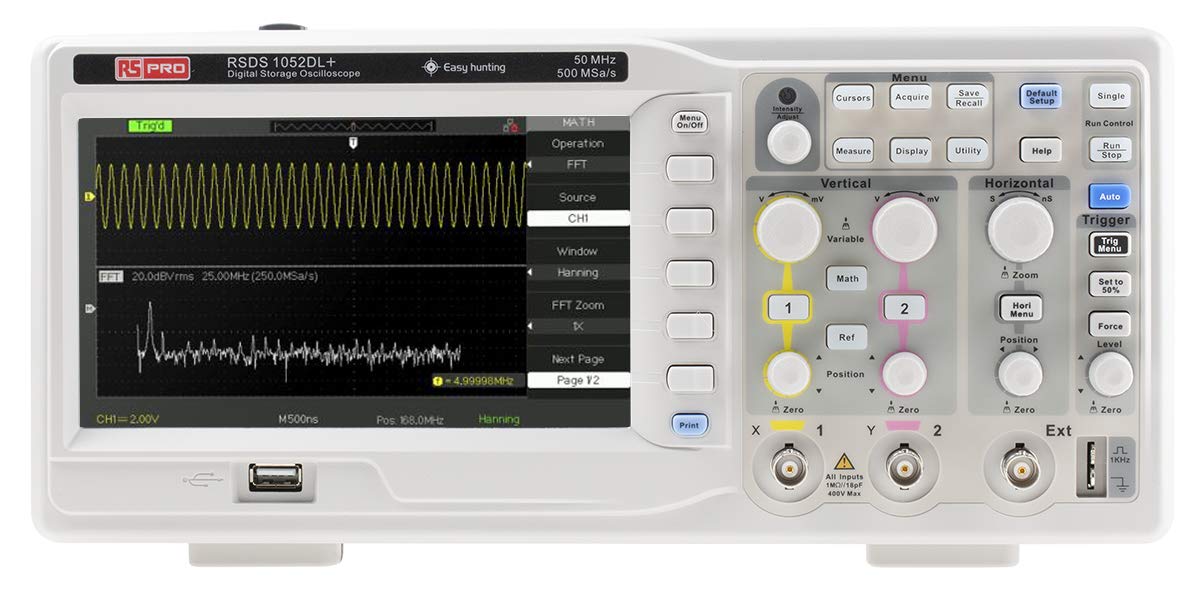
Figuur 3.1: Voorkant View of the Oscilloscope. This image shows the front panel of the RS PRO RSDS 1052 DL+ oscilloscope, highlighting the 7-inch TFT LCD display, control knobs, function buttons, and input connectors for channels 1 and 2. The screen displays a typical waveform and FFT analysis.

Figuur 3.2: Hoekig View of the Oscilloscope. This image provides an angled perspective of the RS PRO RSDS 1052 DL+ oscilloscope, showcasing its compact design and integrated handle for portability. The side ventilation grilles are also visible.

Figuur 3.3: Agter View of the Oscilloscope. This image displays the rear panel of the RS PRO RSDS 1052 DL+ oscilloscope, featuring the power input, USB device port, USB host port, LAN port, and Pass/Fail output. Safety warnings and product labels are also visible.
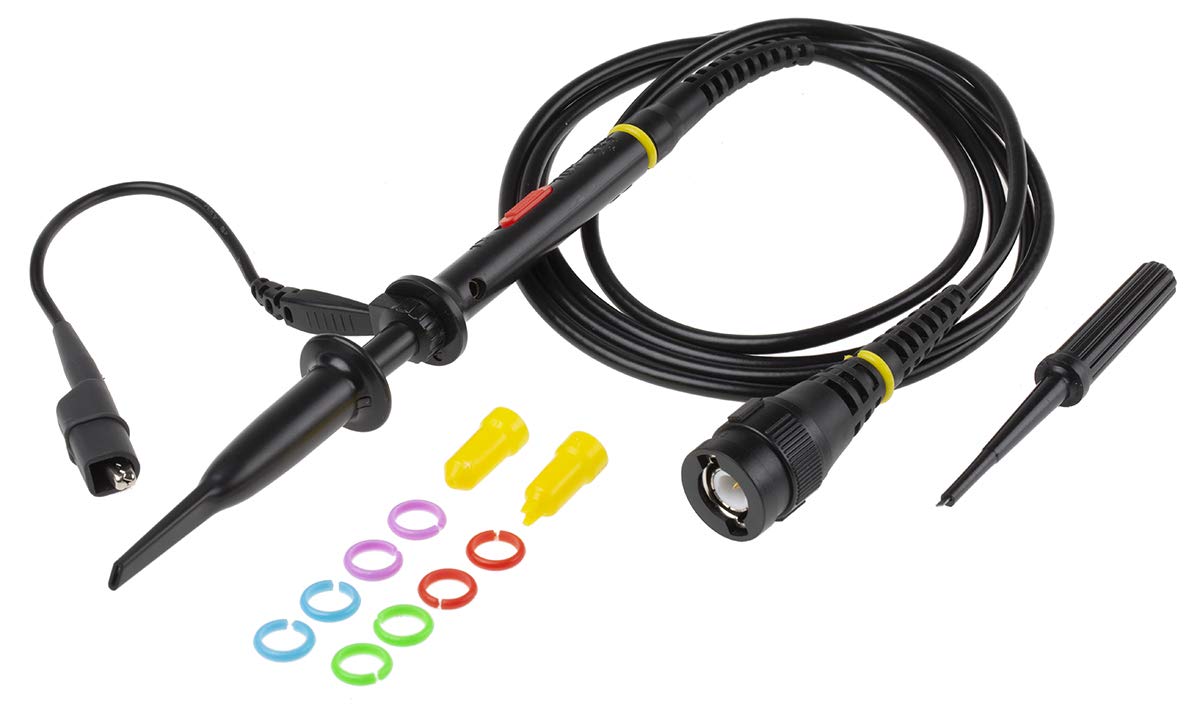
Figure 3.4: Oscilloscope Probe and Accessories. This image shows a passive oscilloscope probe (1:1/10:1) along with various accessories, including colored rings for channel identification and probe tip covers. These are essential for connecting signals to the oscilloscope.

Figure 3.5: Power Plugs and Probe Tip. This image displays an assortment of power plugs (EU, UK, US types) that may be included with the oscilloscope, along with a specialized probe tip. These ensure compatibility with various power outlets and provide versatility for measurements.
3.1 Ingesluit toebehore
The RS PRO RSDS 1052 DL+ typically includes the following accessories:
- Passive Probe 1:1/10:1 (x2)
- USB kabel
- Vinnige Begingids
- Kwaliteit Sertifikaat
- Power Cord (region-specific)
- CD (including User Manual and EasyScopeX software)
4. Opstelling
4.1 Uitpak en inspeksie
- Carefully remove the oscilloscope and all accessories from the packaging.
- Inspect the instrument for any signs of physical damage during transit. If damage is found, contact your supplier immediately.
- Verify that all included accessories listed in Section 3.1 are present.
4.2 Kragverbinding
- Maak seker dat die kragskakelaar op die agterpaneel in die AF-posisie is.
- Koppel die meegeleverde kragkabel aan die WS-ingang op die agterpaneel van die ossilloskoop.
- Plug the other end of the power cord into a grounded AC power outlet. The oscilloscope supports 100-240V AC, 50/60Hz.
4.3 Sondeverbinding en -kompensasie
- Connect the BNC connector of the passive probe to one of the input channels (CH1 or CH2) on the front panel.
- Attach the probe tip to the probe compensation output (usually a square wave test signal) on the front panel.
- Adjust the compensation trimmer on the probe until the displayed square wave is flat-topped, without overshoot or undershoot. This ensures accurate measurements.
5. Bedryfsinstruksies
5.1 Basiese werking
- Krag aan/af: Press the power button on the front panel to turn the oscilloscope on or off.
- Outo-opstelling: Druk die Outo button to automatically adjust vertical, horizontal, and trigger settings for a stable waveform display.
- Vertikale kontroles: Gebruik die VOLTS/DIV knob to adjust the vertical scale (voltage per division) and the POSISIE knob to move the waveform vertically.
- Horisontale Beheer: Gebruik die SEC/DIV knob to adjust the horizontal scale (time per division) and the POSISIE knob to move the waveform horizontally.
- Snellerkontroles: Pas die VLAK knob to set the trigger threshold. The trigger ensures a stable display of repetitive waveforms.
5.2 Gevorderde funksies
- Meetfunksies: Druk die Meet button to access automatic measurement parameters such as Vpp, Vmax, Vmin, Freq, Period, etc.
- Wiskunde funksies: Druk die Wiskunde button to perform mathematical operations on waveforms (e.g., Add, Subtract, Multiply, Divide, FFT).
- Storage and Recall: Gebruik die Stoor/herroep buttons to save waveform data, setups, or screenshots to internal memory or a USB drive.
- USB-verbinding: Connect a USB drive to the front panel USB host port for data storage. Use the rear USB device port to connect the oscilloscope to a PC for data transfer and control via EasyScopeX software.
6. Onderhoud
6.1 Skoonmaak
- Ontkoppel die kragkabel voor skoonmaak.
- Gebruik 'n sagte, damp cloth with mild detergent to clean the exterior of the instrument.
- Do not use abrasive cleaners or solvents that may damage the plastic parts.
- Ensure no liquid enters the instrument.
6.2 Kalibrasie
The oscilloscope is factory calibrated. For optimal performance, periodic calibration by qualified personnel is recommended, typically every 12-24 months, depending on usage and environmental conditions.
6.3 Berging
When not in use for extended periods, store the oscilloscope in a dry, dust-free environment, away from extreme temperatures and humidity.
7. Probleemoplossing
Hierdie afdeling bied oplossings vir algemene probleme wat u mag teëkom.
| Probleem | Moontlike oorsaak | Oplossing |
|---|---|---|
| Geen krag nie | Power cord disconnected; Power switch off; Blown fuse | Check power cord connection; Turn power switch on; Contact service for fuse replacement. |
| Geen golfvorm word vertoon nie | Input signal too small/large; Incorrect vertical/horizontal settings; Trigger not set correctly; Probe not connected | Adjust VOLTS/DIV and SEC/DIV; Use Auto Setup; Adjust trigger level; Ensure probe is connected and compensated. |
| Onstabiele golfvorm | Incorrect trigger settings; No trigger source selected | Adjust trigger level and mode; Select appropriate trigger source (e.g., CH1, CH2, Ext). |
| Verwronge golfvorm | Probe compensation incorrect; Probe damaged; Input overloaded | Perform probe compensation; Try a different probe; Check input signal amplitude. |
If the problem persists after attempting these solutions, please contact RS PRO customer support.
8. Spesifikasies
Key technical specifications for the RS PRO RSDS 1052 DL+ Digital Storage Oscilloscope:
- Analoog kanale: 2
- Oscilloscope Type: Digitale berging
- Bandwydte: 50 MHz
- Intyds S.ampLe koers: Up to 500 MSa/s
- Geheue diepte: 32 Kpts
- Vertoon tipe: TFT LCD
- Vertoongrootte: 7 inches (800 x 480 pixels)
- Vertikale Sensitiwiteit: 2mV/div to 10V/div
- Tydbasisreeks: 10ns/div tot 50s/div
- Kragtoevoer: Mains operated (100-240V AC, 50/60Hz)
- Gewig: 2.5 kg
- Veiligheidskategorie: CAT I, CAT II
- Interfaces: RS232, USB Host, USB Device, LAN
9. Waarborg en Ondersteuning
RS PRO products are manufactured to high standards and are typically covered by a manufacturer's warranty. Please refer to the warranty card included with your product or visit the official RS PRO webwebwerf vir gedetailleerde waarborgbepalings en -voorwaardes.
For technical support, service, or inquiries regarding your RS PRO RSDS 1052 DL+ oscilloscope, please contact RS PRO customer service through their official channels. Contact information can usually be found on the RS PRO webwebwerf of in die dokumentasie wat saam met die produk verskaf word.
RS PRO Official Webwebwerf: https://uk.rs-online.com/web/
Ask a question about this manual
Ask about setup, troubleshooting, compatibility, parts, safety, or missing instructions. Manuals+ will review the question and use this page’s manual context to help answer it.