femometer DET-306
femometer Infrared Forehead Thermometer DET-306 User Manual
Non-Contact Digital Thermometer for Infants and Adults
1. Inleiding
Thank you for choosing the femometer Infrared Forehead Thermometer DET-306. This device is designed for safe and accurate temperature measurement of the human body, objects, and ambient room temperature without contact. Please read this manual thoroughly before use to ensure proper operation and to maintain the device's accuracy and longevity.
Belangrike veiligheidsinligting:
- Moenie probeer om die termometer uitmekaar te haal of te herstel nie.
- Hou die toestel weg van direkte sonlig, stof en uiterste temperature.
- Ensure the measurement area (forehead) is clean and dry for accurate readings.
- This thermometer is intended for household use. Consult a medical professional for any health concerns.
2. Produk verbyview
2.1 Toestelkomponente

Image: The femometer Infrared Forehead Thermometer DET-306 shown with its retail packaging, highlighting its non-contact feature, 1-second instant reading, and LCD backlight.

Image: A detailed diagram of the thermometer's LCD display and control buttons, including the Start Button, Forehead/Object Mode Button, and Power Button. It also illustrates the color-coded fever alarm system (Green, Orange, Red) and various display icons.
2.2 Sleutelkenmerke
- 3-in-1 Measurement: Measures body, object, and room temperature.
- Non-Contact: Safe and hygienic measurement from a distance.
- Instant & Accurate Readings: Provides results in 1 second with high precision.
- Koorsalarm: Color-coded LCD display (Green, Orange, Red) indicates temperature status.
- Herroep geheue: Stores up to 10 previous readings with exact time.
- Agtergrond LCD -skerm: Clear readings day or night.
- Skakelbare eenhede: Wissel maklik tussen Celsius (°C) en Fahrenheit (°F).
- Outomatiese afskakeling: Bewaar batterylewe.
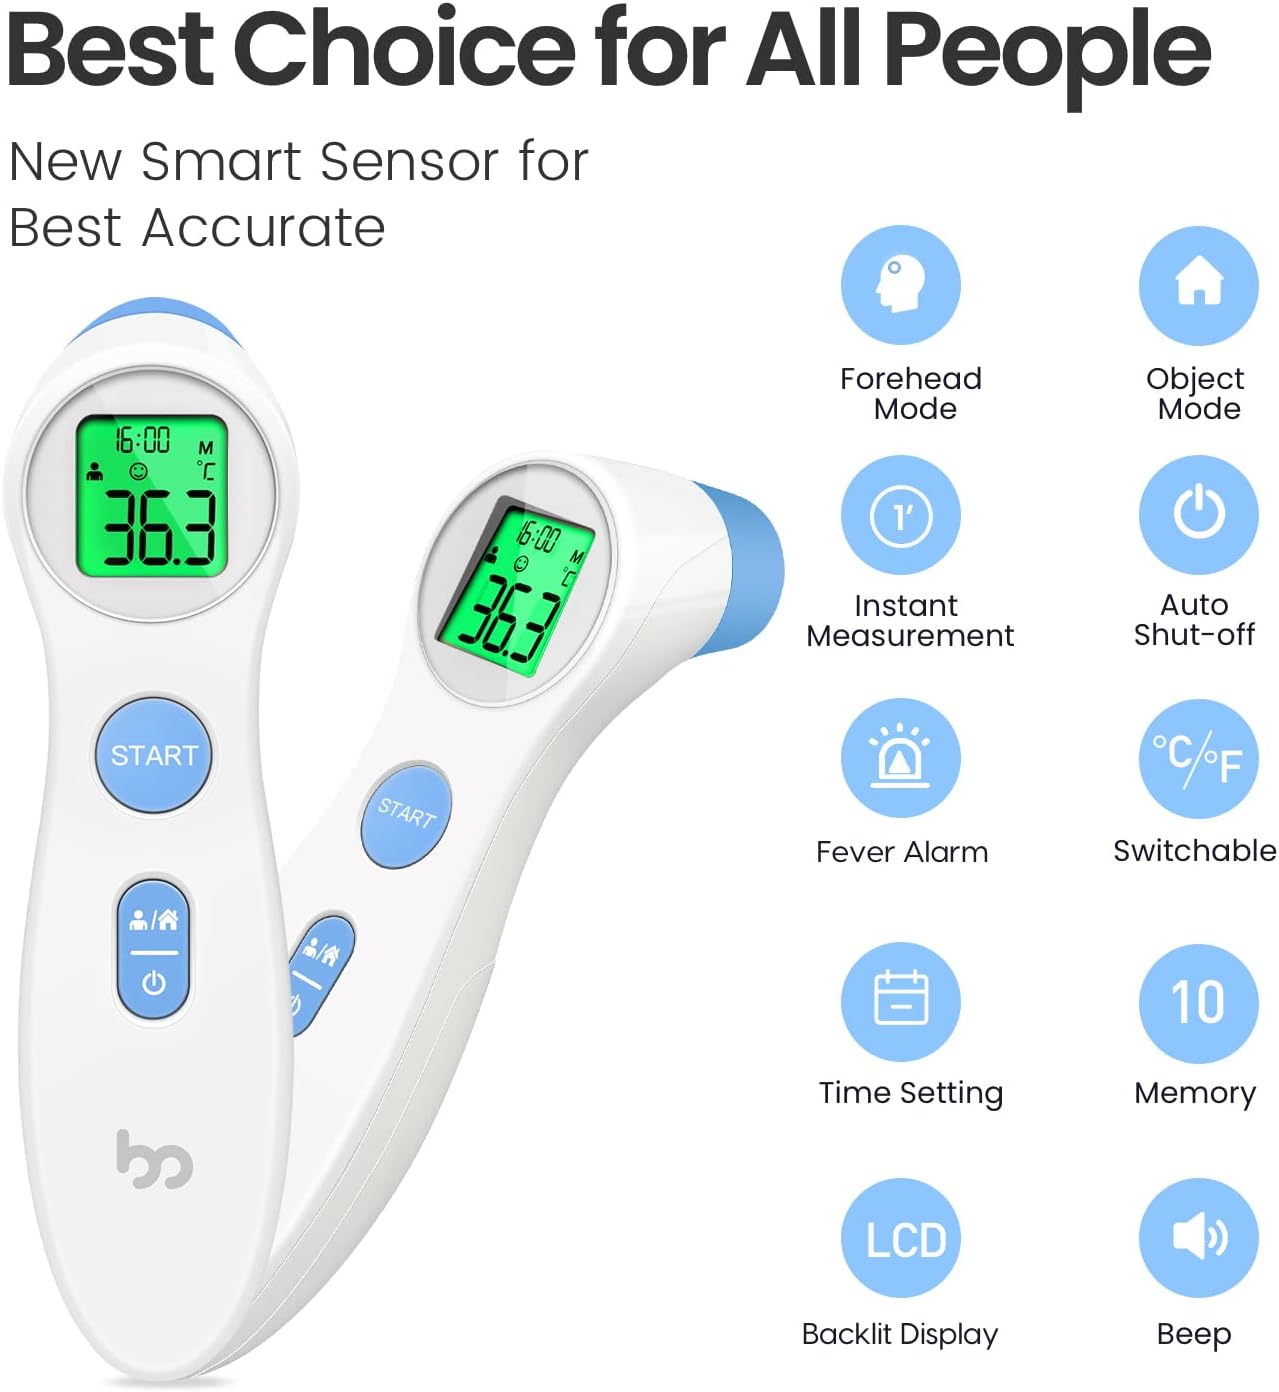
Image: An infographic summarizing the key features of the femometer infrared thermometer, including Forehead Mode, Object Mode, Instant Measurement, Auto Shut-off, Fever Alarm, °C/°F Switchable, Time Setting, 10 Memory Recall, LCD Backlit Display, and Beep function.
3. Opstelling
3.1 Battery installasie
The femometer DET-306 thermometer requires 2 AAA batteries (included). To install or replace batteries:
- Vind die batteryklepdeksel aan die agterkant van die toestel.
- Skuif die deksel oop.
- Plaas twee AAA-batterye in en maak seker dat die polariteit (+ en -) korrek is soos aangedui in die kompartement.
- Maak die batterykompartement se deksel stewig toe.
The device will emit a short beep and the display will show all segments briefly, indicating successful battery installation.
4. Bedryfsinstruksies
4.1 Skakel aan/af
- Om aan te sit: Druk die kragknoppie (I/O). The display will show all segments, then the last measurement, and finally enter standby mode.
- Om af te sit: The device will automatically shut off after approximately 30 seconds of inactivity to conserve battery. You can also manually turn it off by pressing and holding the Power Button for a few seconds.
4.2 Meetmodusse
The thermometer has two main measurement modes: Forehead Mode (for body temperature) and Object Mode (for surface/room temperature).
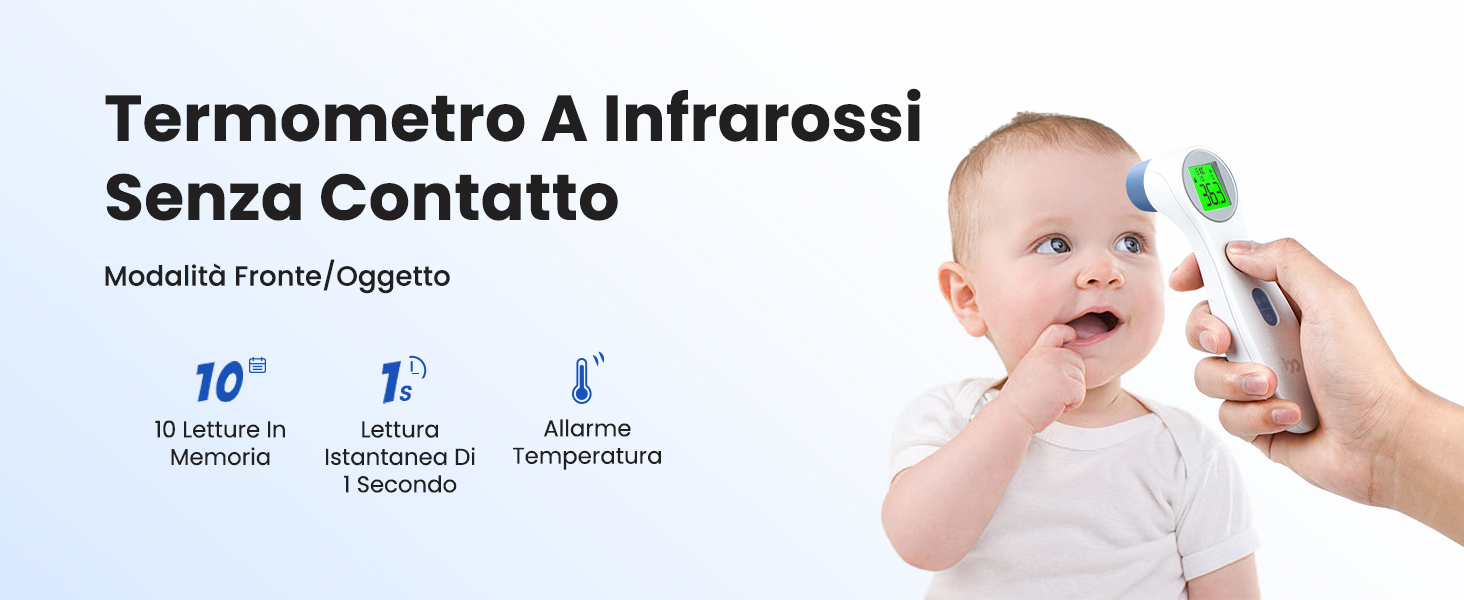
Image: A baby being measured with the non-contact infrared thermometer, illustrating its ease of use for infants. Key features like 10 memory readings, 1-second instant reading, and temperature alarm are highlighted.

Image: Demonstrates the thermometer in use for Forehead Mode (measuring a person's temperature) and Object Mode (measuring food and room temperature), showcasing sy veelsydigheid.
To switch between modes, press the Forehead/Object Button (person/house icon). The corresponding icon will appear on the LCD display.
4.3 Neem 'n meting
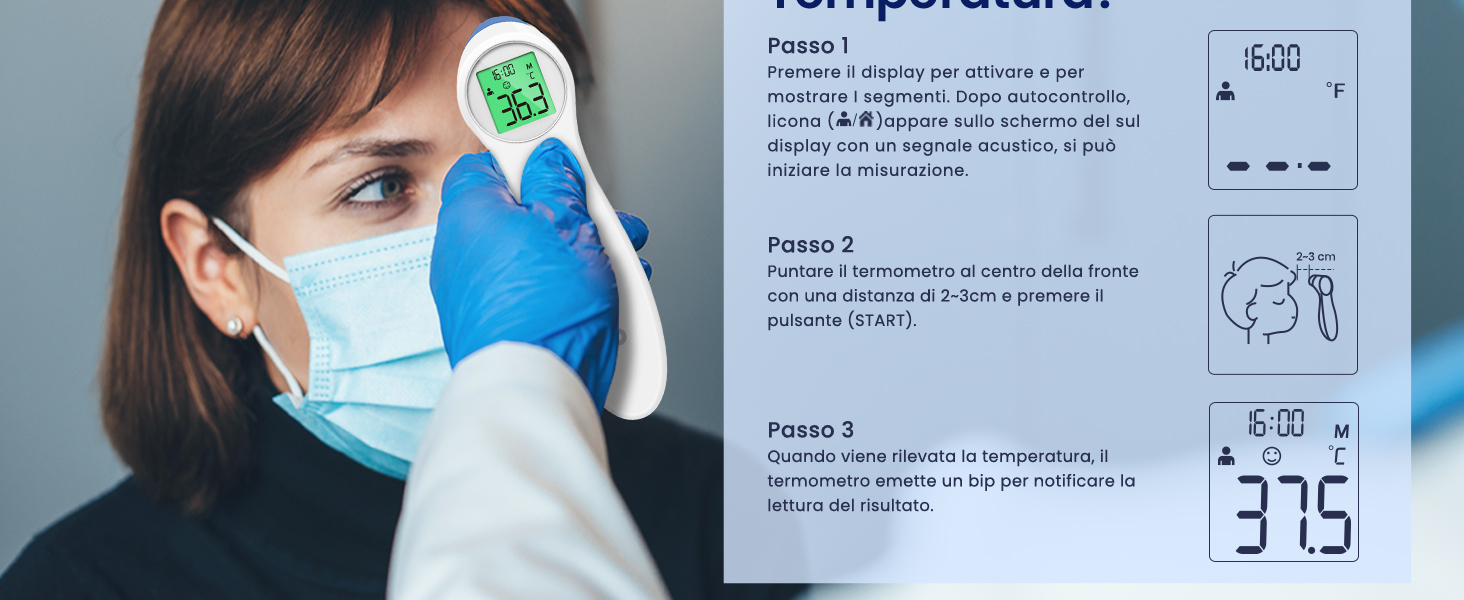
Image: A visual guide demonstrating the three steps to measure temperature: 1. Power on and select mode. 2. Point thermometer 2-3 cm from the forehead and press START. 3. Read the temperature after a short beep.
- Ensure the thermometer is in the desired mode (Forehead or Object).
- Position the thermometer 1-3 cm (0.4-1.2 inches) away from the center of the forehead (for body temperature) or the object/surface.
- Druk die BEGIN knoppie.
- The measurement will be completed after a short beep, and the temperature reading will be displayed on the LCD screen.
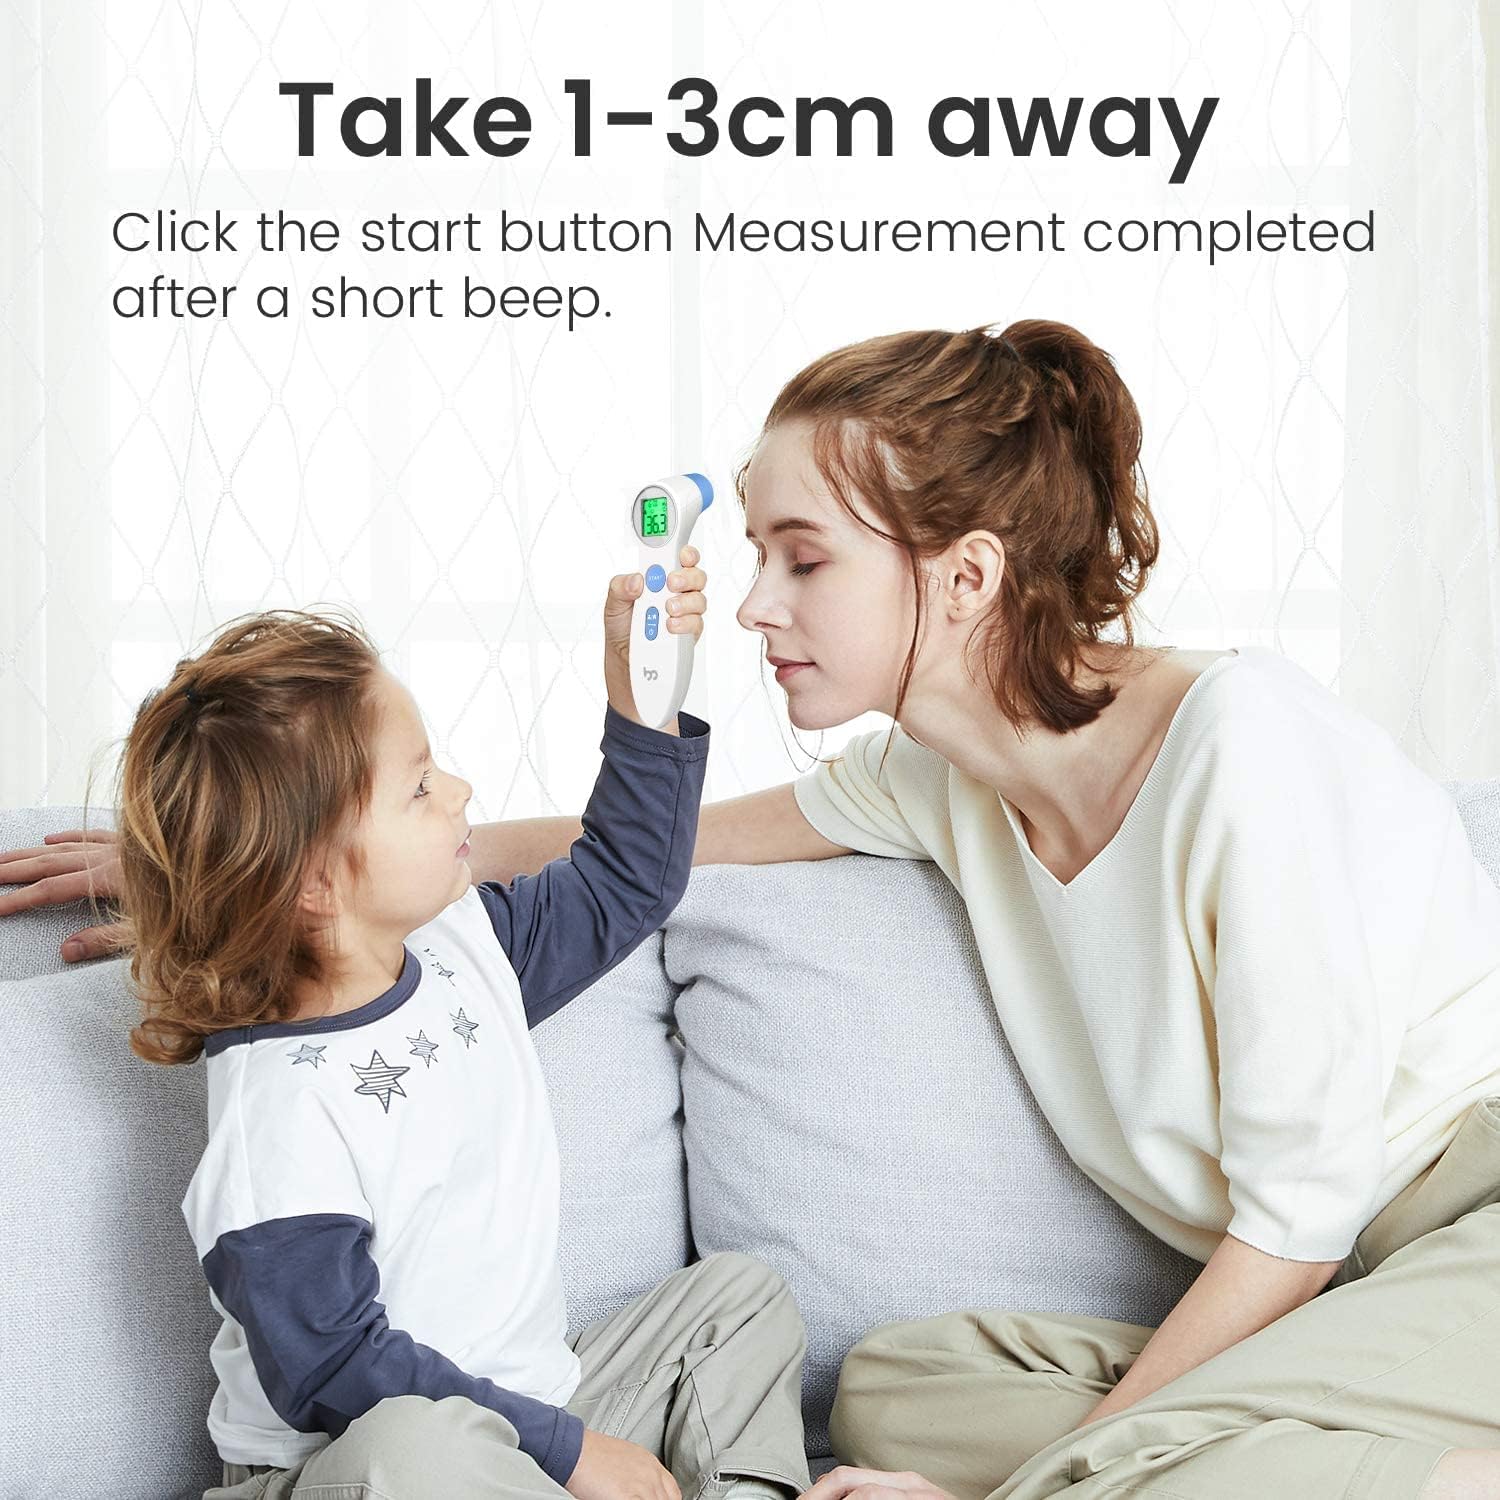
Image: Illustrates the recommended measurement distance of 1-3 cm from the forehead for accurate readings, showing a child and adult using the thermometer.
4.4 Skakeltemperatuureenhede (°C/°F)
Om tussen Celsius (°C) en Fahrenheit (°F) te wissel:
- Ensure the thermometer is in the OFF state.
- Druk en hou die BEGIN knoppie vir 3-5 sekondes.
- The display will show the current unit, and then switch to the other unit. Release the button when the desired unit is displayed.

Image: Shows how to switch the temperature unit between Celsius (°C) and Fahrenheit (°F) by pressing the start button, with examples of both displays.
4.5 Fever Alarm Interpretation
The thermometer's LCD backlight changes color to indicate temperature status:
- Groen: Normal body temperature (T ≤ 37.3°C / 99.1°F).
- Oranje: Low-grade fever (37.3°C < T < 37.7°C / 99.1°F < T < 99.9°F).
- Rooi: High fever (T ≥ 37.7°C / 99.9°F).
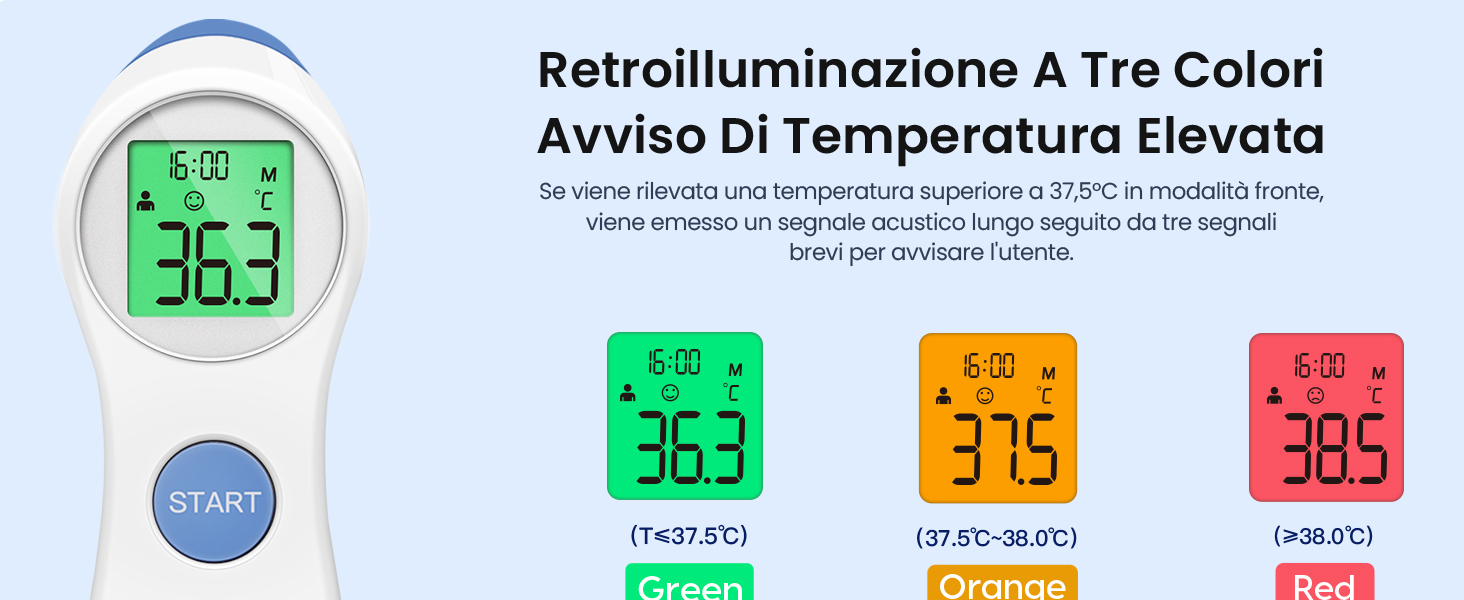
Image: Illustrates the three-color backlight system for temperature alerts: Green for normal, Orange for elevated, and Red for high temperature, with corresponding temperature ranges.
4.6 Geheueherroeping
The thermometer automatically stores the last 10 temperature readings with the exact time. To access memory recall:
- Skakel die termometer aan.
- Press the Forehead/Object Button (person/house icon) repeatedly to cycle through the stored readings.
- Each press will display the next stored reading, starting from the most recent.

Image: Shows the thermometer being used in a dark room, demonstrating its backlit LCD display for clear readings at night without disturbing others.
5. Onderhoud
5.1 Skoonmaak
- Wipe the thermometer body with a soft, dry cloth.
- For the probe, gently clean with an alcohol swab (70% isopropyl alcohol) or a cotton swab moistened with alcohol. Allow it to air dry completely before use.
- Do not immerse the thermometer in water or any cleaning solutions.
5.2 Berging
- Bêre die termometer op 'n koel, droë plek, weg van direkte sonlig en uiterste temperature.
- If not in use for an extended period, remove the batteries to prevent leakage.
6. Probleemoplossing
| Probleem | Moontlike oorsaak | Oplossing |
|---|---|---|
| Geen skerm/Toestel skakel nie aan nie | Dooie batterye, verkeerde battery-installasie. | Vervang batterye, maak seker dat die polariteit korrek is. |
| Onakkurate lesings | Incorrect measurement distance, dirty probe, environmental factors (drafts, direct sunlight), recent activity (eating, exercising). | Ensure 1-3 cm distance, clean probe, measure in stable environment, wait 30 minutes after activity. |
| Display shows 'Lo' or 'Hi' | Temperatuur is buite die meetbare reeks. | Ensure measurement is within specified operating range (e.g., 32°C-42.9°C for body). |
| Display shows 'Err' | System error or malfunction. | Remove and reinsert batteries. If error persists, contact customer support. |
7. Spesifikasies
- Model: DET-306
- Meetreeks:
- Body: 32.0°C – 42.9°C (89.6°F – 109.2°F)
- Object: 0°C – 100°C (32°F – 212°F)
- Akkuraatheid: ±0.2°C (±0.4°F) for body temperature within 35.0°C – 42.0°C (95.0°F – 107.6°F)
- Meetafstand: 1-3 cm
- Vertoon: LCD met agtergrond
- Geheue: 10 XNUMX lesings
- Kragbron: 2 x AAA batteries (DC 3V)
- Outomatiese afskakeling: Ongeveer. 30 sekondes
- Afmetings: 15 x 4 x 4 cm
- Gewig: 124 gram (met batterye)
- Materiaal: Plastiek
- Ingesluit komponente: 1 Thermometer, 2 AAA Batteries
8. Waarborg en Ondersteuning
femometer is committed to providing high-quality products and excellent customer service. We offer many years of friendly customer service for our products.
If you have any questions, concerns, or require assistance with your femometer Infrared Forehead Thermometer DET-306, please do not hesitate to contact our customer support team. Refer to the product packaging or the official femometer webwebwerf vir kontakbesonderhede.

Image: The official femometer brand logo.
Ask a question about this manual
Ask about setup, troubleshooting, compatibility, parts, safety, or missing instructions. Manuals+ will review the question and use this page’s manual context to help answer it.