1. Produk verbyview
The MICTUNING Nema 14-50P Male Plug Connector is a robust 4-prong, 50 Amp, 125/250 Volt straight blade plug designed for heavy-duty applications. It serves as a replacement or new installation plug for various electrical equipment, including RVs, generators, and electric dryers. Constructed from flame-retardant ABS material and featuring solid brass blades, this connector ensures durability and optimal electrical conductivity.

Image 1.1: The MICTUNING Nema 14-50P Male Plug Connector, highlighting its ABS material, heavy-duty construction, pressure-proof design, and 125/250V rating.
2. Veiligheidsinligting
WAARSKUWING: Electrical work can be hazardous. Improper installation or use can result in serious injury, death, or property damage. Always follow these safety guidelines:
- Ontkoppel krag: Before attempting any installation or wiring, ensure that the power source is completely disconnected and locked out to prevent accidental energization.
- Gekwalifiseerde personeel: Installation should be performed by a qualified electrician or a knowledgeable individual with experience in electrical wiring.
- Proper Wire Gauge: Use appropriate wire gauges for 50 Amp applications as specified by local electrical codes. Using undersized wire can lead to overheating and fire hazards.
- Plaaslike kodes: Adhere to all national and local electrical codes and regulations.
- Inspekteer komponente: Before installation, inspect the plug for any signs of damage. Do not use if damaged.
- Veilige verbindings: Ensure all wire connections are tight and secure to prevent arcing and overheating.
3. Pakketinhoud
- 1 x MICTUNING Nema 14-50P Male Plug Connector
4. Installasie-instruksies
Follow these steps to correctly wire the Nema 14-50P Male Plug Connector:
- Berei die kabel voor: Strip the outer jacket of your 4-conductor electrical cable (typically 6 AWG for 50A applications) to expose the individual insulated wires (Black, Red, White, Green/Bare). Strip approximately 3/4 inch of insulation from the end of each individual wire.
- Demonteer die prop: Unscrew the housing of the Nema 14-50P plug to separate the front and back sections, exposing the internal terminals.
- Identifiseer terminale: Refer to the internal wiring diagram (Image 4.1) to identify the correct terminal for each wire. The terminals are typically marked or color-coded.
- Groen draad: Connect to the ground terminal (typically marked 'G' or green screw).
- Wit draad: Connect to the neutral terminal (typically marked 'W' or silver screw).
- Swart draad: Connect to one hot terminal (typically marked 'X' or brass screw).
- Rooi draad: Connect to the other hot terminal (typically marked 'Y' or brass screw).
- Koppel drade: Insert each stripped wire end into its corresponding terminal and tighten the screw securely. Ensure no stray wire strands are present and that the insulation is close to the terminal without being pinched under the screw.
- Bevestig die kabel: Route the cable through the strain relief mechanism at the back of the plug. Tighten the strain relief to secure the cable and prevent tension on the wire connections.
- Monteer die prop weer: Carefully align the front and back sections of the plug housing and secure them with the screws. Ensure no wires are pinched during reassembly.
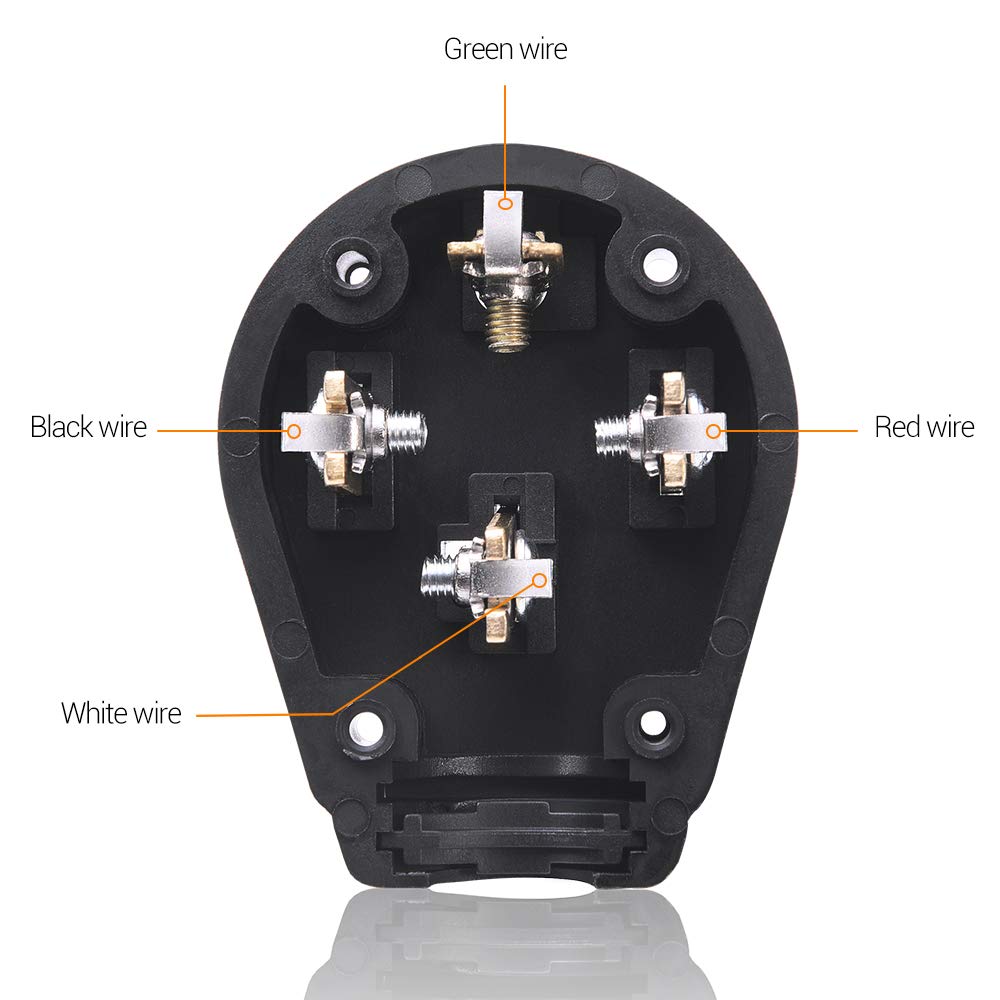
Beeld 4.1: Intern view of the Nema 14-50P plug, indicating the connection points for the Green (Ground), Black (Hot), Red (Hot), and White (Neutral) wires.

Image 4.2: Detail of the solid brass blades, designed for maximum conductivity and minimal electrical loss.
5. Operasie
Once the Nema 14-50P plug is correctly wired and assembled, it is ready for use.
- Koppel tans: Align the prongs of the plug with the corresponding slots in a Nema 14-50R receptacle. Insert the plug firmly until it is fully seated.
- Ontkoppel tans: Grasp the body of the plug and pull it straight out from the receptacle. Avoid pulling on the cable itself, as this can damage the wiring or the plug.
6. Onderhoud
Regular inspection and basic maintenance can extend the life of your plug connector:
- Visuele inspeksie: Periodically check the plug for any signs of physical damage, such as cracks in the housing, bent prongs, or discoloration from overheating.
- Draadverbindings: If you suspect an issue, carefully open the plug (after disconnecting power) and check that all wire connections remain tight. Loose connections can cause resistance and heat buildup.
- Skoonmaak: Keep the plug clean and free from dirt, dust, and moisture. Use a dry cloth for cleaning. Do not use liquid cleaners on electrical components.
- Berging: When not in use, store the plug in a clean, dry environment away from extreme temperatures.
7. Probleemoplossing
If you encounter issues with your Nema 14-50P plug, consider the following:
- Geen krag:
- Verifieer dat die kragbron aktief is.
- Gaan stroombrekers of sekerings na.
- Inspect internal wiring for loose connections (refer to Section 4).
- Oorverhitting:
- Ensure the wire gauge is appropriate for 50 Amps.
- Check for loose or corroded wire connections within the plug.
- Confirm the connected appliance is not drawing more than 50 Amps.
- Moeilikheid om drade te pas: Some heavy-gauge wires can be stiff. Ensure wires are properly stripped and twisted before inserting into terminals. If necessary, trim a small amount of insulation to allow for full insertion into the terminal without excess bare wire.
- Bent Prongs: If a prong becomes bent, carefully attempt to straighten it. If the prong shows signs of fatigue or cracking, replace the plug immediately to prevent poor connection and potential hazards.
8. Spesifikasies
| Kenmerk | Spesifikasie |
|---|---|
| Handelsmerk | MICTUNING |
| Model | Nema 14-50P |
| Amperageer | 50 Amps |
| Voltage | 125/250 Volt |
| Connector Tipe | 4-Prong Male Plug |
| Aantal drade | 4 |
| Materiaal | Akrielnitril Butadieen Styreen (ABS) |
| Lemme Materiaal | Soliede koper |
| Spesifikasie Met | NEMA |

Image 8.1: Dimensional drawing of the Nema 14-50P plug, indicating key measurements for fitment.

Beeld 8.2: Onderkant view of the plug, displaying its NEMA rating and voltage/amperage specifications, emphasizing its solid construction.
9. Waarborg en Ondersteuning
For warranty information, technical support, or any inquiries regarding your MICTUNING Nema 14-50P Male Plug Connector, please refer to the official MICTUNING webwebwerf of kontak hul kliëntediens direk. Bewaar u aankoopbewys vir waarborgeise.
MICTUNING Official Webwebwerf: Visit MICTUNING Store on Amazon


