1. Inleiding en Veiligheidsinligting
Thank you for choosing the ANENG V8 Digital Multimeter. This device is designed for safe and accurate measurement of AC/DC voltage, AC/DC current, resistance, capacitance, frequency, temperature, diode, continuity, and battery testing. Please read this manual thoroughly before use to ensure proper operation and to prevent potential hazards.
1.1 Veiligheidsmaatreëls
- Always ensure the multimeter is in good working condition before use. Inspect test leads for damage.
- Moenie toepas voltage or current that exceeds the maximum rated values for the multimeter.
- Wees uiters versigtig wanneer u met voltages above 36V DC or 25V AC RMS, as these can pose a shock hazard.
- Ontkoppel altyd die krag na die stroombaan en ontlaai alle hoëvolume.tage-kondensators voordat weerstand, kontinuïteit, diodes of kapasitansie gemeet word.
- Maak seker dat die draaiskakelaar in die korrekte posisie is vir die verlangde meting voordat die toetsdrade aan die stroombaan gekoppel word.
- Moenie die multimeter in plofbare gas-, damp- of stowwerige omgewings gebruik nie.
- Vervang batterye onmiddellik wanneer die lae battery-aanwyser verskyn om akkurate lesings te verseker.
2. Produk verbyview
2.1 Pakketinhoud
The ANENG V8 Digital Multimeter package typically includes the following items:
- ANENG V8 Digital Multimeter
- Toetsdrade (Rooi en Swart)
- Temperatuursonde
- Dratas
- Gebruikershandleiding

Image: ANENG V8 Digital Multimeter with its standard accessories, including test leads, a temperature probe, and a protective carrying case.
2.2 Kontroles en Skerm
The multimeter features an 8000-count LCD backlight display for clear readings in various lighting conditions. Key controls include a rotary switch for function selection and buttons for range, data hold, and other features.

Beeld: Gedetailleerd view of the multimeter's front panel, highlighting the LCD screen, the central rotary selector, and various control buttons.
3. Opstelling
3.1 Battery installasie
The ANENG V8 Digital Multimeter is powered by batteries. To install or replace batteries:
- Maak seker dat die multimeter afgeskakel is en ontkoppel alle toetsdrade.
- Vind die batteryklepdeksel aan die agterkant van die toestel.
- Gebruik 'n skroewedraaier om die skroef(e) wat die batteryklep vasmaak, los te maak.
- Verwyder die deksel.
- Insert new batteries, observing the correct polarity (+ and -) as indicated inside the compartment. The device typically uses AA batteries.
- Plaas die batterydeksel terug en maak dit vas met die skroef(e).
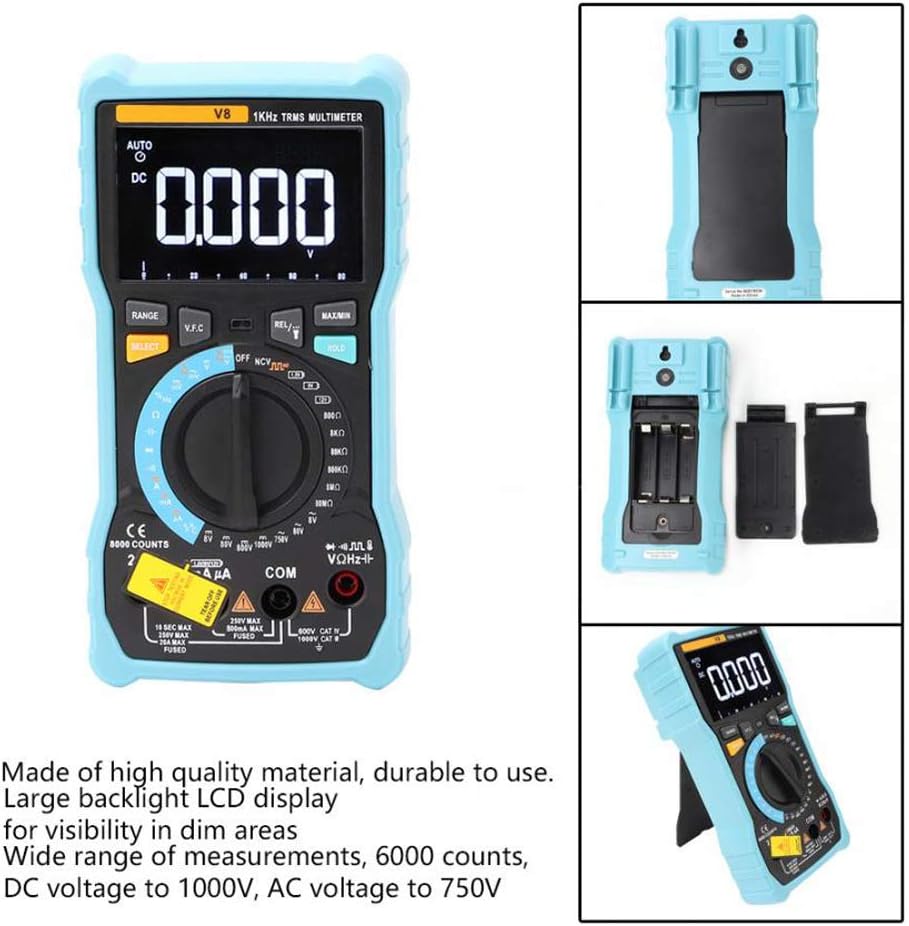
Beeld: Die agterkant view of the multimeter with the battery compartment open, illustrating the correct placement for three AA batteries.
4. Bedryfsinstruksies
Before any measurement, ensure the test leads are correctly inserted into the input jacks and the rotary switch is set to the appropriate function.
4.1 Measuring DC/AC Voltage
- Set the rotary switch to the 'V–' (DC Voltage) or 'V~' (AC Voltage) posisie.
- Connect the red test lead to the 'VΩmA' jack and the black test lead to the 'COM' jack.
- Koppel die toetsdrade parallel aan die stroombaan of komponent wat jy wil meet.
- Lees die voltage waarde op die skerm.
4.2 Measuring DC/AC Current
- Set the rotary switch to the 'A–' (DC Current) or 'A~' (AC Current) position. For milliampere (mA) of mikroampere (µA) measurements, select the corresponding range.
- For current up to 800mA, connect the red test lead to the 'VΩmA' jack. For current up to 20A, connect the red test lead to the '20A' jack. Connect the black test lead to the 'COM' jack.
- Disconnect power to the circuit. Open the circuit where you want to measure current. Connect the multimeter in series with the circuit.
- Skakel krag na die stroombaan en lees die stroomwaarde op die skerm.
4.3 Meet van weerstand
- Set the rotary switch to the 'Ω' (Resistance) position.
- Connect the red test lead to the 'VΩmA' jack and the black test lead to the 'COM' jack.
- Ensure the circuit is de-energized and all capacitors are discharged. Connect the test leads across the component to be measured.
- Lees die weerstandswaarde op die skerm.
4.4 NCV (Nie-kontakvolume)tage) Opsporing
- Stel die draaiskakelaar na die 'NCV'-posisie.
- Move the top end of the multimeter near the conductor or outlet.
- The multimeter will emit an audible beep and the NCV indicator light will flash if AC voltage is detected, indicating the presence of live voltage sonder fisiese kontak.
4.5 Temperatuurmeting
- Set the rotary switch to the '°C/°F' (Temperature) position.
- Connect the temperature probe to the 'VΩmA' and 'COM' jacks, observing polarity if applicable.
- Plaas die punt van die temperatuursonde op of naby die voorwerp waarvan jy die temperatuur wil meet.
- Lees die temperatuurwaarde op die skerm.
4.6 Ander funksies
- Kapasitansie: Set the rotary switch to the 'F' position. Connect leads across the discharged capacitor.
- Frekwensie/Dienssiklus: Set the rotary switch to the 'Hz/%' position. Connect leads to the signal source.
- Diode toets: Set the rotary switch to the 'Diode' position. Connect leads across the diode.
- Kontinuïteitstoets: Set the rotary switch to the 'Continuity' position. Connect leads across the circuit. An audible beep indicates continuity.
- Battery toets: Set the rotary switch to the 'Battery' position. Connect leads to the battery terminals (1.5V, 9V, or 12V).
- Datahou: Druk die 'HOLD'-knoppie om die huidige lesing op die skerm te vries. Druk weer om los te laat.
- Agterlig/Flitslig: Press the backlight button to turn on/off the display backlight or flashlight.
- Outo-afskakeling: Die multimeter sal outomaties afskakel na 'n tydperk van onaktiwiteit om batterylewe te bespaar.
5. Onderhoud
5.1 Skoonmaak
Vee die omhulsel af met advertensieamp lap en sagte skoonmaakmiddel. Moenie skuurmiddels of oplosmiddels gebruik nie. Hou die invoerterminale vry van vuiligheid en vog.
5.2 Sekeringvervanging
If the current measurement function fails, the fuse may need replacement. Refer to the specifications for the correct fuse type and rating. Fuse replacement should only be performed by qualified personnel.
5.3 Berging
When not in use for extended periods, remove the batteries to prevent leakage and store the multimeter in a dry, cool place.
6. Probleemoplossing
- Geen skerm: Kontroleer batteryinstallasie en laai. Vervang batterye indien nodig.
- Verkeerde lesings: Ensure the rotary switch is set to the correct function and range. Check test lead connections. Verify battery charge.
- Huidige meting werk nie: Check the fuse. Replace if blown (refer to fuse replacement section).
- NCV word nie opgespoor nie: Ensure the NCV function is selected and the multimeter is close enough to the AC voltage bron.
7. Spesifikasies
| Parameter | Waarde |
|---|---|
| Vertoon | 8000 Counts LCD with Backlight |
| DC Voltage (V) | 8.000V / 80.00V / 800.0V / 1000V |
| DC Voltage (mV) | 800mV |
| AC Voltage (V) | 8.000V/80.00V/750V |
| AC Voltage (mV) | 800mV |
| GS-stroom (A) | 8.000A / 20.00A |
| Gelykstroom (mA) | 8.000mA / 80.00mA / 800.0mA |
| GS-stroom (µA) | 800µA / 8000µA |
| WS-stroom (A) | 8.000A / 20.00A |
| Wisselstroom (mA) | 8.000mA / 80.00mA / 800.0mA |
| WS-stroom (µA) | 800µA / 8000µA |
| Weerstand | 800.0Ω / 8.000kΩ / 80.00kΩ / 800.0kΩ / 8.000MΩ / 80.00MΩ |
| Kapasitansie | 9.999nF / 99.99nF / 999.9nF / 9.999µF / 99.99µF / 999.9µF / 9.999mF / 99.99mF |
| Frekwensie | 9.999 Hz / 99.99 Hz / 999.9 Hz / 9.999 kHz / 99.99 kHz / 999.9 kHz / 9.999 MHz |
| Pligsiklus | 1% ~ 99% |
| Temperatuurreeks | -20°C ~ 1000°C (-4°F ~ 1832°F) |
| Battery toets | 1.5V/9V/12V |
| Reeks | Outomaties / handmatig |
| Dateer koers op | 3 keer / sekonde |
| Ware RMS | Ja |
| Data hou | Ja |
| Agterlig/flitslig | Ja |
| Lae battery waarskuwing | Ja |
| Outomatiese afskakeling | Ja |
| Materiaal | ABS / PVC |
| Kragbron | Battery aangedrewe |
8. Waarborg en Ondersteuning
This product is covered by a standard manufacturer's warranty against defects in materials and workmanship. Please refer to the warranty card included with your purchase for specific terms and conditions. For technical support or service inquiries, please contact your retailer or the manufacturer's customer service department.
9. Amptelike produkvideo's
Geen amptelike produkvideo's van die verkoper is tans beskikbaar vir inbedding nie.


