1. Inleiding en oorview
The Escort EDM 1111A is a versatile digital multimeter designed for accurate measurement of various electrical parameters. This device is essential for electricians, technicians, and hobbyists for testing circuits, components, and power sources. It features a clear digital display and a rotary dial for selecting different measurement functions.

The Escort EDM 1111A Digital Multimeter with red and black test leads connected, ready for use.
Sleutelfunksies sluit in:
- DC Voltage (DCV) measurement
- AC Voltage (ACV) measurement
- DC Current (DCA) measurement
- AC Current (ACA) measurement
- Weerstand (Ω) meting
- Capacitance (CX) measurement
- Diode and Transistor (hFE) testing
2. Opstelling
2.1 Battery installasie
The Escort EDM 1111A requires a DC 9V 006P battery for operation. To install or replace the battery:
- Maak seker dat die multimeter AFGESKAKEL is.
- Vind die batterykompartement aan die agterkant van die eenheid.
- Carefully slide open or unscrew the battery cover.
- Insert a new 9V 006P battery, observing the correct polarity (+/-).
- Plaas die batterydeksel veilig terug.

Die agterkant view of the Escort EDM 1111A Digital Multimeter, showing the battery compartment cover and the product label.
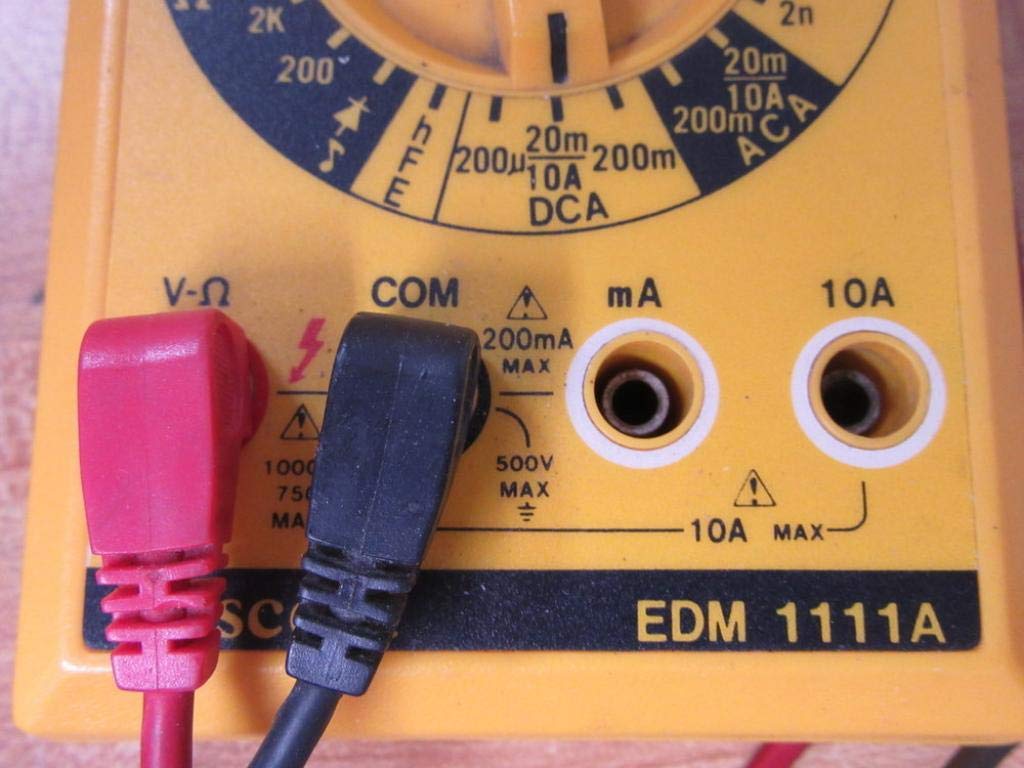
2.2 Verbinding van toetsdrade
The multimeter comes with two test leads, typically one red (positive) and one black (negative/common). Proper connection is crucial for accurate and safe measurements.
- Vir die meeste volumestage, resistance, and low current measurements, connect the black lead to the 'COM' (Common) jack.
- Connect the red lead to the 'V-Ω-mA' jack for voltage, weerstand en milliampere huidige metings.
- For high current measurements (up to 10A), connect the red lead to the '10A' jack. Always ensure the correct jack is used to prevent damage to the meter or circuit.

A closer look at the input jacks (V-Ω, COM, mA, 10A) and the lower portion of the rotary dial, indicating current measurement ranges.

The red and black test probes (leads) used with the Escort EDM 1111A Digital Multimeter, featuring pointed tips for electrical contact.
3. Bedryfsinstruksies
Before taking any measurements, ensure the test leads are correctly connected and the rotary dial is set to the appropriate function and range.

Gedetailleerd view of the rotary selector dial on the Escort EDM 1111A Digital Multimeter, displaying various measurement functions such as DCV, ACV, Ω, DCA, ACA, and CX.
3.1 Meet DC Voltage (DCV)
- Set the rotary dial to the desired DCV range (e.g., 200m, 2, 20, 200, 1000). Choose a range higher than the expected voltage.
- Connect the red lead to the positive (+) side of the circuit and the black lead to the negative (-) side.
- Lees die voltage waarde op die skerm.
3.2 Meting van AC Voltage (ACV)
- Set the rotary dial to the desired ACV range (e.g., 200m, 2, 20, 200, 750). Choose a range higher than the expected voltage.
- Verbind die toetsdrade oor die WS-volumetage source. Polarity does not matter for AC voltage.
- Lees die voltage waarde op die skerm.
3.3 Measuring Resistance (Ω)
- Maak seker dat die stroombaan of komponent gedeaktiveer is voordat weerstand gemeet word.
- Set the rotary dial to the desired Ω range (e.g., 200, 2K, 20K, 200K, 2M, 20M, 200M).
- Verbind die toetsdrade oor die komponent wat gemeet moet word.
- Lees die weerstandswaarde op die skerm.
3.4 Measuring DC Current (DCA)
- Maak seker dat die stroombaan gedeaktiveer is.
- Set the rotary dial to the desired DCA range (e.g., 200µ, 2m, 20m, 200m, 10A).
- Belangrik: For currents up to 200mA, use the 'V-Ω-mA' jack for the red lead. For currents up to 10A, use the '10A' jack.
- Break the circuit and connect the multimeter in series with the load. The current must flow through the multimeter.
- Skakel die stroombaan weer aan en lees die stroomwaarde.
3.5 Measuring AC Current (ACA)
- Maak seker dat die stroombaan gedeaktiveer is.
- Set the rotary dial to the desired ACA range (e.g., 200µ, 2m, 20m, 200m, 10A).
- Belangrik: For currents up to 200mA, use the 'V-Ω-mA' jack for the red lead. For currents up to 10A, use the '10A' jack.
- Verbreek die stroombaan en koppel die multimeter in serie met die las.
- Skakel die stroombaan weer aan en lees die stroomwaarde.
3.6 Measuring Capacitance (CX)
- Maak seker dat die kondensator volledig ontlaai is voor toetsing.
- Set the rotary dial to the CX range (e.g., 2n, 20n, 200n, 2µ, 20µ).
- Verbind die toetsdrade oor die kondensatorterminale.
- Lees die kapasitansiewaarde op die skerm.
3.7 Diode and Transistor (hFE) Testing
Refer to the specific markings on the dial for diode and transistor testing functions. Typically, diode test mode allows checking the forward voltage drop of a diode, and hFE mode is used for measuring the DC current gain of transistors.
4. Onderhoud
4.1 Batteryvervanging
Replace the 9V 006P battery when the low battery indicator appears on the display or if the multimeter fails to power on. Follow the instructions in Section 2.1.
4.2 Skoonmaak
Om die multimeter skoon te maak, gebruik 'n sagte, damp lap. Moenie skuurmiddels of oplosmiddels gebruik nie, aangesien dit die c kan beskadig.asing or display. Ensure the device is turned off and disconnected from any circuits before cleaning.
4.3 Berging
When not in use for extended periods, store the multimeter in a cool, dry place, away from direct sunlight and extreme temperatures. Consider removing the battery to prevent leakage, which could damage the internal components.
5. Probleemoplossing
| Probleem | Moontlike oorsaak | Oplossing |
|---|---|---|
| Geen vertoon of dowwe vertoon | Lae of dooie battery | Replace the 9V 006P battery. |
| Verkeerde lesings | Incorrect range selected Poor lead connection Damaged test leads Incorrect input jack used | Kies die toepaslike reeks. Ensure leads are firmly connected. Inspect and replace damaged leads. Verify leads are in the correct V-Ω-mA or 10A jack. |
| "OL" (Oorlading) word vertoon | Meting oorskry gekose reeks | Skakel oor na 'n hoër reeks. |
| Geen kontinuïteitspiep nie | Continuity function not selected Oop kring | Ensure dial is on continuity/diode test. Check the circuit for breaks. |
6. Spesifikasies
| Parameter | Waarde |
|---|---|
| Model | EDM 1111A |
| Produkafmetings (L x B x H) | 8 x 4 x 2 duim |
| Item gewig | 1.84 pond |
| Kragbron | DC 9V 006P Battery |
| Tipe meting | Multimeter |
| Vervaardiger | Escort |
| Datum Eerste Beskikbaar | 21 November 2019 |
| DC Voltage Reeks | 200mV, 2V, 20V, 200V, 1000V |
| AC Voltage Reeks | 200mV, 2V, 20V, 200V, 750V |
| GS-stroomreekse | 200µA, 2mA, 20mA, 200mA, 10A |
| WS-stroomreekse | 200µA, 2mA, 20mA, 200mA, 10A |
| Weerstandsreekse | 200Ω, 2KΩ, 20KΩ, 200KΩ, 2MΩ, 20MΩ, 200MΩ |
| Capacitance Ranges | 2nF, 20nF, 200nF, 2µF, 20µF |
7. Waarborginligting
For specific warranty details regarding your Escort EDM 1111A Digital Multimeter, please refer to the documentation provided at the time of purchase or contact the manufacturer directly. Warranty terms typically cover defects in materials and workmanship under normal use.
8. Kliëntediens
If you encounter any issues or have questions not covered in this manual, please contact Escort customer support. Have your product model number (EDM 1111A) and serial number (if applicable, found on the back label) ready when contacting support for faster assistance.
The product label on the back of the Escort EDM 1111A, indicating 'DIGITAL MULTIMETER DC 9V 006P BATTERY', serial number, and 'MADE IN TAIWAN R.O.C.'.