TRUE CDT845P2NS1
CAFE CDT845P2NS1 24" Matte Collection Built-In Dishwasher User Manual
Model: CDT845P2NS1 | Brand: TRUE
1. Inleiding
This user manual provides comprehensive instructions for the installation, operation, maintenance, and troubleshooting of your CAFE CDT845P2NS1 24" Matte Collection Built-In Dishwasher. Designed for efficiency and performance, this appliance features advanced cleaning and drying technologies to ensure your dishes are spotless and ready for use. Please read this manual thoroughly before operating your dishwasher to ensure safe and optimal performance.

Figuur 1: Voorkant view of the CAFE CDT845P2NS1 Built-In Dishwasher, showcasing its sleek matte finish and handle design.
2. Belangrike veiligheidsinligting
Volg altyd basiese veiligheidsmaatreëls wanneer u hierdie toestel gebruik om die risiko van brand, elektriese skok of besering aan persone te verminder.
- Lees alle instruksies voordat jy die skottelgoedwasser gebruik.
- Koppel aan 'n behoorlik gegradeerde, beskermde en gegrootte kragtoevoerkring.
- Gebruik slegs skoonmaakmiddels en spoelmiddels wat vir skottelgoedwassers aanbeveel word.
- Moenie die skottelgoedwasser gebruik nie, tensy alle omhulselpanele behoorlik in plek is.
- Hou kinders weg van skoonmaakmiddel en spoelmiddel.
- Moenie toelaat dat kinders in of op die toestel speel nie.
- Skerp items moet met handvatsels na bo gelaai word om die risiko van snye te verminder.
- Do not wash plastic items unless marked "dishwasher safe."
- In case of a malfunction, disconnect the appliance from the power supply before attempting any repairs.
3. Installasie (Opstelling)
Behoorlike installasie is noodsaaklik vir die werkverrigting en lang lewensduur van jou skottelgoedwasser. Dit word sterk aanbeveel dat die installasie deur 'n gekwalifiseerde installeerder uitgevoer word.
3.1 Uitpak en plasing
Carefully remove all packaging materials. Ensure the dishwasher is placed on a level surface in its designated cabinet opening. The dimensions are 34"D x 24"W x 23"H.
3.2 Water- en dreinverbindings
Connect the water supply line to the dishwasher's inlet valve and the drain hose to the sink drain or garbage disposal. Ensure all connections are secure and leak-free.
3.3 Elektriese aansluiting
Connect the dishwasher to a dedicated 120 Volts electrical circuit as per local electrical codes. Ensure the power is off at the circuit breaker before making connections.
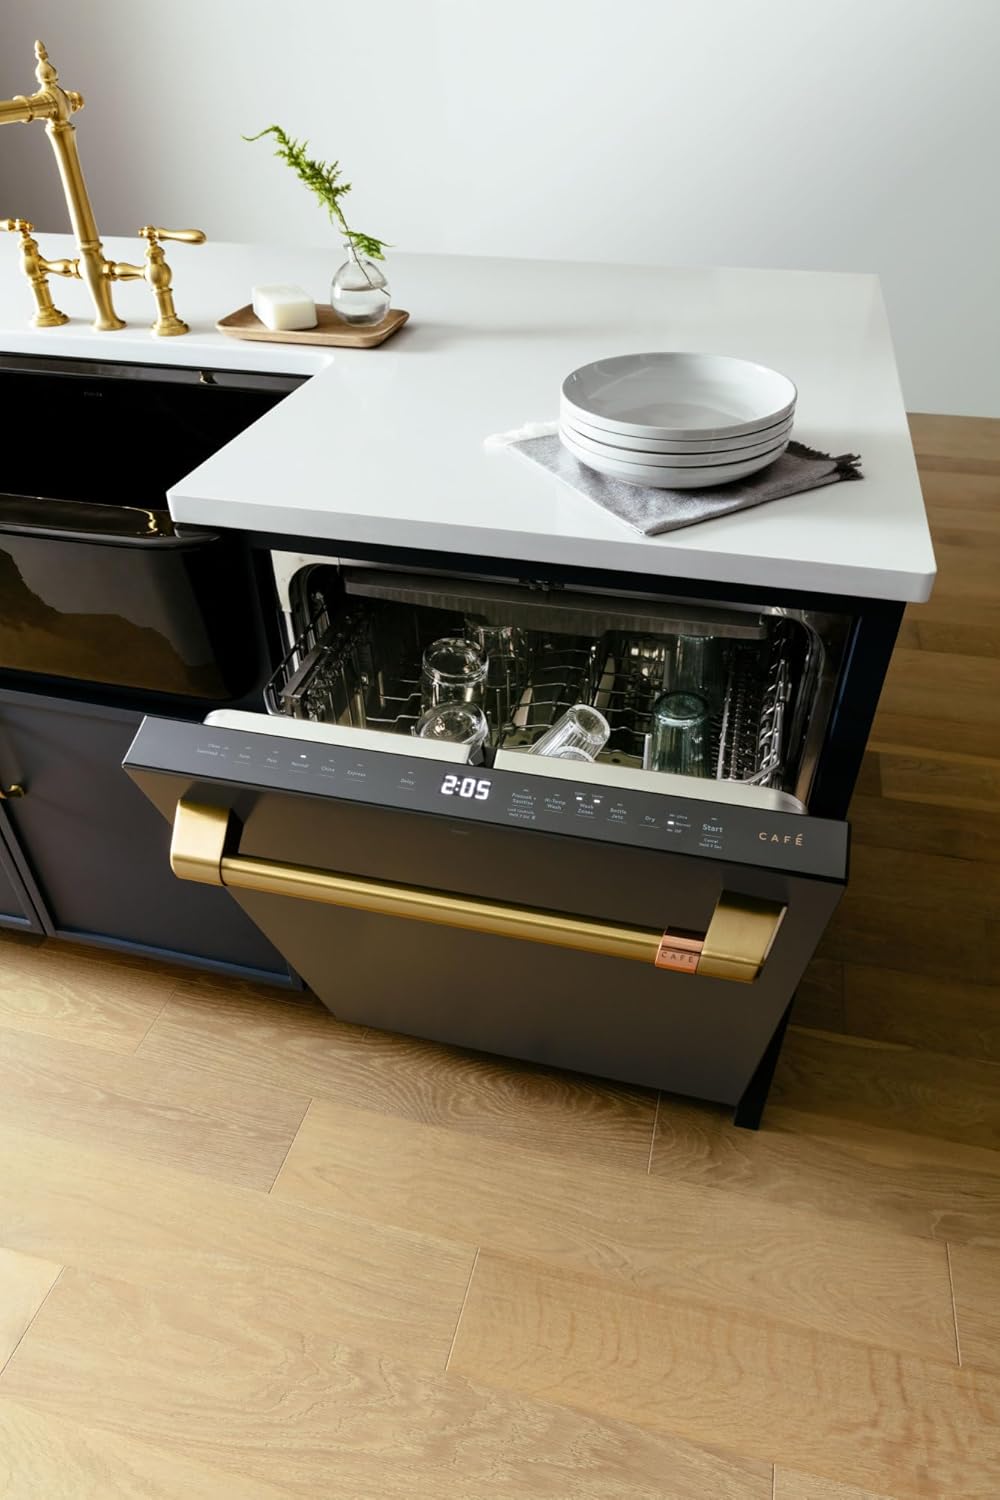
Figure 2: The dishwasher integrated into a kitchen setting, demonstrating its built-in form factor and how it complements kitchen cabinetry.
4. Bedryfsinstruksies
Your CAFE dishwasher is designed for intuitive operation, offering various settings to achieve optimal cleaning results.
4.1 Laai van die skottelgoedwasser
Proper loading maximizes cleaning performance. Utilize the 16 place settings capacity effectively. The lower wash arm provides excellent coverage for larger loads. Fold-down tines accommodate wide or odd-shaped items, and the third rack offers extra space for silverware and cookware. Adjustable upper shelves can be moved two inches up or down for loading flexibility, accommodating fine stemware or tall bakeware.

Figuur 3: Binne view showing the flexible loading options, including the third rack for cutlery and adjustable upper shelves.
4.2 Byvoeging van wasmiddel en spoelmiddel
Add the appropriate amount of dishwasher detergent to the dispenser. For enhanced drying and to prevent spots, fill the rinse aid dispenser with a suitable rinse aid product.
4.3 Kies 'n wassiklus
The control panel is located on the top edge of the door. Select from various cycles and options:
- Ultra-Wash & Dry: Delivers excellent cleaning and drying results with 90+ cleaning jets.
- Steam + Sani: Loosens stubborn food residue and provides thorough sanitization, reducing 99.999% of bacteria.
- Wash Zones: Customize cycles to wash a half load on either the top or bottom rack, saving water and time.
- Rapid Cycle: For quick washing needs.
- Additional options include Pots, Normal, China, Express, Delay, Pre-soak, Hi-Temp Wash, Bottle Jets, and Dry settings.

Figure 4: The discreetly located control panel on the top edge of the door, showing cycle and option selections.

Figure 5: Visual representation of the Steam + Sani feature's effectiveness in reducing bacteria and cleaning tough residues.
4.4 Begin 'n siklus
Close the dishwasher door firmly. Press the "Start" button to begin the selected wash cycle. The dishwasher will automatically proceed through the wash, rinse, and dry phases.
5. Sorg en Onderhoud
Gereelde onderhoud verseker dat jou skottelgoedwasser doeltreffend bly werk en sy lewensduur verleng.
5.1 Skoonmaak van die binnekant
Periodically clean the interior of the dishwasher, including the spray arms and the filter area. The Hard Food Disposer helps manage food particles, but occasional cleaning of the filter can prevent blockages and odors.
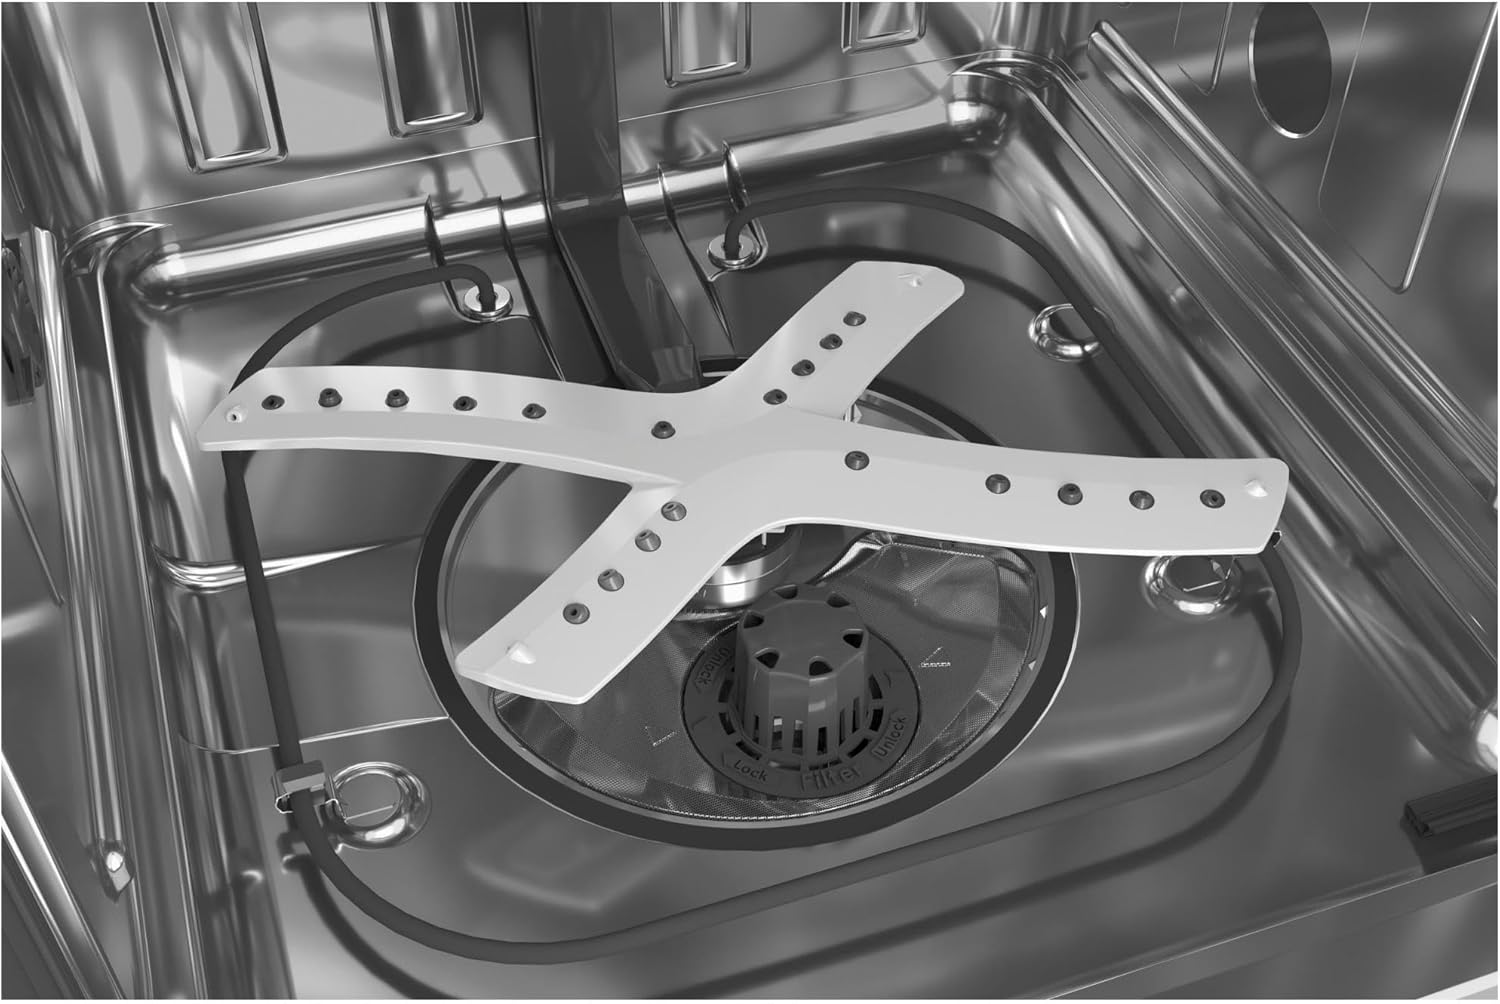
Figuur 6: Gedetailleerd view of the lower spray arm and the removable filter system, important for regular cleaning.
5.2 Skoonmaak van die buitekant
Vee die buite-oppervlaktes af met 'n sagte, damp cloth. For stainless steel finishes, use a specialized stainless steel cleaner. Avoid abrasive cleaners that can scratch the surface.
5.3 Winterklaarmaak (Indien van toepassing)
If your dishwasher is in a location subject to freezing temperatures, it is important to winterize it. Consult a qualified technician for proper winterization procedures to prevent damage from freezing water.
6. Probleemoplossing
Voordat jy vir diens ontbied, t.o.vview die volgende algemene probleme en hul moontlike oplossings:
| Probleem | Moontlike oorsaak/oplossing |
|---|---|
| Skottelgoedwasser begin nie | Ensure the door is fully latched. Check power supply and circuit breaker. Verify a cycle has been selected and the "Start" button pressed. |
| Geregte is nie skoon nie | Check water temperature (should be hot). Ensure spray arms are not blocked. Use proper detergent and rinse aid. Avoid overloading. |
| Skottelgoedwasser is raserig | Check for foreign objects in the pump or spray arms. Ensure dishes are not rattling against each other. |
| Water dreineer nie | Check for clogs in the drain hose or air gap. Ensure the drain pump is clear. |
For more detailed troubleshooting or issues not listed here, please refer to the comprehensive troubleshooting guide available on the manufacturer's webwebwerf of kontak kliëntediens.
7. Produkspesifikasies
| Kenmerk | Detail |
|---|---|
| Model Naam | CDT845P2NS1 |
| Handelsmerk | WAAR |
| Installasie tipe | Ingeboude |
| Produk afmetings | 34" D x 24" B x 23" H |
| Kapasiteit | 16 Plek-instellings |
| Geraasvlak | 45 dB |
| Materiaal | Vlekvrye staal |
| Voltooi Tipe | Vlekvrye Staal, Mat |
| Voltage | 120 Volt |
| Beheer tipe | Ten volle geïntegreerd |
| Opsie siklusse | 5 (including Rapid) |
| Spesiale kenmerke | Hard Food Disposer, Quick Wash, Steam + Sani, Wash Zones |
| Sertifisering | Energiester, NSF |
| Ingesluit komponente | Dishwasher, Cutlery Basket |
8. Waarborg en Kliëntediens
For warranty information, product registration, or technical assistance, please refer to the warranty card included with your purchase or visit the official TRUE (CAFE) website. You can also contact customer support directly for service inquiries or to order replacement parts.
Vir verdere hulp, besoek asseblief: GE Store on Amazon
Ask a question about this manual
Ask about setup, troubleshooting, compatibility, parts, safety, or missing instructions. Manuals+ will review the question and use this page’s manual context to help answer it.