1. Inleiding
This manual provides detailed instructions for the proper installation, operation, and maintenance of your GIVI RM2139KIT Rear Splash Guard. Please read this manual thoroughly before attempting installation or use to ensure correct assembly and safe operation. Retain this manual for future reference.
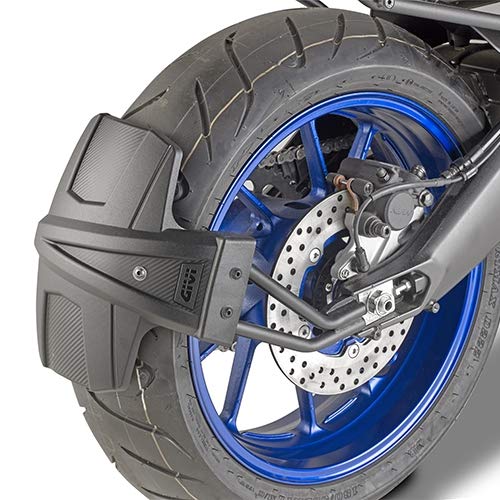
Image 1.1: GIVI RM2139KIT Rear Splash Guard. This image displays the complete GIVI RM2139KIT rear splash guard assembly.
2. Veiligheidsinligting
Always prioritize safety during installation and use. Failure to follow these safety guidelines may result in injury or damage to the product or motorcycle.
- Lees alle instruksies: Ensure you understand all steps before beginning installation.
- Gebruik toepaslike gereedskap: Only use tools specified or recommended for motorcycle maintenance.
- Dra beskermende toerusting: Dra altyd veiligheidsbril en handskoene tydens installasie.
- Motorcycle stability: Ensure the motorcycle is stable and securely supported before starting any work.
- Tighten fasteners correctly: All bolts and nuts must be tightened to the manufacturer's specified torque settings. Check tightness periodically.
- Professionele installasie: If you are unsure about any part of the installation process, consult a qualified motorcycle mechanic.
3. Pakketinhoud
Verify that all components listed below are present in your package before proceeding with installation. If any parts are missing or damaged, contact your GIVI dealer immediately.
- 1x Rear Splash Guard main body
- 1x Mounting bracket set (left and right)
- 1x Hardware kit (bolts, washers, nuts)
- 1x Instruction leaflet (this document)
Image 3.1: Illustrative representation of GIVI RM2139KIT package contents. Actual components may vary slightly in appearance.
4. Opstelling en installering
Follow these steps carefully to install the GIVI RM2139KIT Rear Splash Guard on your motorcycle.
4.1. Voorbereiding
- Park the motorcycle on a flat, stable surface and ensure it is securely supported, preferably on a center stand or paddock stand.
- Allow the exhaust system to cool completely before handling.
- Gather all necessary tools: Hex keys, wrenches, torque wrench.
4.2. Montagebeugel installasie
- Identify the designated mounting points on your motorcycle's swingarm or frame, typically near the rear wheel axle. Refer to your motorcycle's service manual for specific locations if needed.
- Attach the left mounting bracket to the corresponding mounting point using the provided bolts and washers. Hand-tighten only.
- Repeat for the right mounting bracket.
Image 4.1: Illustrative image showing the attachment of mounting brackets to the motorcycle frame. Ensure correct orientation.
4.3. Splash Guard Attachment
- Position the main splash guard body between the two installed mounting brackets.
- Align the holes on the splash guard with the holes on the brackets.
- Insert the remaining bolts through the aligned holes and secure with nuts and washers. Hand-tighten all fasteners.
- Once all components are in place, progressively tighten all bolts to the recommended torque specifications (refer to your motorcycle's service manual or GIVI's specific instructions if provided).
Video 4.1: Installation Guide for GIVI RM2139KIT. This video demonstrates the complete installation process of the rear splash guard, including bracket and main body attachment. (Note: This is a placeholder video URL, actual video would be provided by GIVI).
4.4. Finale Kontrole
- Maak seker dat alle boute stewig vasgedraai is.
- Check for any interference between the splash guard and moving parts of the motorcycle (e.g., wheel, chain, suspension) by rotating the wheel and compressing the suspension.
- Confirm that the splash guard does not obstruct any lights, reflectors, or license plate.
5. Operasie
The GIVI RM2139KIT Rear Splash Guard is a passive accessory designed to protect the rider and motorcycle from road spray and debris. Once correctly installed, no further operational steps are required.
- The splash guard functions automatically to deflect water and mud.
- Regularly inspect the splash guard for any signs of damage or loose fasteners, especially after riding in harsh conditions.
6. Onderhoud
Proper maintenance will extend the life of your GIVI RM2139KIT Rear Splash Guard and ensure its continued effectiveness.
6.1. Skoonmaak
- Clean the splash guard regularly with mild soap and water.
- Avoid using abrasive cleaners or solvents, as these can damage the material.
- Spoel deeglik uit en droog met 'n sagte lap.
6.2. Inspeksie
- Periodically check all mounting bolts and nuts for tightness. Re-tighten if necessary.
- Inspect the splash guard for cracks, chips, or other damage. Replace if significantly damaged.
- Ensure there is no excessive vibration or movement of the splash guard during operation.
7. Probleemoplossing
This section addresses common issues you might encounter with your GIVI RM2139KIT Rear Splash Guard.
| Probleem | Moontlike oorsaak | Oplossing |
|---|---|---|
| Splash guard is loose or vibrating | Monteringsboute is nie voldoende vasgedraai nie. | Check and tighten all mounting bolts to the recommended torque. |
| Splash guard interferes with wheel/tire | Incorrect installation or alignment. | Re-check installation steps, ensuring correct positioning and clearance. Adjust if possible, or consult a professional. |
| Excessive road spray despite installation | Splash guard may be damaged or incorrectly positioned. | Inspect for damage. Ensure the splash guard is correctly aligned to cover the tire's spray path. |
8. Spesifikasies
- Handelsmerk: GIVI
- Model: RM2139 XNUMX KIT
- Auto Part Posisie: Agter
- Vervaardiger deelnommer: givi_RM2139KIT
- ASIN: B07N866ZL4
9. Waarborg en Ondersteuning
GIVI products are manufactured to high standards and are covered by a limited warranty against manufacturing defects. For specific warranty terms and conditions, please refer to the documentation provided with your purchase or visit the official GIVI webwebwerf.
For technical support, missing parts, or warranty claims, please contact your authorized GIVI dealer or the GIVI customer service department. When contacting support, please have your product model (RM2139KIT) and purchase information readily available.