Laserliner 082.150A
Laserliner CoatingTest-Master 082.150A Instruction Manual
Model: 082.150A | Brand: Laserliner
1. Inleiding en oorview
The Laserliner CoatingTest-Master 082.150A is a precision instrument designed for non-destructive measurement of coating thicknesses on various metal surfaces. It utilizes both magnetic induction and eddy current principles to accurately determine the thickness of non-metallic layers.
This device is capable of measuring non-magnetic coatings such as paint and zinc on steel, as well as insulating coatings like paint and anodized layers on non-ferrous metals. It features automatic identification of the base material (ferrous/ferromagnetic or non-ferrous/non-ferromagnetic), an internal memory for 400 measured values, and options for one-point and two-point calibration. Data transfer and evaluation are facilitated via a USB interface. The illuminated display provides Min/Max/Avg readings for comprehensive analysis.

Figure 1: Laserliner CoatingTest-Master 082.150A device.
2. Pakketinhoud
Nadat u die pakkie oopgemaak het, maak asseblief seker dat al die volgende items ingesluit is:
- Laserliner CoatingTest-Master 082.150A device
- Beskermende dratas
- USB-kabel vir data-oordrag
- Calibration foils/plates (for one-point and two-point calibration)
- Instruksiehandleiding (hierdie dokument)
- Software CD (for data evaluation)
- Batterye (indien ingesluit)

Figure 2: Contents of the CoatingTest-Master package.
3. Opstelling
3.1 Battery installasie
The CoatingTest-Master requires batteries for operation. Locate the battery compartment on the back of the device. Insert the specified battery type (e.g., AAA batteries) ensuring correct polarity as indicated inside the compartment. Close the battery cover securely.
3.2 Aan-/afskakel
Druk en hou die Krag button (usually marked with a power symbol ⏻) to turn the device on. The display will illuminate. To turn off the device, press and hold the Krag knoppie weer totdat die skerm afskakel.
4. Bedryfsinstruksies
4.1 Basiese Meting
To perform a basic coating thickness measurement:
- Maak seker dat die toestel aangeskakel is.
- Place the small measuring head firmly and perpendicularly onto the surface to be measured. The device will automatically detect the base material (ferrous or non-ferrous).
- The coating thickness reading will be displayed on the screen in micrometers (µm).
- Lift the measuring head from the surface to prepare for the next measurement.
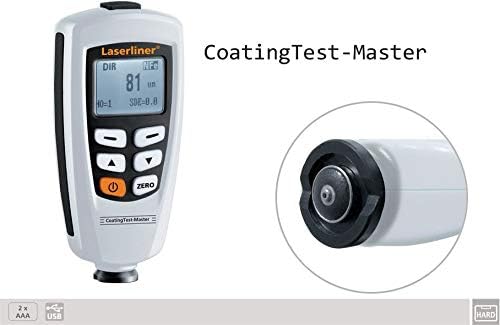
Figure 3: The device features a small measuring head for pinpoint accuracy.
4.2 Kalibrasie
For accurate measurements, especially when measuring different types of coatings or base materials, calibration is essential. The CoatingTest-Master supports one-point and two-point calibration.
4.2.1 Eenpunt-kalibrasie
This method uses a single known thickness to adjust the device. Refer to the on-screen prompts or specific manual section for detailed steps on using the provided calibration foils.
4.2.2 Tweepunt Kalibrasie
This method uses two known thicknesses (e.g., zero and a specific thickness) for more precise calibration across a range. Follow the device's on-screen instructions for this procedure.
4.3 Databestuur
The device has an internal memory for up to 400 measured values. Use the navigation buttons to review stored data. To transfer data to a computer, connect the device via the provided USB cable and use the accompanying software for evaluation.
4.4 Vertoonfunksies
The illuminated display shows the current measurement, and can also cycle through Minimum (Min), Maximum (Max), and Average (Avg) values of a series of measurements. Consult the device's on-screen menu for accessing these display modes.
5. Onderhoud
Proper maintenance ensures the longevity and accuracy of your CoatingTest-Master.
- Skoonmaak: Wipe the device with a soft, dry cloth. Do not use abrasive cleaners or solvents. Ensure the measuring head is kept clean and free of debris.
- Berging: When not in use, store the device in its protective carrying case in a dry, dust-free environment, away from extreme temperatures and direct sunlight.
- Battery vervanging: Replace batteries promptly when the low battery indicator appears on the display to avoid interruption of measurements and potential data loss.
6. Probleemoplossing
| Probleem | Moontlike oorsaak | Oplossing |
|---|---|---|
| Toestel skakel nie aan nie. | Dooie of verkeerd geïnstalleerde batterye. | Kontroleer batterypolariteit; vervang batterye. |
| Onakkurate lesings. | Device not calibrated; dirty measuring head; incorrect measurement technique. | Perform calibration; clean measuring head; ensure proper contact with surface. |
| USB data transfer failure. | Incorrect cable connection; software not installed or running; driver issues. | Ensure secure USB connection; install/reinstall software and drivers; try a different USB port. |
7. Spesifikasies
| Kenmerk | Detail |
|---|---|
| Meetbeginsel | Magnetic Induction (FE) / Eddy Current (NFe) |
| Measuring Range (FE) | 0 – 1250 µm |
| Accuracy (FE) | 0–850 µm: ±(3% + 1 µm); 850–1250 µm: ±5% |
| Measuring Range (NFe) | 0 – 1250 µm |
| Accuracy (NFe) | 0–850 µm: ±(3% + 1 µm); 850–1250 µm: ±5% |
| Base Material Identification | Automatic (Ferrous / Non-Ferrous) |
| Geheue | 400 gemete waardes |
| Kalibrasie | One-point and Two-point |
| Koppelvlak | USB |
| Vertoon | Illuminated, Min/Max/Avg display |
8. Waarborg en Ondersteuning
Laserliner products are manufactured with high quality standards. For information regarding warranty coverage, technical support, or service, please refer to the warranty card included with your product or visit the official Laserliner webwebwerf. Bewaar u aankoopbewys as bewys van aankoop vir enige waarborgeise.
For further assistance, you may contact Laserliner customer service through their official channels. Contact details are typically available on the manufacturer's webwebwerf of in die produkverpakking.