1. Inleiding
Thank you for choosing the Cecotec Power Espresso 20 coffee machine. This manual provides essential information for the safe and efficient operation, maintenance, and troubleshooting of your appliance. Please read these instructions carefully before first use and retain them for future reference.
2. Veiligheidsinstruksies
Neem altyd basiese veiligheidsmaatreëls in ag wanneer elektriese toestelle gebruik word om die risiko van brand, elektriese skok en persoonlike besering te verminder.
- Verseker die voltagDie volume wat op die toestel aangedui word, stem ooreen met jou netspanning.tage voor aansluiting.
- Moenie die toestel, kragsnoer of prop in water of enige ander vloeistof dompel nie.
- Hou die toestel buite bereik van kinders.
- Koppel die toestel uit die kragpunt wanneer dit nie gebruik word nie en voor skoonmaak.
- Moenie die toestel gebruik met 'n beskadigde koord of prop, of as dit wanfunksioneer of op enige manier beskadig is nie.
- Gebruik slegs bykomstighede wat deur die vervaardiger aanbeveel word.
- Wees versigtig wanneer warm oppervlaktes en stoom hanteer word.
3. Produk verbyview
The Cecotec Power Espresso 20 is an 850W espresso and cappuccino machine designed for home use. It features a 20-bar Italian pressure pump for optimal aroma and crema, a 1.5-liter removable water tank, and a digital control panel.
Sleutelkomponente:
- Beheerpaneel: EasyTouch digital controls with light indicators for intuitive operation.
- Portafilter: Double outlet arm for preparing one or two coffees simultaneously.
- Stoomstaaf: Adjustable steam wand for frothing milk, dispensing hot water, and heating liquids.
- Watertenk: 1.5-liter removable tank for easy refilling.
- Beker warmer: Stainless steel surface on top to pre-heat cups.
- Lekbak: Verwyderbaar vir maklike skoonmaak.

Beeld 3.1: Voorkant view of the Cecotec Power Espresso 20 coffee machine, showing two cups being filled with espresso.

Image 3.2: Close-up of the digital control panel with illuminated buttons for single shot, double shot, power, and steam functions.
4. Opstelling
4.1 Aanvanklike skoonmaak
- Verwyder alle verpakkingsmateriaal en etikette.
- Wash the water tank, portafilter, filter basket, and drip tray with warm soapy water. Rinse thoroughly and dry.
- Vee die buitekant van die masjien af met adamp lap.
4.2 Vul die watertenk
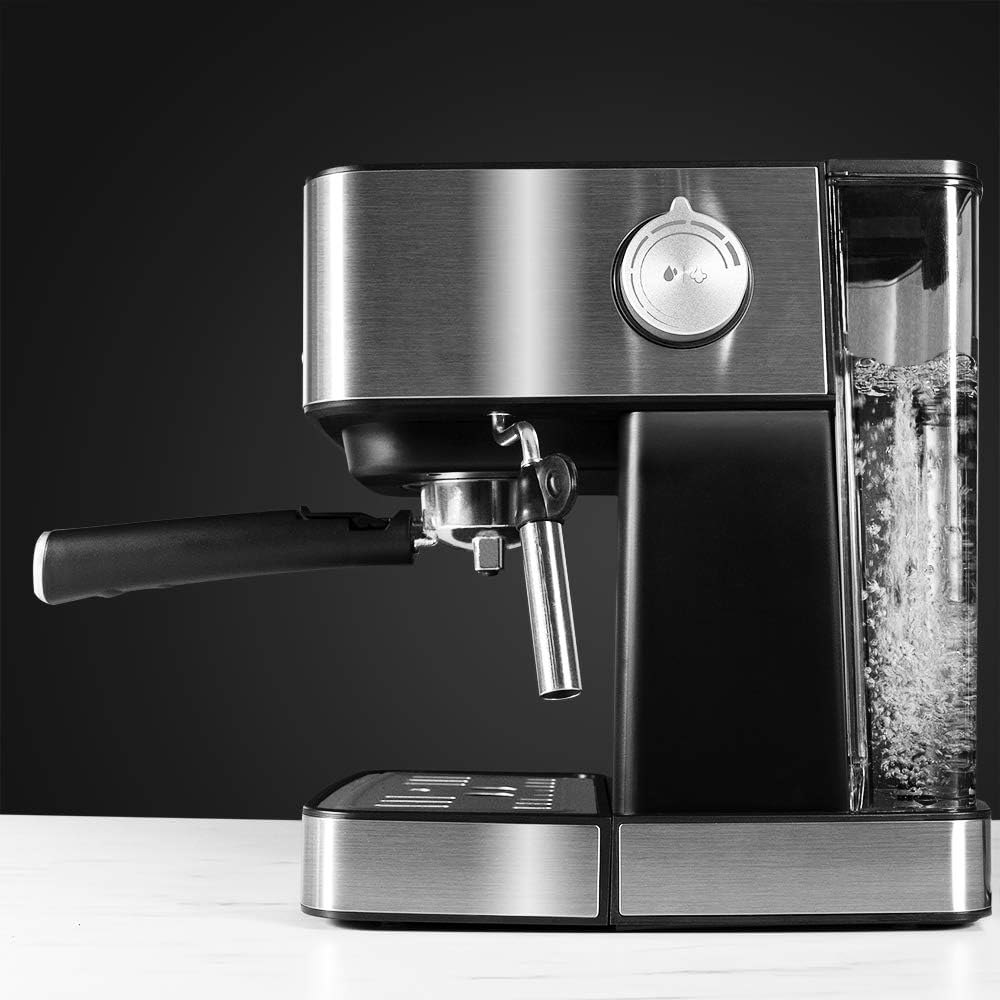
Beeld 4.1: Sykant view of the coffee machine highlighting the transparent, removable water tank.
- Verwyder die watertenk aan die agterkant van die masjien.
- Vul die tenk met vars, koue water tot by die MAX-vlakaanwyser. Moenie die MAX-lyn oorskry nie.
- Plaas die watertenk terug in sy posisie en maak seker dat dit stewig vas is.
4.3 Eerste gebruik / Voorbereiding van die stelsel
Before making coffee for the first time, or if the machine has not been used for a long period, prime the system:
- Maak seker dat die watertenk gevul is.
- Place a cup under the portafilter (without coffee).
- Druk die aan/af-knoppie om die masjien aan te skakel. Die aanwyserliggies sal flikker soos die masjien opwarm.
- Once the lights are solid, press the single or double espresso button to run water through the system for approximately 30 seconds.
- Repeat this process for the steam wand by turning the steam knob to release hot water/steam for a few seconds.
5. Bedryfsinstruksies
5.1 Maak Espresso
- Ensure the machine is powered on and preheated (indicator lights solid).
- Place the desired filter basket (single or double) into the portafilter.
- Add ground coffee to the filter basket. Use the included measuring spoon and tamper to level and lightly tamp the coffee. Do not overfill.
- Attach the portafilter to the brewing head by aligning it and rotating it firmly to the right until secure.
- Place one or two pre-warmed cups on the drip tray under the portafilter spouts.
- Press the single espresso button for one shot or the double espresso button for two shots. The machine will automatically dispense the correct amount of coffee.
- To manually control the coffee volume, press the desired espresso button to start, and press it again to stop.
5.2 Skuimende Melk

Image 5.1: A hand demonstrating the use of the steam wand to froth milk in a small pitcher.
- Vul 'n melkkruik met koue melk (suiwel- of nie-suiwelmelk).
- Press the steam button on the control panel. The steam indicator light will flash while heating and become solid when ready.
- Plaas die stoompyp net onder die oppervlak van die melk.
- Slowly turn the steam knob to release steam. Move the pitcher up and down to create foam.
- Once the desired texture and temperature are reached, turn the steam knob off and then press the steam button to deactivate steam mode.
- Vee die stoompyp onmiddellik met advertensie afamp lap om te verhoed dat melkreste uitdroog.
5.3 Warmwatertoediening
The steam wand can also dispense hot water for teas or Americanos.
- Plaas 'n koppie onder die stoomstaf.
- Press the steam button. Once the light is solid, slowly turn the steam knob to dispense hot water.
- Turn the knob off and press the steam button to stop.
6. Onderhoud en Skoonmaak
Gereelde skoonmaak verseker optimale werkverrigting en verleng die lewensduur van jou koffiemasjien.
6.1 Daaglikse skoonmaak

Image 6.1: The coffee machine with its removable water tank and drip tray detached for cleaning.
- Lekbak: Empty and clean the removable drip tray daily.
- Portafilter en filtermandjie: After each use, remove the portafilter, discard spent coffee grounds, and rinse the portafilter and filter basket under running water.
- Stoomstaaf: Wipe immediately after frothing milk. Periodically, remove the tip and clean any dried milk residue with a small brush or needle.
- Watertenk: Spoel die watertenk gereeld uit en vul dit met vars water.
- Buitekant: Vee die buite-oppervlaktes af met 'n sagte, damp lap. Moenie skuur skoonmaakmiddels of oplosmiddels gebruik nie.
6.2 Ontkalking
Descaling is necessary to remove mineral deposits that can build up over time, affecting performance and taste. The frequency depends on water hardness and usage.
- Berei 'n ontkalkingsoplossing voor volgens die ontkalkervervaardiger se instruksies, of gebruik 'n mengsel van wit asyn en water (1:1 verhouding).
- Vul die watertenk met die ontkalkingsoplossing.
- Plaas 'n groot houer onder die portafilter en stoompyp.
- Turn on the machine. Once heated, run approximately half of the solution through the portafilter by pressing the espresso button.
- Then, run the remaining solution through the steam wand.
- Skakel die masjien af en laat dit vir 15-20 minute staan.
- Empty and rinse the water tank thoroughly. Fill it with fresh water.
- Run several full tanks of fresh water through both the portafilter and steam wand to rinse out any descaling solution residue.
7. Probleemoplossing
| Probleem | Moontlike oorsaak | Oplossing |
|---|---|---|
| Geen koffie word uitgedeel nie. | Watertenk leeg; masjien nie voorberei nie; koffie te fyn gemaal of te veelamped; clogged filter. | Fill water tank; prime the system; use coarser grind or less pressure; clean filter basket. |
| Koffie is te swak of waterig. | Insufficient coffee; coffee too coarsely ground; brewing too fast. | Verhoog die hoeveelheid koffie; gebruik fyner maal;amp stewiger. |
| Geen stoom van die spuitstok af nie. | Steam function not activated; wand clogged; machine not heated to steam temperature. | Press steam button; clean steam wand tip; wait for steam indicator light to become solid. |
| Masjien lek water. | Water tank not seated correctly; portafilter not properly attached; seal issues. | Ensure water tank is secure; re-attach portafilter firmly; contact support if seals are damaged. |
| Masjien kan nie aanskakel nie. | Nie ingeprop nie; probleem met kragpunt. | Kontroleer die kragaansluiting; probeer 'n ander aansluiting. |
8. Spesifikasies
- Handelsmerk: Cecotec
- Modelnommer: 01509
- Krag: 850 W
- Druk: 20 bar
- Watertenk kapasiteit: 1.5 liter
- Materiaal: Vlekvrye staal
- Produk afmetings: 31.7 x 26 x 31.2 cm
- Gewig: 4.14 kg
- Spesiale kenmerke: Cup Warmer, Milk Frother, Digital Control
9. Waarborg en Ondersteuning
For warranty information and customer support, please refer to the documentation provided with your purchase or visit the official Cecotec webwebwerf. Bewaar u bewys van aankoop vir enige waarborgeise.