1. Inleiding
This manual provides essential information for the proper installation, setup, and operation of your YoLuKe P1-4X-2.5 PTZ Dome IP Security Camera. This camera is designed for both indoor and outdoor surveillance, offering high-definition video, pan-tilt-zoom capabilities, and advanced features to enhance your security monitoring.
2. Produkkomponente
Familiarize yourself with the various parts of your camera and included accessories:

Figure 2.1: YoLuKe PTZ Dome IP Camera Components. This image displays the main camera unit with its high-intensity antenna, HD zoom lens, waterproof IP66 body, microphone, reset button, power interface, audio port, and network interface.
- PTZ Dome IP Camera: Main surveillance unit.
- High-Intensity Antenna: Vir draadlose konnektiwiteit.
- HD Zoom Lens: Provides clear, magnified views.
- Waterproof Body (IP66): Ensures durability in various weather conditions.
- Mikrofoon: Vir oudio-invoer.
- Herstel-knoppie: For device reset.
- Kragkoppelvlak: Om die kragadapter aan te sluit.
- Klankpoort: For external audio connections.
- Netwerkkoppelvlak: Vir bedrade netwerkverbinding.
- Kragadapter: To supply power to the camera.
- Ethernet-kabel: For initial setup and wired connection.
- Monteer hardeware: Skroewe en ankers vir installasie.
- CD: Contains software and drivers.
- Vinnige bedieningsgids: Additional setup instructions.
3. Opstelling
3.1 Fisiese installasie
Follow these steps for secure physical installation of your camera:

Figure 3.1: Detailed steps for mounting the PTZ camera. This image illustrates rotating the base, determining screw hole locations, drilling holes, inserting the base, and securing the camera.
- Rotate and Remove Base: Rotate the camera base to align with the arrow and remove it from the tail line.
- Bepaal Montage Plek: Identify and mark the desired location for the mounting screw holes on the ceiling or wall.
- Boorgate: Drill holes at the marked positions and insert the expansion screws.
- Voeg basis in: Insert the camera base into the tail line and lift it into position.
- Veilige kamera: Insert the screws into the expansion screws to firmly secure the camera.
3.2 Network and Software Setup
Connect your camera to the network and set up the monitoring software:

Figure 3.2: Steps for setting up the camera using the CamHiPro app. This image shows downloading the app, powering on the camera, connecting the network cable, configuring Wi-Fi settings, and remote viewing.
- Download CamHiPro APP: Scan the QR code in the quick operation guide or search for "CamHiPro" in your mobile app store (Google Play or Apple App Store).
- Skakel aan en koppel: Power on the camera and connect it to your network router using the provided Ethernet cable.
- Wi-Fi-instellings: Follow the in-app instructions to configure Wi-Fi settings for wireless operation.
- Remote Watch: Once configured, you can monitor your camera anytime, anywhere via the app.
3.3 Pairing with NVR (Network Video Recorder)
If you are using an NVR system, follow these steps to pair your camera:
Video 3.1: Manual Camera Addition to NVR. This video demonstrates the process of manually adding a camera to an NVR system, including powering on the devices, resetting the camera, and searching for it on the NVR interface.
- Power On NVR and Camera: Ensure both your NVR and the camera are powered on.
- Herstel kamera: Long press the reset button on the camera until you hear a sound indicating a successful reset.
- Soek vir Cameras on NVR: On your NVR interface, navigate to the camera setup or add device section and initiate a search for new cameras.
- Bevestig saambinding: Once the camera is detected and a "Wireless connection is successful" sound is heard, confirm the pairing on the NVR.
4. Bedryfsinstruksies
4.1 Pan-, Kantel- en Zoem- (PTZ) Beheer
Beheer die kamera se viewing angle and zoom level remotely:
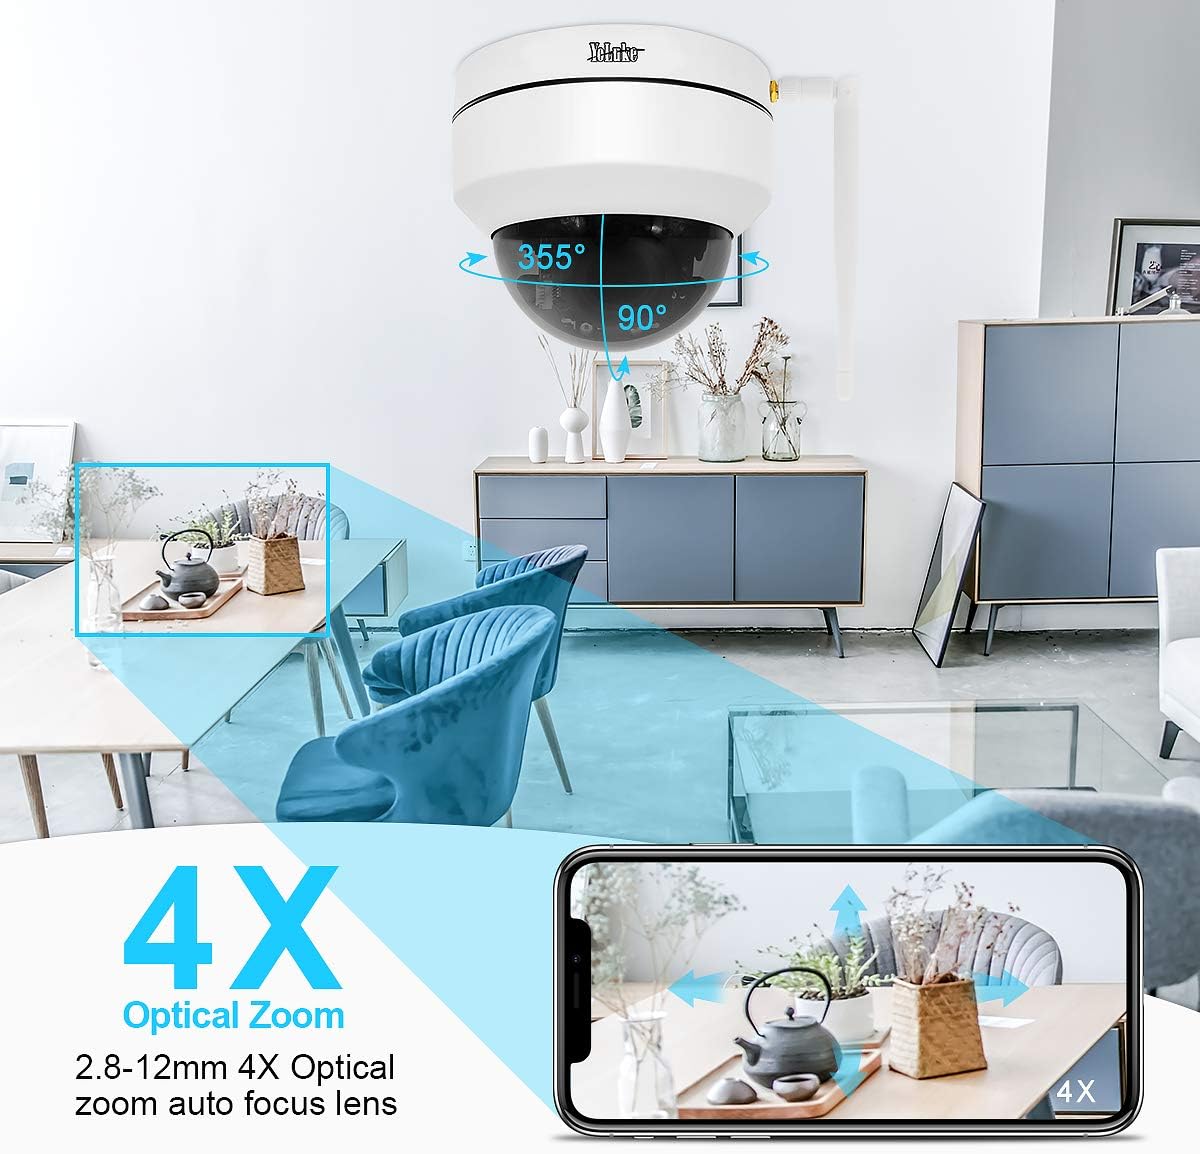
Figure 4.1: Remote PTZ and 4X Optical Zoom. This image demonstrates the camera's 355° horizontal rotation and 90° vertical pan, along with its 4X optical zoom capability, controllable via a smartphone app.
- pan: Draai die kamera horisontaal tot 355°.
- Kantel: Verstel die kamera vertikaal tot 90°.
- Zoem: Utilize the 4X optical zoom lens (2.8-12MM) for detailed views.
- Beheer: All PTZ functions are easily operable through the mobile application or PC client.
4.2 Nagvisie
The camera provides clear surveillance even in low-light conditions:

Figure 4.2: Day and Night Vision Comparison. This image illustrates the camera's ability to provide 24-hour surveillance with clear day vision and effective 20m night vision using LED arrays.
- Outomatiese skakeling: The camera automatically switches between day and night vision modes based on ambient light.
- Verbeterde Nagvisie: Equipped with two LED arrays, extending night vision range up to 65.6 feet (20 meters) in complete darkness.
4.3 Motion Detection and Alarm
Stay informed of any detected activity:
- Verstelbare sensitiwiteit: Motion detection area and alarm sensitivity can be customized via the app.
- Kitskennisgewings: Upon motion detection, the camera sends notifications to your mobile phone and video clips to your email.
- Alarm sirene: The camera supports an alarm siren feature for deterrence.
4.4 Tweerigting-klank
Communicate through the camera:
- Ingeboude mikrofoon: Captures audio from the camera's vicinity.
- Speaker Support: Connect an external speaker for two-way communication.
4.5 Opname en berging
Manage your video recordings:
- SD kaart ondersteuning: Supports up to 128GB SD card (not included) for local storage.
- Smart H.265 Video Coding: Efficient compression allows for up to 15 days of 24-hour recording on a 128GB card.
- Afstandweergawe: View recorded videos on your PC client, mobile app, or web blaaier.
5. Onderhoud
- Gereelde skoonmaak: Maak die kameralens en behuising gereeld skoon met 'n sagte, damp lap om duidelike beeldkwaliteit te verseker. Vermy skuurmiddels.
- Firmware -opdaterings: Gaan die vervaardiger na website or app for available firmware updates to ensure optimal performance and security.
- Kragtoevoerkontrole: Ensure the power adapter and cables are securely connected and free from damage.
- Netwerkverbinding: Verify stable network connection (wired or Wi-Fi) for uninterrupted monitoring.
6. Probleemoplossing
As jy probleme met jou kamera ondervind, raadpleeg die volgende algemene oplossings:
| Probleem | Moontlike oorsaak | Oplossing |
|---|---|---|
| Kamera skakel nie aan nie | Kragadapter ontkoppel of foutief. | Check power connections; try a different power outlet or adapter. |
| Kan nie aan Wi-Fi koppel nie | Incorrect Wi-Fi password; camera too far from router; network interference. | Verify Wi-Fi password; move camera closer to router; reset camera and reconfigure. |
| Geen videostroom nie | Network issue; camera offline; software glitch. | Check network connection; reboot camera and router; restart monitoring app/software. |
| Bewegingsbespeuring werk nie | Detection area not set; sensitivity too low; schedule not configured. | Adjust motion detection settings in the app/software; ensure schedule is active. |
| Swak kwaliteit nagsig | Obstruction in front of lens; insufficient ambient IR light. | Clear any obstructions; ensure IR LEDs are not blocked; consider additional IR illuminators if needed. |
7. Spesifikasies
| Kenmerk | Detail |
|---|---|
| Effektiewe video-resolusie | 5 MP (1920*1080p@20fps) |
| Lens | 2.8-12MM 4X Optical Zoom Lens |
| Pan/kantel-reeks | 355° Horisontaal, 90° Vertikaal |
| Nagvisie | Up to 65.6 feet (20 meters) with two LED arrays |
| Berging | 128GB Max SD card support (H.265 coding) |
| Konnektiwiteit | Wireless (Wi-Fi) and Wired (Ethernet) |
| Oudio | 2-Way Audio (Built-in Mic, external speaker support) |
| Weerbestande gradering | IP66 |
| Bewegingsopsporing | Adjustable area and sensitivity, alarm siren |
| Krag | 12 Volt, 24 Watt |
| Afmetings | 5.91 x 5.91 x 5.91 duim |
| Gewig | 2.27 pond |
8. Waarborg en Ondersteuning
Your YoLuKe P1-4X-2.5 PTZ Dome IP Security Camera is backed by a Volle jaar waarborg from the date of purchase. For any questions regarding installation, technical support, or warranty claims, please contact our support team via Amazon or through the contact information provided in your quick operation guide. We are always here to help.
For additional support and resources, please refer to the official YoLuKe store on Amazon: Visit YoLuKe Store