1. Produk verbyview
The GREENCYCLE Smart Wireless Light Switch and Receiver system provides a convenient solution for controlling lights and appliances. This kit includes a wireless switch panel and a compact receiver module. It supports traditional manual control, remote control via a smartphone application, and voice control through Amazon Alexa and Google Home. The system is designed for easy installation without the need for new wiring to the switch location, offering flexibility in placement and control.

Figuur 1: GREENCYCLE Smart Wireless Light Switch and Receiver. The image displays the white, rectangular wireless switch panel on the left and the smaller, white receiver module with an antenna on the right. The receiver has input/output labels and a warning sticker.
2. Pakketinhoud
Verifieer dat alle items in jou pakket teenwoordig is:
- 1 x Wireless Switch Panel
- 1 x Ontvangermodule
- 2 x Adhesive Rubbers
- 1 x Gebruikershandleiding
3. Spesifikasies
| Modelnommer | M-KS-WLSWH-1B-1PK+WLREV-WIFI-1PK-001 |
| Invoer Voltage (Ontvanger) | AC 80-270V, 50/60Hz |
| Maksimum las (ontvanger) | 10A / 1000W (LED) |
| Draadlose frekwensie | 433MHz (Switch to Receiver) |
| Wi-Fi Standard | 2.4GHz (Receiver to Router) |
| Outdoor Transmission Distance | > 500m |
| Indoor Transmission Distance | >40m (through walls) |
| Skakel Battery | CR2032 button lithium battery |
| Switch Battery Lifetime | Up to 20 years (approx. 4-6 years with 10 operations/day) |
| Switch Button Life | 800,000 XNUMX XNUMX keer |
| Receiver Life | 400,000 XNUMX XNUMX keer |
| Switch Waterproof Rating | IP54 |
| Materiaal | Polikarbonaat |
| Sertifiserings | CE, CQC, FCC, RoHS |

Figuur 2: Dimensions of the Wireless Switch (3.38 x 3.38 inches) and Receiver (2.95 x 1.10 x 1.12 inches).
4. Belangrike veiligheidsinligting
Lees en verstaan asseblief alle veiligheidsinstruksies voor installasie en gebruik. Versuim om hierdie instruksies te volg, kan lei tot elektriese skok, brand of ander gevare.
- WAARSKUWING: Always turn off power at the circuit breaker before installing or servicing the receiver module.
- Installasie moet deur 'n gekwalifiseerde elektrisiën of in ooreenstemming met plaaslike elektriese kodes uitgevoer word.
- Moenie die maksimum lasgradering van 10A / 1000W oorskry nie.
- Ensure proper wiring connections (Live In, Neutral In, Live Out, Neutral Out) as indicated on the receiver.
- The wireless switch is IP54 water-resistant, suitable for damp environments like bathrooms, but should not be submerged in water.
- Hou die produk buite bereik van kinders.
5. Opstelling en installering
5.1 Receiver Wiring
- Skakel krag af: Locate the circuit breaker controlling the light fixture and turn off the power. Verify power is off using a voltage toetser.
- Koppel die ontvanger: The receiver module should be wired between the power supply and the light fixture. Refer to the wiring diagram below.
- Koppel die Bly in wire from the power supply to the 'L IN' terminal on the receiver.
- Koppel die Neutraal in wire from the power supply to the 'N IN' terminal on the receiver.
- Koppel die Uitleef wire to the light fixture to the 'L OUT' terminal on the receiver.
- Koppel die Neutraal uit wire to the light fixture to the 'N OUT' terminal on the receiver.
- Secure the receiver: The compact receiver can be placed inside a wiring box, canopy, or electrical box.
- Herstel krag: Once all connections are secure, turn the power back on at the circuit breaker.

Figuur 3: Wiring diagram showing the receiver connected between the power source (AC 80-270V) and the lamp. Live and Neutral input wires connect to 'IN', and Live and Neutral output wires connect to 'OUT'.
5.2 Wireless Switch Placement
The wireless switch requires no wiring and can be mounted anywhere using the provided adhesive rubbers or screws (not included).
- Clean the desired surface for mounting.
- Peel off the backing from the adhesive rubbers and firmly press the switch panel onto the surface.
- Alternatively, use screws to secure the switch panel to a wall or junction box.

Figuur 4: Examples of the wireless switch installed in different rooms, demonstrating its flexible placement without wiring.
5.3 Pairing the Wireless Switch with the Receiver
The switch and receiver are typically pre-paired. If re-pairing is needed or for multi-way control setup:
- Maak seker dat die ontvanger aangeskakel is.
- Press and hold the pairing button on the receiver (refer to receiver diagram for location, usually a small button or indicator). The indicator light on the receiver will start blinking.
- While the receiver indicator is blinking, press the desired button on the wireless switch panel.
- The receiver's indicator light will stop blinking or flash a confirmation, indicating successful pairing.
- To set up multi-way control, repeat steps 2-3 with additional wireless switch panels.
5.4 Verbinding met Wi-Fi en Toepassingopstelling
To enable smart control features, connect the receiver to your home Wi-Fi network and set up the companion application.
- Laai die toepassing af: Soek vir the "Wireless Smart" app on the Apple App Store (for iOS) or Google Play Store (for Android) and install it on your smartphone.
- Registreer/Teken Aan: Maak die toepassing oop en volg die instruksies op die skerm om 'n rekening te skep of aan te meld.
- Voeg toestel by: In the app, select the option to add a new device. Follow the app's instructions to put the receiver into Wi-Fi pairing mode (this usually involves a specific power cycle or button press on the receiver).
- Koppel aan Wi-Fi: Enter your 2.4GHz Wi-Fi network name and password when prompted by the app. The receiver will connect to your home network.
- Name the Device: Assign a descriptive name to your smart switch (e.g., "Living Room Light") for easy identification and voice control.

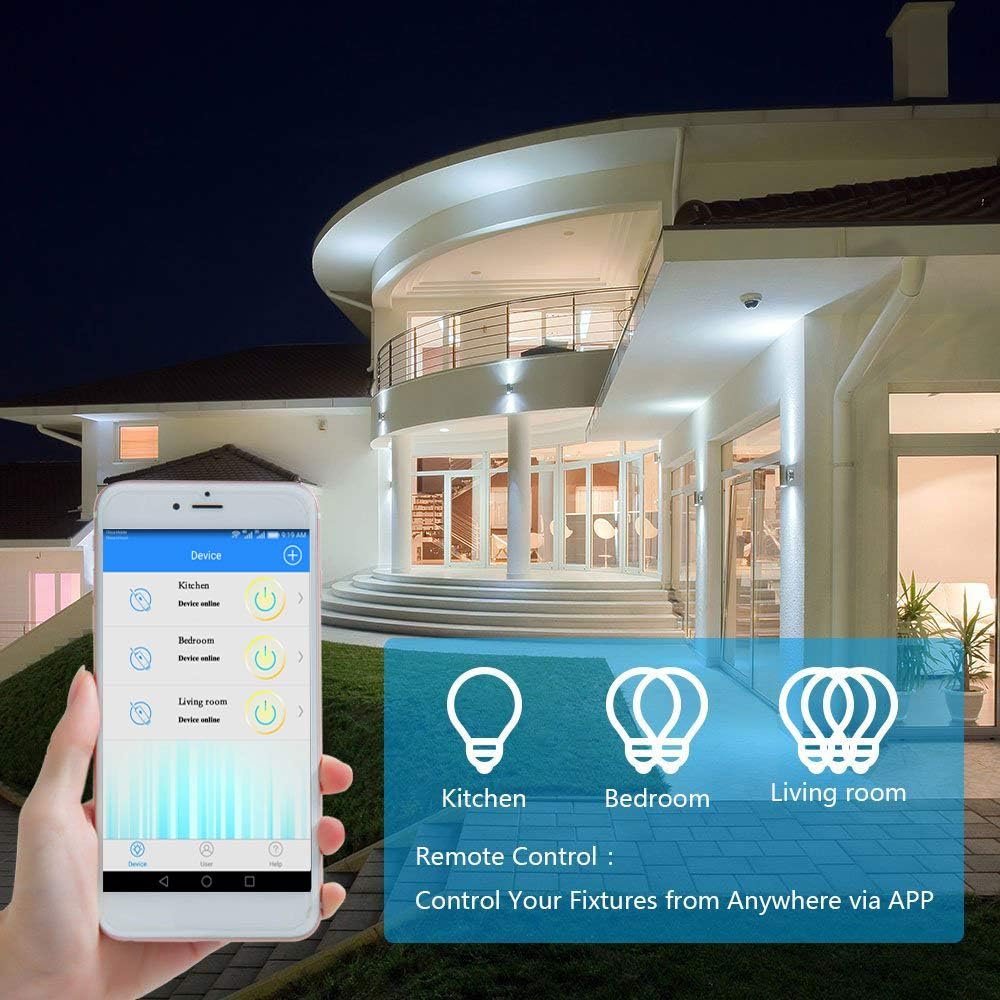
Figuur 5: A smartphone displaying the "Wireless Smart" app interface, showing control over various light fixtures (Kitchen, Bedroom, Living Room).
6. Bedryfsinstruksies
6.1 Handmatige beheer
Press the wireless switch panel to toggle the connected light or appliance on and off. The switch transmits a 433MHz signal to the receiver.
6.2 Toepassingsbeheer
Use the "Wireless Smart" application on your smartphone to control your lights from anywhere with an internet connection.
- Open the "Wireless Smart" app.
- Select the desired smart switch from your device list.
- Tap the on/off icon to toggle the light.
- If the connected light fixture supports dimming and the app provides the function, you can adjust brightness levels.
6.3 Stembeheer (Amazon Alexa en Google Home)
Integrate your GREENCYCLE Smart Wireless Light Switch with Amazon Alexa or Google Home for convenient voice control.
- Koppel rekening: In your Alexa or Google Home app, navigate to the 'Skills' or 'Works with Google' section. Soek vir and enable the "Wireless Smart" skill/service. Link your "Wireless Smart" account.
- Ontdek toestelle: Vra jou stemassistent om "Toestelle te ontdek" of begin toestelontdekking handmatig in die toepassing.
- Stembevele: Once discovered, you can use commands such as:
- "Alexa, skakel [Toestelnaam] aan"
- "Haai Google, skakel [Toestelnaam] af"
- "Alexa, set [Device Name] to 50%" (if dimming is supported)
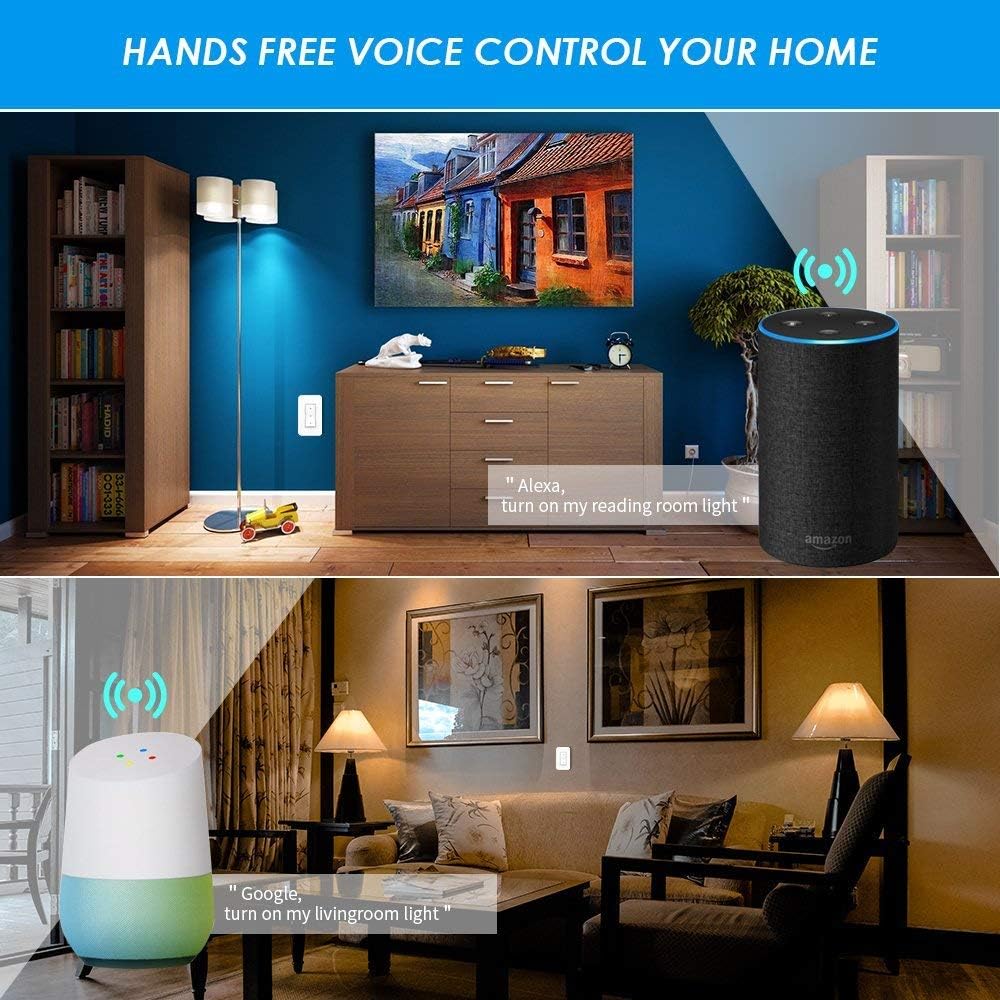
Figuur 6: Examples of voice control in a home setting, showing an Amazon Echo and Google Home device responding to commands to control lights.
6.4 Tydsberekeningsfunksie
Utilize the app's timing functions to automate your lights and appliances.
- Scheduled Timer: Set specific times for your lights to turn on or off daily.
- Aftel-afteller: Stel 'n timer sodat die lig na 'n bepaalde tyd afskakel.
- Lustydteller: Konfigureer herhalende aan/af-siklusse.
- Sunrise/Sunset Sync: Schedule lights to turn on or off based on local sunrise and sunset times.
Figuur 7: Screenshots from the app demonstrating scheduled timers for lights, including daily on/off times and synchronization with sunrise/sunset.
7. Onderhoud
7.1 Skoonmaak
Wipe the wireless switch panel and receiver with a soft, dry cloth. Do not use abrasive cleaners or solvents, as these may damage the surface or internal components.
7.2 Wireless Switch Battery Replacement
The wireless switch is powered by a CR2032 button lithium battery, which has a long lifespan (up to 20 years, or 4-6 years with typical use). If the switch becomes unresponsive, the battery may need replacement.
- Carefully pry open the back cover of the wireless switch panel.
- Verwyder die ou CR2032-battery.
- Plaas 'n nuwe CR2032-battery met die positiewe (+) kant na bo.
- Klik die agterste deksel stewig vas.
8. Probleemoplossing
8.1 Light Not Responding to Wireless Switch
- Check Receiver Power: Ensure the receiver is properly wired and receiving power.
- Kontroleer paring: Re-pair the wireless switch with the receiver (refer to Section 5.3).
- Batterykontrole: Replace the CR2032 battery in the wireless switch (refer to Section 7.2).
- Afstand/Obstruksies: Ensure the switch is within the effective range of the receiver (up to 40m indoors) and there are no excessive obstructions.
8.2 App/Voice Control Not Working
- Wi-Fi konneksie: Verify that your receiver is connected to your 2.4GHz Wi-Fi network. Check your router and internet connection.
- Programstatus: Ensure the "Wireless Smart" app shows the device as "Online".
- Rekeningkoppeling: Confirm that your "Wireless Smart" account is correctly linked to Amazon Alexa or Google Home.
- Toestelnaam: Use the exact device name configured in the app for voice commands.
- Router Interference: If you have a dual-band router, ensure the receiver is connected to the 2.4GHz band.
8.3 Light Flickers or Does Not Turn On/Off Correctly
- Laaiversoenbaarheid: Ensure the connected light fixture's wattage does not exceed the receiver's maximum load (1000W).
- Bedradingskontrole: Double-check all wiring connections to the receiver (Live In, Neutral In, Live Out, Neutral Out) for looseness or incorrect placement.
- Verdoof funksie: If attempting to dim, ensure the light bulb itself is dimmable and the app supports dimming for this specific device.
9. Waarborg en Ondersteuning
For warranty information or technical support, please contact GREENCYCLE customer service. Refer to the product packaging or the GREENCYCLE official webwebwerf vir die mees onlangse kontakbesonderhede.
Vervaardiger: GREENCYCLE TECH INC.