Inleiding
Dankie vir die aankoopasing the Nedis CLAR005BK Digital LED Projection Alarm Clock Radio. This manual provides detailed instructions for the safe and efficient use of your new device. Please read this manual thoroughly before use and keep it for future reference.
Veiligheidsinstruksies
- Lees alle instruksies noukeurig deur voordat u die toestel gebruik.
- Moenie die toestel aan drup- of spatwater blootstel nie.
- Moenie voorwerpe wat met vloeistowwe gevul is, soos vase, op die toestel plaas nie.
- Verseker behoorlike ventilasie. Moenie enige ventilasie-openinge blokkeer nie.
- Plaas die toestel op 'n stabiele, plat oppervlak.
- Gebruik slegs die kragadapter wat by die toestel voorsien is.
- Moenie probeer om die toestel self te herstel of te wysig nie. Verwys alle diens na gekwalifiseerde personeel.
- Hou die toestel weg van direkte sonlig, hittebronne en sterk magnetiese velde.
Pakketinhoud
Kontroleer asseblief die inhoud van die pakket om seker te maak dat alle items teenwoordig en in 'n goeie toestand is:
- Nedis CLAR005BK Projection Alarm Clock Radio
- Power Adapter (if included, otherwise integrated cable)
- Gebruikershandleiding (hierdie dokument)
Produk verbyview
Familiarize yourself with the various parts and controls of your alarm clock radio.

Figuur 1: Voorkant View. This image displays the front of the alarm clock radio, featuring a prominent red LED display showing "8:00". The "Nedis" brand logo is visible above the display, and text "ALARM CLOCK RADIO / TIME PROJECTION" is below. Buttons are visible on the top surface.

Figure 2: Top Controls. This image shows the top panel of the alarm clock radio, highlighting the various control buttons for setting time, alarms, radio functions, and snooze.
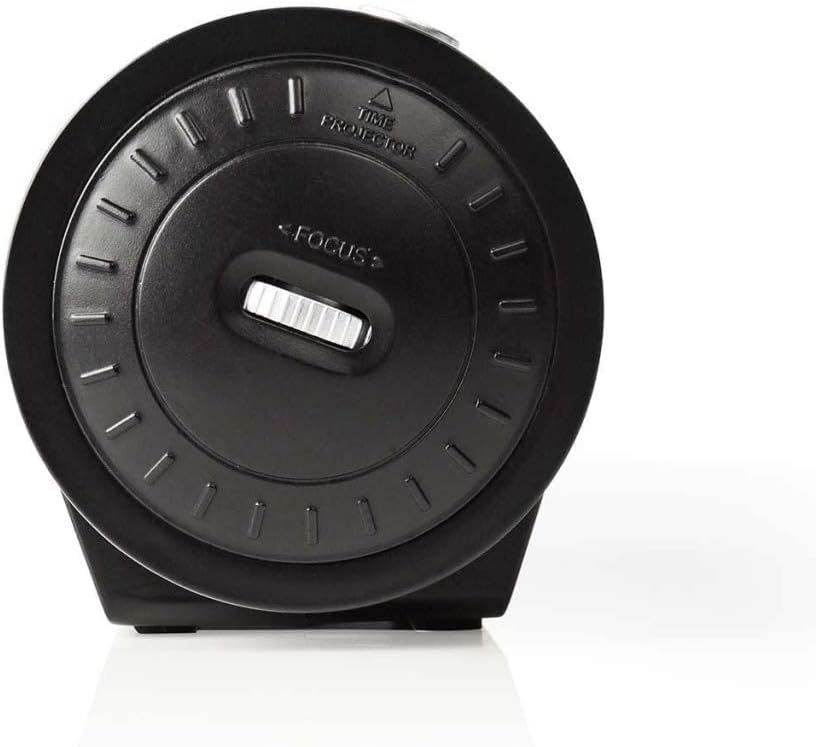
Figure 3: Projector Side. This image focuses on the side of the alarm clock radio where the time projector lens is located. A "FOCUS" wheel is clearly visible for adjusting the clarity of the projected time, along with an indicator for "TIME PROJECTOR".
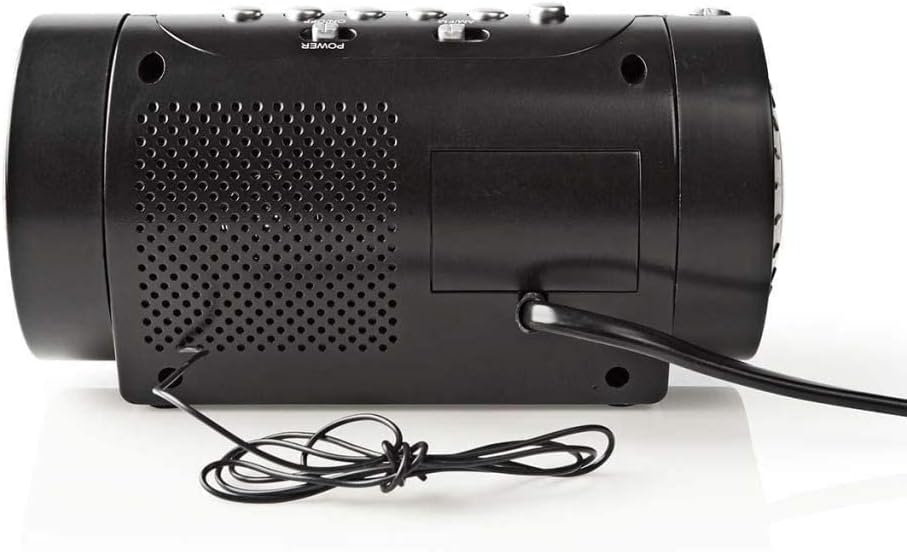
Figuur 4: Agterpaneel. This image shows the back of the alarm clock radio, featuring the integrated power cable, a speaker grille for audio output, and a battery compartment cover (if applicable).
Control Buttons (Refer to Figure 2)
- TYDSTEL: Druk om tydinstellingsmodus te betree.
- UUR / MIN: Use to adjust hour and minute during time/alarm setting.
- ALARM 1 / ALARM 2: Druk om Alarm 1 of Alarm 2 in te stel.
- SLUIM / SLAAP / DIMMER: Press to activate snooze, set sleep timer, or adjust display brightness.
- RADIO ON/OFF / BAND: Power on/off the radio or switch between AM/FM bands.
- TUNE +/-: Adjust radio frequency.
- VOLUME +/-: Adjust radio volume.
- PROJEKSIE AAN/AF: Turn the time projection on or off.
- PROJECTION ROTATION: Rotate the projected time display.
- FOCUS (Figure 3): Adjust the clarity of the projected time.
Opstelling
1. Kragverbinding
- Uncoil the power cable from the rear of the unit (Figure 4).
- Plug the power cable into a standard wall outlet. The LED display will light up.
- (Optional) For battery backup, open the battery compartment (usually at the bottom or rear) and insert 2x AAA batteries (not included). This will preserve time settings during a power outage.
2. Stel die tyd in
- Druk en hou die TYD BEREIK knoppie totdat die uursyfers begin flikker.
- Gebruik die UUR button to adjust the hour. Pay attention to AM/PM indicators if present.
- Druk die TYD BEREIK knoppie weer, en die minuutsyfers sal flikker.
- Gebruik die MIN knoppie om die minute aan te pas.
- Druk TYD BEREIK weer om te bevestig en die tydinstellingsmodus te verlaat.
3. Adjusting the Projection
- Locate the projector lens on the side of the unit (Figure 3).
- Druk die PROJEKSIE AAN/UIT button to activate the time projection.
- Draai die PROJEKSIE ROTASIE button/dial to adjust the angle of the projected time on your wall or ceiling.
- Draai die FOKUS wheel (Figure 3) until the projected time is clear and sharp.
Bedryf
1. Radio-operasie
- Druk die RADIO AAN/UIT knoppie om die radio aan te skakel.
- Druk die BAND button (often the same as RADIO ON/OFF) to switch between AM and FM bands.
- Gebruik die TUNE +/- knoppies om handmatig na jou verlangde stasie in te skakel.
- Stel die volume aan met die VOLUME +/- knoppies.
- To save a preset station: Tune to the desired station, then press and hold a preset button (if available, usually numbered 1-10 or M1-M5) until you hear a confirmation beep.
- To recall a preset station: Briefly press the corresponding preset button.
- Om die radio af te skakel, druk die RADIO AAN/UIT knoppie weer.
2. Alarminstellings
This device features two independent alarms (Alarm 1 and Alarm 2).
- Alarmtyd instel:
- Druk en hou die ALARM 1 or ALARM 2 knoppie totdat die alarmuursyfers flikker.
- Gebruik die UUR knoppie om die verlangde alarmuur in te stel.
- Druk die ALARM 1 or ALARM 2 knoppie weer, en die minuutsyfers sal flikker.
- Gebruik die MIN knoppie om die verlangde alarmminute in te stel.
- Druk die ALARM 1 or ALARM 2 button once more to confirm the alarm time.
- Selecting Alarm Source (Buzzer/Radio):
- Nadat u die alarmtyd ingestel het, druk die ALARM 1 or ALARM 2 button repeatedly to cycle through alarm modes: Buzzer, Radio, or Off. An indicator icon will show the selected mode.
- Sluimer-funksie: As die alarm klink, druk die SLUIMER knoppie om die alarm tydelik vir ongeveer 9 minute stil te maak. Die alarm sal weer na hierdie tydperk afgaan.
- Stop die alarm: To turn off the alarm for the day, press any button other than SNOOZE. The alarm will reset for the next day.
- Deaktiveer die alarm permanent: Cycle through the alarm source options until "OFF" or no alarm icon is displayed.
3. Slaaptimer
Die slaaptimer laat die radio toe om vir 'n vasgestelde duur te speel voordat dit outomaties afskakel.
- Terwyl die radio speel, druk die SLAAP button (often combined with SNOOZE/DIMMER) repeatedly to cycle through sleep timer options (e.g., 90, 60, 30, 15 minutes, OFF).
- Die radio sal outomaties afskakel na die gekose tyd.
4. Skermdimmer
Pas die helderheid van die LED-skerm aan.
- Druk die DOWWER button (often combined with SNOOZE/SLEEP) repeatedly to cycle through different brightness levels (e.g., High, Medium, Low, Off).
Onderhoud
Skoonmaak
- Ontkoppel altyd die toestel van die kragtoevoer voordat u dit skoonmaak.
- Gebruik 'n sagte, droë lap om die buite-oppervlaktes af te vee.
- Moenie skuurmiddels, wasse of oplosmiddels gebruik nie, aangesien dit die afwerking kan beskadig.
- For the projector lens, use a soft, lint-free cloth specifically designed for optics.
Battery Replacement (for backup)
- If the time display is incorrect after a power outage, the backup batteries may need replacement.
- Open the battery compartment cover (refer to Figure 4 for general location).
- Verwyder die ou batterye en gooi dit behoorlik weg volgens plaaslike regulasies.
- Insert new 2x AAA batteries, ensuring correct polarity (+/-).
- Maak die batterykompartement se deksel toe.
Probleemoplossing
| Probleem | Moontlike oorsaak | Oplossing |
|---|---|---|
| Geen krag/Skerm af | Power cable not connected; Power outage. | Ensure power cable is securely plugged into a working outlet. Check household circuit breaker. |
| Projected time is blurry | Fokus nie aangepas nie. | Pas die FOKUS wheel on the projector side until the image is clear. |
| Projected time is upside down or sideways | Projection rotation needs adjustment. | Gebruik die PROJEKSIE ROTASIE button/dial to orient the time correctly. |
| Alarm klink nie | Alarm not set; Alarm volume too low; Alarm mode set to OFF. | Verify alarm time and ensure alarm is activated (Buzzer or Radio mode). Increase radio volume if alarm source is radio. |
| Swak radio-ontvangs | Antenna not extended/positioned correctly; Interference. | Extend the wire antenna fully and reposition it for better reception. Move the unit away from other electronic devices. |
Spesifikasies
- Handelsmerk: NEDIS
- Model: CLAR005BK
- Kleur: Swart
- Vertoon tipe: Digitale LED
- Spesiale kenmerke: Alarm, Snooze, Time Projection
- Kragbron: Electric (AC), Battery Backup (2x AAA, not included)
- Verbinding: Jack 3,5 mm (likely for antenna or headphone output)
- Gewig: 364.9 gram
- Materiaal: Plastiek
- Gebruik: Binneshuise
- Vervaardiger deelnommer: CLAR005BK
- GTIN: 05412810274116
Waarborg
This product is covered by a manufacturer's warranty. Please refer to the warranty card included in your package or contact your retailer for specific terms and conditions. Keep your proof of purchase for warranty claims.
Ondersteuning
For technical support, troubleshooting assistance, or to inquire about spare parts, please contact Nedis customer service. Contact details can typically be found on the Nedis webwebwerf of op die produkverpakking.
U kan ook die Nedis Store on Amazon vir meer produkinligting.