PowMr SL03-30A
PowMr SL03-30A Solar Charge Controller User Manual
Model: SL03-30A
1. Inleiding
The PowMr SL03-30A Solar Charge Controller is designed to manage the power flow from your solar panels to your battery bank, ensuring efficient charging and protecting your batteries from overcharge and over-discharge. This controller is suitable for 12V/24V systems and supports various battery types including Lithium and Lead-Acid batteries. It features an LCD display for monitoring system parameters and offers multiple protection functions to enhance system safety and longevity.
2. Sleutel kenmerke

Beeld: Oorview of the PowMr SL03-30A Solar Charge Controller's main features, including 12V/24V auto-detection, energy recording, temperature compensation, aluminum heat sink, eight electronic protections, compatibility with Lithium/Lead-acid batteries, and light & timer control.
- 12V/24V Auto-detection: Automatically identifies system voltage.
- Energy Recording/Current Display: Provides real-time monitoring of energy and current.
- Temperatuurkompensasie: Adjusts charging parameters based on ambient temperature.
- Aluminium hitte sink: Ensures efficient heat dissipation for stable operation.
- Eight Electronic Protections: Comprehensive safety features including overcharge, over-discharge, short-circuit, and reverse current protection.
- Batteryversoenbaarheid: Supports Lithium and Lead-Acid battery types (Flooded, GEL, AGM, LiFePO4).
- Light & Timer Control: Programmable load control functions.
- LCD-skerm: Clear interface for parameter viewing and adjustment.

Beeld: Intern view of the controller highlighting key components such as the copper coil for stable charge/discharge, a fuse for double protection, and MOSFETs made from good raw materials for current sensing.
3. Veiligheidsinstruksies
Please read all instructions carefully before installation and operation. Failure to follow these instructions may result in damage to the controller, battery, or solar panels, and may void the warranty.
- Ensure the battery is connected first to allow the controller to recognize the system voltage.
- Always connect the solar panels and load after the battery.
- Disconnect the solar panels and load before disconnecting the battery.
- Install the controller in a well-ventilated, dry, and cool environment, away from flammable materials.
- Avoid touching or short-circuiting wires or terminals.
- Gebruik gepaste draaddiktes vir alle verbindings om oorverhitting te voorkom.
- This device is for indoor use only. Avoid exposure to water or excessive humidity.
- Hou buite bereik van kinders.
4. Installasie
4.1 Bedradingsvolgorde
- Connect the battery to the charge controller. Ensure correct polarity (+ to + and - to -). The controller will display the battery voltage.
- Connect the solar panel to the charge controller. Ensure correct polarity. The controller will begin charging the battery.
- Connect the load to the charge controller. Ensure correct polarity.
Belangrik: Always connect the battery first and disconnect it last. This sequence prevents damage to the controller from voltage oplewing.
4.2 Montering
Mount the controller vertically on a wall or flat surface in a well-ventilated area, away from direct sunlight, high temperatures, and water. Ensure there is sufficient air circulation around the heat sink.

Image: The PowMr SL03-30A Solar Charge Controller showing its mounting holes on the sides, indicating how it can be affixed to a surface.
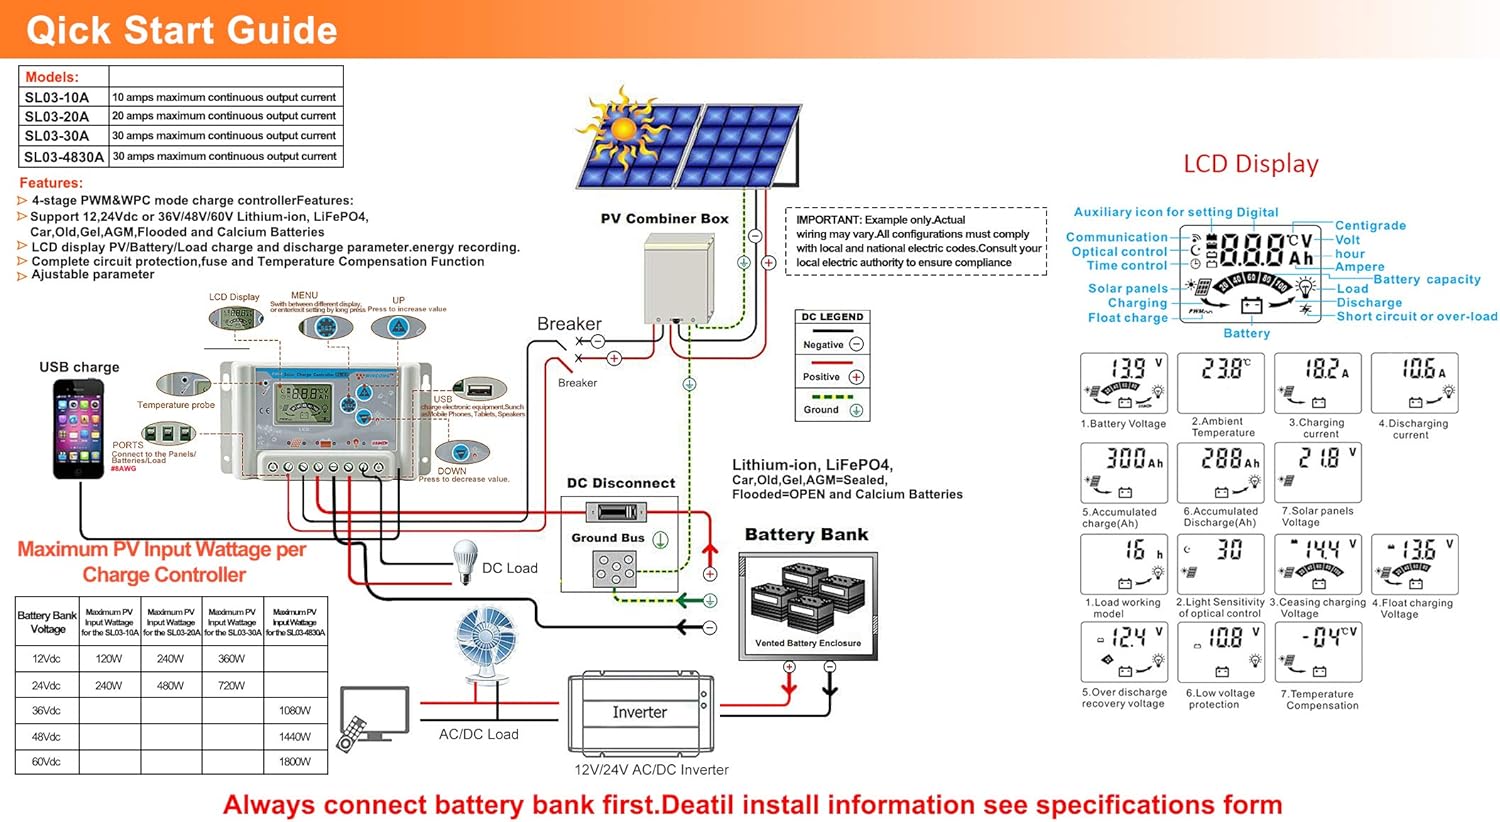
Image: A detailed wiring diagram for the solar charge controller, showing connections for PV combiner box, battery bank, DC load, and inverter. It also illustrates the LCD display and various parameters.
4.3 Video Guide: How to Connect the Controller
Video: This video demonstrates the correct wiring procedure for the PowMr SL03-30A Solar Charge Controller, showing how to connect the battery and solar panels. It also shows how to browse the interface and adjust settings.
5. Operasie
5.1 LCD-skerm en knoppies
The controller features an LCD display and three buttons for operation: UP, DOWN, and SET.
- UP -knoppie: Navigates through display interfaces, increases parameter values.
- AFKNOP knoppie: Navigates through display interfaces, decreases parameter values.
- SET -knoppie: Enters/exits setting mode, confirms parameter changes.
5.2 Browsing Display Interfaces
Press the UP or DOWN button to cycle through various display interfaces, including battery voltage, charging current, accumulated discharge, and load status.
5.3 Parameterinstellings
To enter the setting interface, long-press the SET button for 5 seconds. Use the UP and DOWN buttons to adjust values and the SET button to confirm and move to the next parameter. Long-press SET again to save changes and exit.
Adjustable parameters include:
- Battery tipe: Select the correct battery type (e.g., Lead-Acid, Lithium).
- Laaibeheermodus: Set timer for load operation (e.g., 24H for continuous, 16H for dusk-to-dawn).
- Charge Voltage: Adjust maximum charge voltage.
- Ontslag Sny-af Voltage: Stel die minimum voltage before load disconnection.
- Discharge Reconnect Voltage: Stel die voltage at which the load reconnects.
Refer to the "Specifications" section for default and adjustable ranges for each parameter.
6. Beskermingsfunksies

Image: A circular diagram illustrating the eight electronic protection features of the PowMr SL03-30A Solar Charge Controller, including power off memory, short-circuit, over-charging, open-circuit, over-load, under-voltage discharge, over-heat, and dual MOSFET reverse current protection.
The PowMr SL03-30A controller incorporates multiple protection mechanisms to ensure the safety and longevity of your solar system:
- Oorlaaibeskerming: Voorkom batteryskade as gevolg van oormatige laai.
- Oorontladingsbeskerming: Disconnects the load when battery voltage drops below a safe level.
- Kortsluitingbeskerming: Skakel outomaties af in geval van 'n kortsluiting.
- Open-circuit Protection: Protects the system if the solar panel circuit is open.
- Omgekeerde polariteitsbeskerming: Prevents damage from incorrect battery or solar panel connections.
- Oorbelastingbeskerming: Disconnects the load if current exceeds the rated limit.
- Oorverhittingbeskerming: Reduces power or shuts down if the controller's internal temperature is too high.
- Skakel geheue af: Behou instellings selfs na kragonderbreking.
7. Spesifikasies

Image: A comprehensive table detailing the specifications for PowMr SL03-10A, SL03-20A, SL03-30A, and SL03-40A models, including normal battery voltage, charge/discharge current, battery type, system recognize range, charging regulation, maximum PV open circuit voltage, and various protection parameters.
| Parameter | Value (SL03-30A) |
|---|---|
| Normale Battery Voltage | 12V / 24V outomaties |
| Laai huidige | 30A |
| Ontladingsstroom | 30A |
| Battery Tipe | Lead-Acid Battery (Flooded, AGM, Gel, Calcium), LiFePO4 (Lithium) |
| System Recognize Range | Lead-Acid Battery: 8V-15V(12V System), 18V-30V(24V System) LiFePO4: 8V-15V(12V), 18V-30V(24V) |
| Charging Regulation | Bulk, Absorption, Float, Equalization |
| Maks. PV Open Circuit Voltage (Gesang) | <= 50V |
| Max. PV Input Wattage (12V/24V) | 360W/720W |
| Stop-charge Voltage | Default 14.4V (12V), 28.8V (24V) (adjustable) |
| Float-charge Voltage | Default 13.6V (12V), 27.2V (24V) (adjustable) |
| Lae Voltage Reconnected | Default 12.4V (12V), 24.8V (24V) (adjustable) |
| Lae Voltage Ontkoppeling | Default 10.8V (12V), 21.6V (24V) (adjustable) |
| No Load Losses | <10mA |
| Batterytemperatuurvergoeding | Automatic with optional NTC thermal probe (adjustable) |
| Bedryfstemperatuur | -20°C tot +60°C |
| Outline Size (L*W*H) | 143*77*40 mm |
| Monteergatspasiëring | 134*55 mm |
| Gewig | 260g |
8. Probleemoplossing
This section provides solutions to common issues you might encounter with your PowMr SL03-30A Solar Charge Controller.
| Probleem | Moontlike oorsaak | Oplossing |
|---|---|---|
| Kontroleerderskerm is af. | Geen battery gekoppel of batteryvolume nietage te laag. | Connect the battery correctly. Ensure battery voltage is bo 8V. |
| "LLL" or "HHH" displayed on screen. | No PV input or PV voltage te laag/hoog. | Ensure solar panels are connected and receiving sunlight. Check PV voltage. |
| Battery laai nie. | Solar panel not connected, insufficient sunlight, or incorrect wiring. | Check solar panel connections and ensure adequate sunlight. Verify wiring polarity. |
| Load not working. | Load disconnected, battery voltage too low (over-discharge protection), or load control settings. | Check load connections. Charge battery. Adjust load control timer (e.g., set to 24H for continuous). |
| Controller overheating. | Poor ventilation or excessive load/charging current. | Ensure proper ventilation around the controller. Reduce load or charging current if consistently overheating. |
9. Onderhoud
Regular maintenance ensures optimal performance and extends the lifespan of your solar charge controller.
- Netheid: Hou die beheerder skoon en vry van stof en puin. Gebruik 'n droë lap vir skoonmaak.
- Verbindings: Periodically check all wiring connections for tightness and corrosion. Loose connections can cause overheating and poor performance.
- Ventilasie: Ensure the ventilation openings are not blocked to allow for proper heat dissipation.
- Battery gesondheid: Monitor battery voltage and health regularly. Replace batteries as needed.
- Omgewingstoestande: Ensure the controller is operating within its specified temperature and humidity ranges.
10. Waarborg en Ondersteuning
For warranty information, technical support, or service inquiries, please contact PowMr customer service through the retailer where the product was purchased or visit the official PowMr website. Please have your model number (SL03-30A) and purchase date available when contacting support.
Vir meer inligting, besoek die PowMr Store.
Verwante Dokumente - SL03-30A
 |
ECO-WORTHY EW1906-30A 12V/24V 30A Sonkragbeheerder Gebruikershandleiding Gebruikershandleiding vir die ECO-WORTHY EW1906-30A 12V/24V 30A Sonkraglaaibeheerder. Dek veiligheidsinstruksies, produkkenmerke, stelselverbinding, sleutelfunksies, vertooninligting, foutkodes, algemene vrae en tegniese parameters. |
 |
BSC Controller Installation Manual This manual provides instructions for the installation of the BSC Controller, a solar charge controller designed for various battery types. |
 |
ECO-WORTHY EW1906-30A 12V/24V 30A Sonkragbeheerder Gebruikershandleiding Omvattende gebruikershandleiding vir die ECO-WORTHY EW1906-30A 12V/24V 30A Sonkraglaaibeheerder, wat veiligheidsinstruksies, produkkenmerke, stelselverbinding, sleutelfunksies, vertoon, foutkodes, algemene vrae en tegniese parameters dek. |
 |
Step-by-Step Installation Guide for Solar Charge Controllers A comprehensive guide to installing amiciSmart solar charge controllers, covering battery connection, type selection, solar panel connection, DC load connection, and inverter connection. Includes details on matching solar panel wattage aan kontroleerder amperage and battery voltage. |
 |
BUSBYR White MPPT Solar Charge Controller User Manual Comprehensive user manual for the BUSBYR White MPPT Solar Charge Controller, covering models with 12V-96V voltage, 30A-100A current, and 230V AC output. Features LCD touch interface and compatibility with Lifepo4, Lithium, GEL, and Lead Acid batteries for home solar panel systems. |
 |
Aideepen MPPT Solar Controller Product Manual Comprehensive product manual for the Aideepen MPPT Solar Controller, covering features, specifications, safety guidelines, and battery configuration for 12V/24V systems. |
Ask a question about this manual
Ask about setup, troubleshooting, compatibility, parts, safety, or missing instructions. Manuals+ will review the question and use this page’s manual context to help answer it.