
1. Inleiding
The EcoNet Controls Bulldog Valve Robot is a Z-Wave Plus certified smart valve controller designed to automate the opening and closing of your home's main water valve. This device integrates with compatible Z-Wave smart home systems, offering remote water flow control and enhancing flood prevention when paired with Z-Wave leak sensors. Its design allows for installation over existing ball valves without requiring plumbing modifications.

Figure 1: EcoNet Controls Bulldog Valve Robot installed on a water pipe.
2. Produk verbyview
2.1 Sleutelkenmerke
- Z-Wave Plus gesertifiseer: Ensures secure, long-range wireless communication with a reach of up to 30 meters (line of sight).
- No Plumbing Required: Installs directly over your existing water valve, simplifying the installation process.
- Klepversoenbaarheid: Works with ¾", 1", 1.25", and 1.5" ball valves. Refer to the valve compatibility chart for details.
- Hoë wringkrag motor: Provides powerful operation, toggling the valve open or closed in approximately 18 seconds.
- Slim huis-integrasie: Compatible with various Z-Wave hubs and controllers, including SmartThings, Wink, Hubitat, Nexia, Control4, Universal Devices, Honeywell, and Ring.
- Vloedvoorkoming: Can be paired with Z-Wave leak sensors and a compatible hub to automatically shut off water in case of a leak.
2.2 Pakketinhoud
Verifieer dat alle komponente in jou pakket teenwoordig is:
- EcoNet Controls Bulldog Valve Robot (Water Shutoff Controller)
- AC Adapter
- Montageset
- Gebruikershandleiding (hierdie dokument)

Figure 2: EcoNet Controls Bulldog Valve Robot with power adapter.
3. Veiligheidsinligting
- Lees alle instruksies sorgvuldig voor installasie en gebruik.
- Maak seker dat die kragtoevoer afgeskakel is voordat enige installasie of onderhoud uitgevoer word.
- This device is designed for indoor use only. Avoid exposure to water or extreme temperatures.
- Moenie probeer om die toestel te wysig of te herstel nie. Verwys alle diens na gekwalifiseerde personeel.
- Ensure the valve robot is securely mounted to prevent damage or malfunction.
- This device requires a Z-Wave hub for remote control and automation.
4. Installasie
The Bulldog Valve Robot is designed for hassle-free installation over existing ball valves without requiring any plumbing work. It is crucial to mount the device correctly to avoid undue stress on your plumbing.
4.1 Valve Compatibility
The device supports ¾", 1", 1.25", and 1.5" ball valves. Please consult the compatibility chart below to ensure your valve type is supported.
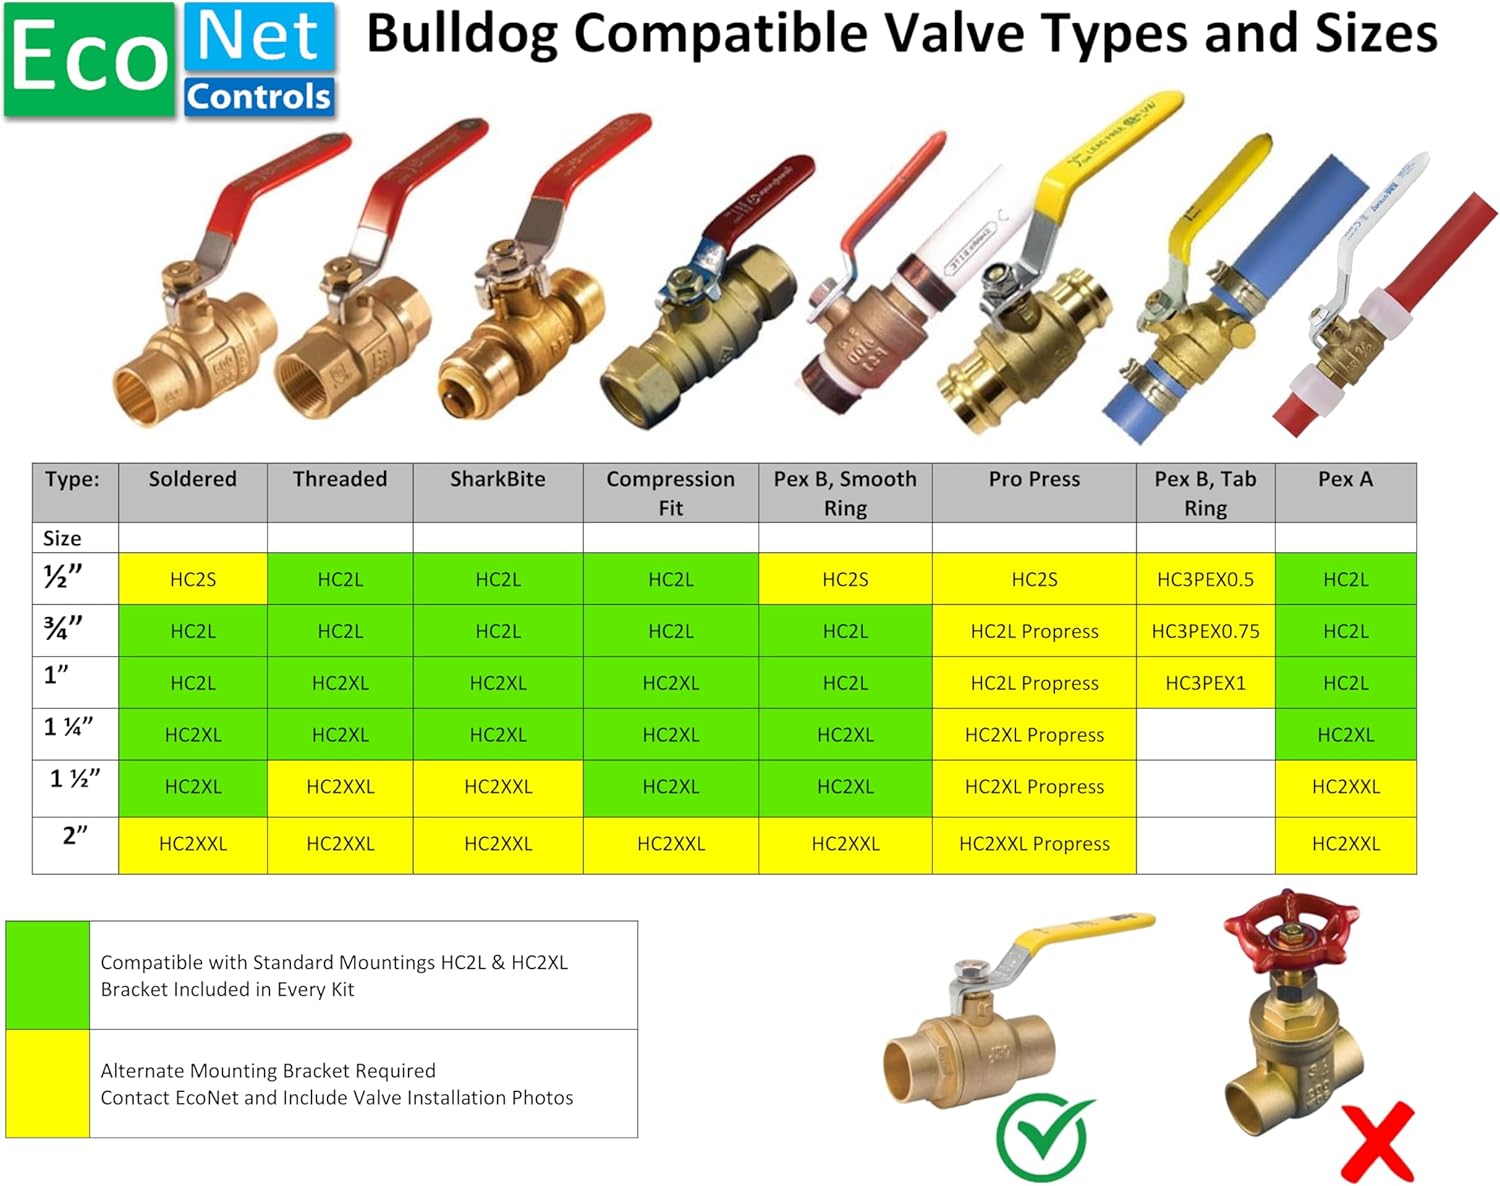
Figure 3: Compatible Valve Types and Sizes.
4.2 Installasiestappe
- Prepare the Valve: Ensure your existing ball valve is in good working condition and accessible.
- Position the Mounting Bracket: Place the lower part of the mounting bracket around the pipe directly below the valve.
- Attach the Valve Robot: Secure the Bulldog Valve Robot to the mounting bracket, ensuring the robot's arm aligns with the valve handle. The robot should mount to the valve body, not the pipe, to prevent stress.
- Bevestig die Vergadering: Tighten all screws in the mounting kit to ensure a firm and stable installation.
- Koppel krag: Plug the AC adapter into the valve robot and then into a standard electrical outlet.

Figuur 4: Ontplof view van installasie stappe.

Figure 5: Correct vs. Incorrect Mounting Method.
5. Z-Wave Setup and Pairing
The Bulldog Valve Robot requires a Z-Wave hub, controller, or gateway for remote control, automation, and notifications. Ensure your Z-Wave hub is powered on and in inclusion mode before proceeding.
5.1 Compatible Smart Home Systems
The Bulldog Valve Robot is compatible with a wide range of Z-Wave certified smart home systems, including but not limited to:
- Slim dinge
- Knipoog
- hubitat
- Nexia
- Beheer 4
- Universal Devices
- Honeywell
- Ring
- Vera
- GoControl
- Fibaro
- 2GIG
- Woonplek
- Tuissiener

Figure 6: Smart Home System Compatibility.
5.2 Paringsinstruksies
- Place your Z-Wave hub into inclusion (pairing) mode. Refer to your hub's user manual for specific instructions.
- Press the Z-Wave button on the Bulldog Valve Robot. The LED indicator on the robot will flash to confirm it is attempting to pair.
- Once successfully paired, the LED indicator will stop flashing and remain solid for a few seconds, then turn off. The device should appear in your Z-Wave controller's interface.
- Test the connection by sending an open/close command from your Z-Wave controller.
6. Operasie
6.1 Handmatige beheer
The Bulldog Valve Robot can be manually operated by pressing the button on the device. A single press will toggle the valve's state (open or closed). The motor will engage and move the valve handle to the opposite position.
6.2 Remote Control via Z-Wave Hub
Once paired with your Z-Wave hub, you can control the valve robot remotely through your smart home application. Commands to open or close the valve will be sent wirelessly to the device. The valve robot typically takes about 18 seconds to fully open or close.
6.3 Automation with Leak Sensors
For enhanced flood prevention, integrate the Bulldog Valve Robot with Z-Wave leak sensors. Configure automation rules within your Z-Wave hub to automatically shut off the main water supply if a leak is detected by any paired sensor. This functionality requires both the valve robot and leak sensors to be connected to the same Z-Wave network.
7. Onderhoud
- Gereelde tjeks: Periodically inspect the mounting and connections to ensure they remain secure.
- Skoonmaak: Wipe the device with a dry, soft cloth. Do not use abrasive cleaners or allow moisture to enter the device.
- Valve Exercise: It is recommended to cycle your main water valve (open and close) at least once a month to prevent it from seizing. This can be done manually or via your Z-Wave controller.
8. Probleemoplossing
- Toestel reageer nie:
- Check if the AC adapter is securely plugged in and receiving power.
- Ensure the device is within range of your Z-Wave hub.
- Verify that the device is properly paired with your Z-Wave hub. If not, attempt re-pairing.
- Valve Not Fully Opening/Closing:
- Inspect the mounting to ensure it is secure and the robot's arm has a clear path to move the valve handle.
- Check for any obstructions preventing the valve handle from moving freely.
- Ensure the valve itself is not stiff or seized. Manual operation of the valve may be required to free it.
- Moeilikheidsgraad met paring:
- Ensure your Z-Wave hub is in inclusion mode.
- Try moving the valve robot closer to the Z-Wave hub during the pairing process.
- Perform a factory reset on the valve robot (refer to your hub's manual for exclusion/reset procedures, or contact support).
9. Spesifikasies
| Model | EVC200-HCSML |
| Handelsmerk | EcoNet-kontroles |
| Z-Wave sertifisering | Z-Wave Plus |
| Supported Valve Sizes | ¾", 1", 1.25", 1.5" ball valves |
| Krag Invoer | 12 Volts (via AC Adapter) |
| Materiaal | Plastiek |
| Item gewig | 3 pond |
| Pakket afmetings | 10 x 7 x 4 duim |
| UPC | 628451752196 |
10. Waarborg en Ondersteuning
EcoNet Controls products are designed for reliability and performance. For specific warranty information, please refer to the warranty card included with your product or visit the official EcoNet Controls website. For technical support, troubleshooting assistance, or to inquire about replacement parts, please contact EcoNet Controls customer service.
Vervaardiger: EcoNet-kontroles
Webwebwerf: EcoNet Controls Store on Amazon (vir algemene produkinligting)