Inleiding
This manual provides instructions for the proper setup, operation, and maintenance of your Oneal OMX-6 6-Channel Audio Mixer. Please read this manual thoroughly before using the device to ensure optimal performance and safety.
The Oneal OMX-6 is a compact mixing console designed for versatile audio applications. It features 6 input channels plus an auxiliary input, 3-band equalization, and balanced microphone/line inputs, offering flexibility for various audio configurations.
Belangrike veiligheidsinstruksies
- Lees hierdie instruksies.
- Hou hierdie instruksies.
- Gee ag op alle waarskuwings.
- Volg alle instruksies.
- Moenie hierdie toestel naby water gebruik nie.
- Maak slegs skoon met 'n droë lap.
- Moenie enige ventilasie-openinge blokkeer nie. Installeer volgens die vervaardiger se instruksies.
- Moenie naby enige hittebronne soos verkoelers, hitteregisters, stowe of ander toerusting (insluitend ampversterkers) wat hitte produseer.
- Moenie die veiligheidsdoel van die gepolariseerde of aardingstipe prop verslaan nie. 'n Gepolariseerde prop het twee lemme met een wyer as die ander. 'n Aardingsprop het twee lemme en 'n derde aardpunt. Die wye lem of die derde tand word voorsien vir jou veiligheid. Indien die voorsiene prop nie in jou uitlaat pas nie, raadpleeg 'n elektrisiën vir die vervanging van die verouderde uitlaat.
- Beskerm die kragkoord teen geloop of vasgeknyp, veral by proppe, geriefshouers en die punt waar dit uit die apparaat kom.
- Gebruik slegs aanhegsels/bykomstighede gespesifiseer deur die vervaardiger.
- Ontkoppel hierdie apparaat tydens weerligstorms of wanneer dit vir lang tye ongebruik word.
- Verwys alle diens na gekwalifiseerde dienspersoneel. Versorging word vereis wanneer die apparaat op enige manier beskadig is, soos kragtoevoerkoord of prop beskadig is, vloeistof gemors is of voorwerpe in die apparaat geval het, die apparaat aan reën of vog blootgestel is, nie normaal werk nie. , of laat vaar is.
Opstelgids
1. Uitpak en inspeksie
Carefully remove the mixer from its packaging. Inspect the unit for any signs of damage during transit. Retain the packaging for future transport or storage.
2. Kragverbinding
Connect the power cord to the AC IN port on the rear panel of the mixer. Ensure the power switch is in the OFF position before connecting to a power outlet. This mixer supports a wide voltage reeks van 120-240V.

Figure 1: Rear panel connections, including the AC IN port and power switch.
3. Oudio-invoerverbindings
The OMX-6 features 6 channels with balanced microphone (XLR) and line (1/4" TRS) inputs, plus an additional auxiliary input.
- Mikrofoon-insette: Connect microphones to the XLR inputs (MIC) on each channel.
- Lyninvoer: Connect instruments or other line-level devices to the 1/4" TRS inputs (LINE) on each channel.
- Hulp-invoer: Use the dedicated auxiliary input for connecting CD players, DVD players, or MP3 devices.
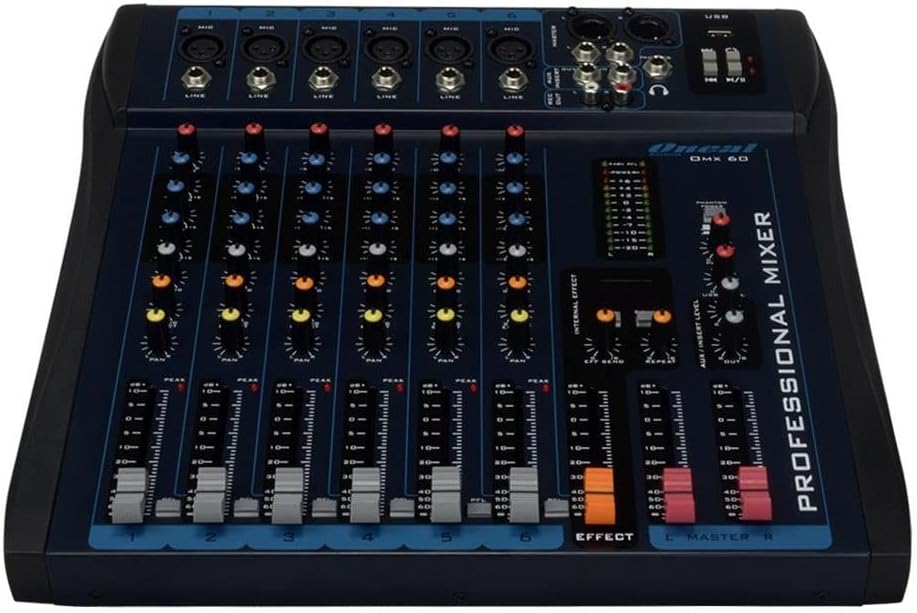
Figure 2: Front panel showing microphone and line inputs for each channel.
4. Oudio-uitsetverbindings
Connect your main speakers or recording devices to the master output ports. The mixer also includes a headphone output for monitoring.
Bedryfsinstruksies
1. Aanskakel
After all connections are made, switch the power button to the ON position. The power indicator light should illuminate.
2. Kanaalkontroles
Each of the 6 channels features the following controls:
- WINS: Adjusts the input sensitivity for the microphone or line input. Start with the GAIN knob fully counter-clockwise and gradually increase until the PEAK LED flashes only occasionally.
- HIGH, MID, LOW (3-Band EQ): Adjusts the treble, midrange, and bass frequencies for the respective channel.
- AUX: Controls the level of the channel signal sent to the auxiliary output for external effects or monitor mixes.
- PAN: Adjusts the stereo position of the channel signal (left to right).
- VLAK-fader: Controls the overall output level of the channel.
- PFL (Luister voor die vervaag): Activates pre-fader monitoring for the channel through headphones.
- PEAK LED: Indicates when the input signal is too high, potentially causing distortion. Reduce GAIN if this LED lights up frequently.
3. Equalization Turbo Loud
Die Turbo Loud button provides an instant enhancement to the equalization, offering a more pronounced sound profile. Experiment with this feature to suit your audio needs.
4. Meester-afdelingkontroles
The master section controls the overall output of the mixer:
- MASTER L/R Faders: Control the main stereo output level.
- VLAKMETER: Displays the output level of the main mix. Aim for levels around 0 dB during normal operation, avoiding consistent peaking into the red.
- FOONE: Headphone output jack and level control for monitoring.
- USB Playback/Recording: If equipped, use the USB port for connecting a USB drive for playback or for connecting to a computer for recording. Refer to specific USB instructions if applicable.
5. Internal Effects (if applicable)
If your model includes internal effects, use the dedicated controls (e.g., EFFECT, REPEAT, SEND) to apply and adjust effects to your mix. The AUX/INSERT LEVEL control may also be used for external effects loops.
Onderhoud
Skoonmaak
Wipe the mixer with a soft, dry cloth. Do not use liquid cleaners or aerosols. Ensure the unit is powered off and unplugged before cleaning.
Berging
When not in use for extended periods, store the mixer in a cool, dry place, away from direct sunlight and extreme temperatures. Keep it covered to prevent dust accumulation.
Probleemoplossing
Geen klankuitset nie
- Kontroleer alle kragverbindings en maak seker dat die menger aangeskakel is.
- Verify that the MASTER L/R faders are raised.
- Ensure individual channel LEVEL faders are raised and GAIN is set appropriately.
- Check connections to speakers or amplewendes.
- Confirm that input sources are active and sending a signal.
Verwronge klank
- Reduce the GAIN on individual channels if the PEAK LED is frequently lighting up.
- Lower the MASTER L/R faders if the main level meter is consistently in the red.
- Check input cables for damage or improper connection.
Gegons of geraas
- Maak seker dat alle kabels behoorlik afgeskerm en gekoppel is.
- Check for ground loops. Try connecting all audio equipment to the same power outlet or power conditioner.
- Hou oudiokabels weg van kragkabels.
Spesifikasies
| Kenmerk | Detail |
|---|---|
| Handelsmerk | Oneal |
| Model | OMX-6 |
| Aantal kanale | 6 + 1 Auxiliary |
| Oudio-invoer | 6 channels (microphones, line, CD/DVD/MP3) + 1 auxiliary |
| Gelykmaking | 3-Band (Low/Mid/Hi) per channel, Turbo Loud feature |
| Mikrofoon insette | Balanced per channel |
| Lyninsette | Balanced per channel |
| Monitor beheer | Individual per channel (MON/PFL) |
| Kragbron | Elektries bedraad |
| Voltage | 120-240V |
| Maksimum verbruik | 7W |
| Pakket afmetings | 52 x 35 x 11 cm |
| Item gewig | 4.4 kg |
| ASIN | B079F662Y4 |
| EAN/GTIN | 7898584231223, 7898934820107 |
Waarborg inligting
This product comes with a standard manufacturer's warranty against manufacturing defects for 90 days from the date of purchase.
Bewaar asseblief u aankoopbewys vir waarborgeise. Die waarborg dek nie skade wat veroorsaak word deur misbruik, ongelukke, ongemagtigde wysigings of normale slytasie nie.
Kliënte ondersteuning
For technical assistance, service, or warranty inquiries, please contact Oneal customer support through their official webterrein of gemagtigde dienssentrums.
Webwebwerf: www.oneal.com.br


