1. Inleiding
This manual provides essential information for the safe and effective operation, maintenance, and troubleshooting of your Norton TR202 Tile Saw. Please read this manual thoroughly before assembly, operation, or maintenance to ensure proper use and to prevent injury or damage to the equipment.
The Norton TR202 is a 900W tile saw designed for precise cutting of various tile materials using a 200mm disc. It operates on 230V electrical power.
2. Veiligheidsinstruksies
Prioritiseer altyd veiligheid wanneer u elektriese gereedskap gebruik. Versuim om hierdie instruksies te volg, kan lei tot ernstige beserings of skade aan eiendom.
- Persoonlike Beskermende Toerusting (PPE): Always wear safety glasses, hearing protection, and appropriate work gloves. A dust mask is recommended when cutting dry.
- Elektriese veiligheid: Ensure the power supply matches the saw's requirements (230 Volts, 900 Watts). Use a ground fault circuit interrupter (GFCI) when operating in wet conditions. Do not operate with wet hands or in standing water.
- Bladveiligheid: Ensure the 200mm cutting disc is correctly installed and secured before operation. Never attempt to cut without the blade guard in place. Allow the blade to reach full speed before beginning a cut.
- Werksarea: Hou die werkarea skoon, goed belig en vry van obstruksies. Verseker voldoende ventilasie.
- Stabiliteit: Ensure the saw is placed on a stable, level surface. The integrated stand provides stability.
- Materiaalhantering: Secure the workpiece firmly. Never force the saw through material.
- Onderhoud: Ontkoppel die krag voordat enige onderhoud, aanpassings of lemveranderings uitgevoer word.
3. Komponente verbyview
Familiarize yourself with the main components of your Norton TR202 Tile Saw.

Figuur 3.1: Algehele view of the Norton TR202 Tile Saw on its stand.
The image above shows the complete tile saw assembly, including the cutting head, sliding table, water tray, and integrated stand with wheels for mobility.

Figure 3.2: Close-up of the cutting head, blade, and water feed line.
Hierdie view highlights the 200mm cutting disc, the protective blade guard, the motor housing, and the clear tubing for the water cooling system, which is essential for wet cutting.
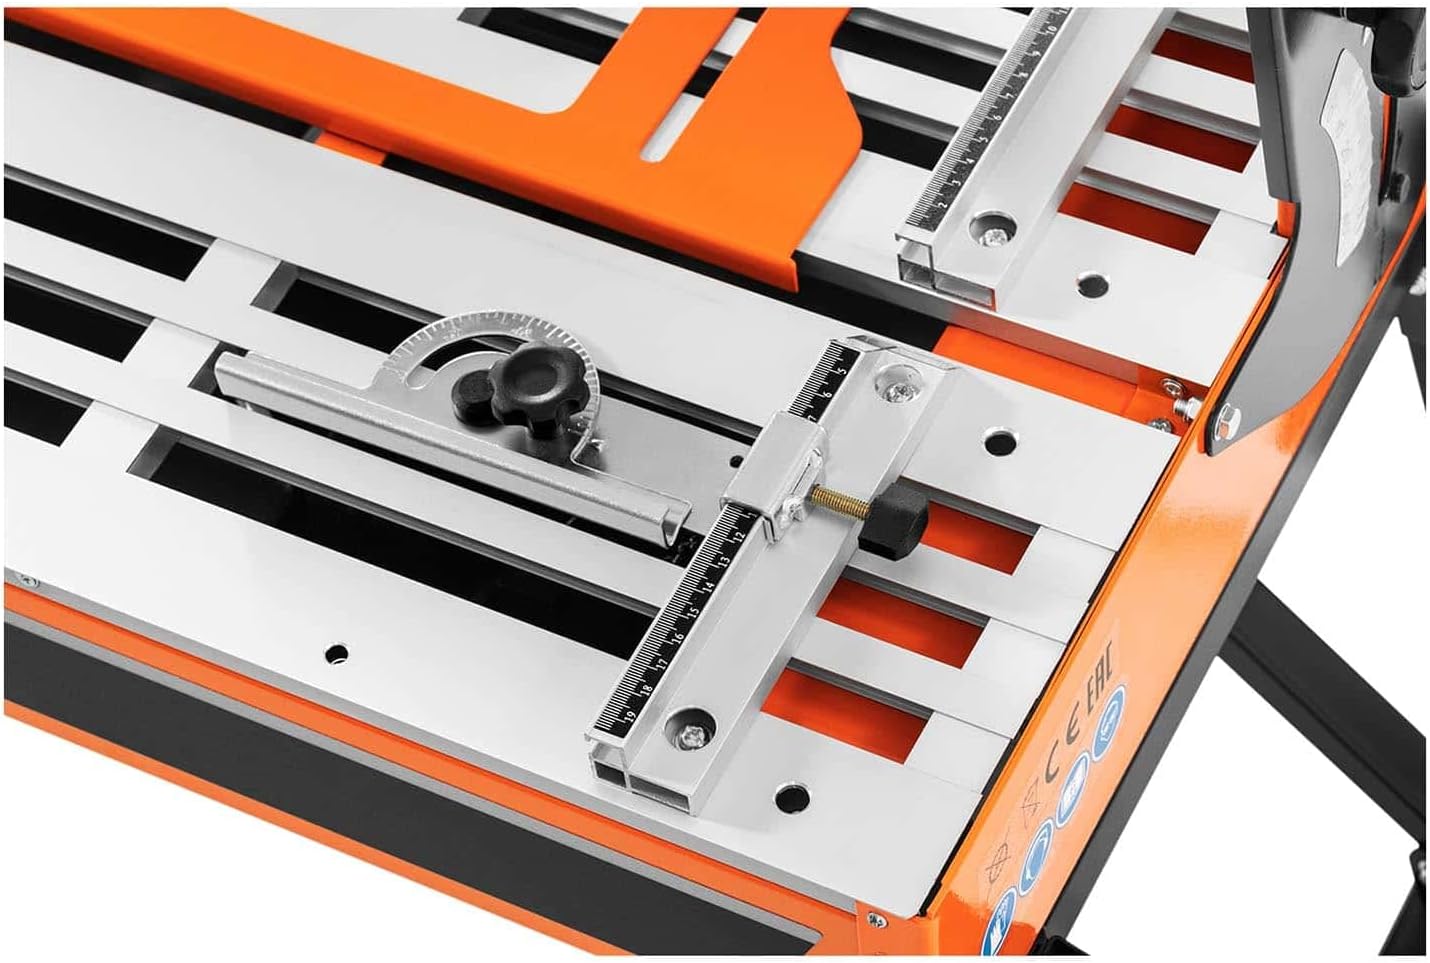
Figure 3.3: Detail of the sliding cutting table with measurement guides and adjustable fence.
The sliding table allows for smooth movement of the tile during cutting. The integrated ruler and adjustable fence assist in making accurate, repeatable cuts.

Figure 3.4: Bevel angle adjustment mechanism.
This mechanism allows the cutting head to be tilted for bevel cuts, up to 45 degrees, providing versatility for various tile installations.

Figure 3.5: Included tools for assembly and maintenance.
The saw comes with essential tools, including wrenches and a screwdriver, for assembly, blade changes, and minor adjustments.
4. Opstelling
4.1 Uitpak en monteer
- Verwyder alle komponente versigtig uit die verpakking.
- Assemble the stand according to the diagrams provided in the separate assembly guide (if applicable). Ensure all fasteners are securely tightened.
- Mount the tile saw unit onto the assembled stand, ensuring it is stable and level.
4.2 Lem Installasie
- Ontkoppel die saag van die kragtoevoer.
- Verwyder die lemskermbedekking.
- Using the provided wrenches, loosen the arbor nut and remove the outer flange.
- Place the 200mm diamond cutting disc onto the arbor, ensuring the rotation arrow on the blade matches the direction of rotation indicated on the saw.
- Plaas die buitenste flens terug en draai die asmoer stewig vas. Moenie te styf vasdraai nie.
- Replace the blade guard cover.
4.3 Watertoevoeraansluiting
- Fill the water tray with clean water to the recommended level.
- Ensure the water pump is submerged and the water feed lines are properly connected to direct water onto the blade during operation.
4.4 Elektriese aansluiting
- Verify that the power switch is in the 'OFF' position.
- Plug the saw into a properly grounded 230V electrical outlet protected by a GFCI.
5. Bedryfsinstruksies
5.1 Aan-/afskakel
- To turn on: Press the green 'ON' button.
- To turn off: Press the red 'OFF' button.
5.2 Aanpassing van snydiepte en -hoek
- Sny diepte: The cutting depth is generally fixed by the blade's position relative to the table. For specific adjustments, consult the saw's mechanical adjustment points.
- Cutting Angle (Bevel): Loosen the locking knob for angle adjustment (refer to Figure 3.4). Tilt the motor head to the desired angle (up to 45 degrees). Tighten the locking knob securely before cutting.
5.3 'n Sny maak
- Ensure the water tray is filled and the pump is operating, providing water to the blade.
- Place the tile firmly against the adjustable fence on the sliding table.
- Align the cutting line on the tile with the blade.
- Skakel die saag aan en laat die lem volle werkspoed bereik.
- Slowly and steadily push the sliding table forward, guiding the tile through the blade. Do not force the cut.
- Once the cut is complete, retract the table and turn off the saw. Wait for the blade to stop completely before removing the cut tile.
6. Onderhoud
Regular maintenance ensures the longevity and optimal performance of your tile saw.
- Skoonmaak: After each use, disconnect power and clean the saw thoroughly. Remove tile dust and debris from the table, water tray, and motor housing.
- Waterstelsel: Regularly clean the water tray and pump to prevent clogging from tile slurry. Replace water frequently.
- Bladinspeksie: Inspect the 200mm blade for wear, damage, or dullness. Replace worn blades promptly.
- Elektriese koord: Check the power cord for any signs of damage. Do not use the saw if the cord is frayed or damaged.
- Bewegende dele: Keep sliding parts clean and lubricated as recommended by the manufacturer (if applicable).
7. Probleemoplossing
Hierdie afdeling spreek algemene probleme aan wat jy mag teëkom.
| Probleem | Moontlike oorsaak | Oplossing |
|---|---|---|
| Saag begin nie | No power, faulty switch, tripped GFCI | Check power connection, reset GFCI, inspect power cord. |
| Swak snykwaliteit / Stadige sny | Dull or incorrect blade, insufficient water, forcing the cut | Replace blade, ensure adequate water flow, reduce feed pressure. |
| Oormatige vibrasie | Loose blade, damaged blade, unstable saw | Tighten blade, replace damaged blade, ensure saw is on a stable surface. |
| No water flow to blade | Empty water tray, clogged pump/lines | Refill water tray, clean pump and water lines. |
8. Spesifikasies
Key technical specifications for the Norton TR202 Tile Saw.
| Kenmerk | Spesifikasie |
|---|---|
| Handelsmerk | Norton |
| Modelnommer | 70184601106 |
| Wattage | 900 watt |
| Voltage | 230 Volt |
| Kragbron | Elektries met koord |
| Bladmateriaal | Aluminium Oxide or Carbide (for cutting disc) |
| Skyf deursnee | 200mm (implied by product title) |
| Snyhoek | Tot 45 grade |
| Item gewig | 2.2 pounds (Note: This weight seems unusually low for a tile saw and may refer to a component, not the full unit.) |
| Produk afmetings | 19.69 x 19.69 x 11.02 duim |
| Ingesluit komponente | Bare Tool (plus standard accessories like blade, pump, stand, tools) |
9. Waarborg en Ondersteuning
For warranty information, please refer to the documentation included with your purchase or contact the retailer or manufacturer directly. Specific warranty terms and conditions may vary.
For technical support, spare parts, or service inquiries, please contact your authorized Norton dealer or the manufacturer's customer service department.
10. Amptelike produkvideo's
Geen amptelike produkvideo's van die verkoper is tans beskikbaar vir inbedding nie.