
1. Inleiding
The MS8229 is an auto-ranging digital multimeter designed for professional and home use. It combines multiple measurement functions including AC/DC voltage and current, resistance, frequency, duty cycle, and capacitance. Additionally, it features built-in sensors for sound level, light (Lux), ambient temperature, and humidity, making it a versatile 5-in-1 testing instrument. Its large dual LCD display with backlight ensures clear readings in various conditions.

Figuur 1.1: Voorkant view of the MS8229 Digital Multimeter, showing the display, rotary switch, and input jacks.
2. Sleutel kenmerke
- Vertoon: 4000 counts, large dual LCD with backlight.
- Geïntegreerde sensors: Built-in Sound Level Meter, Light Meter (Lux), Ambient Temperature, and Humidity Tester.
- Core Measurements: Tests AC/DC Voltage and Current, Resistance, Frequency, Duty Cycle, and Capacitance.
- Diode & Continuity: Diode Check and Continuity Test with audible buzzer (if resistance is less than 40 ohms).
- Temperatuurmeting: Type K thermocouple contact temperature measurement.
- Datafunksies: Data Hold and Relative Measurement.
- Operasie: Auto Ranging / Selection.
- Kragaanwyser: Lae battery-aanwyser.
3. Pakketinhoud
Nadat u die pakkie oopgemaak het, maak asseblief seker dat al die items wat hieronder gelys word, teenwoordig en in 'n goeie toestand is:
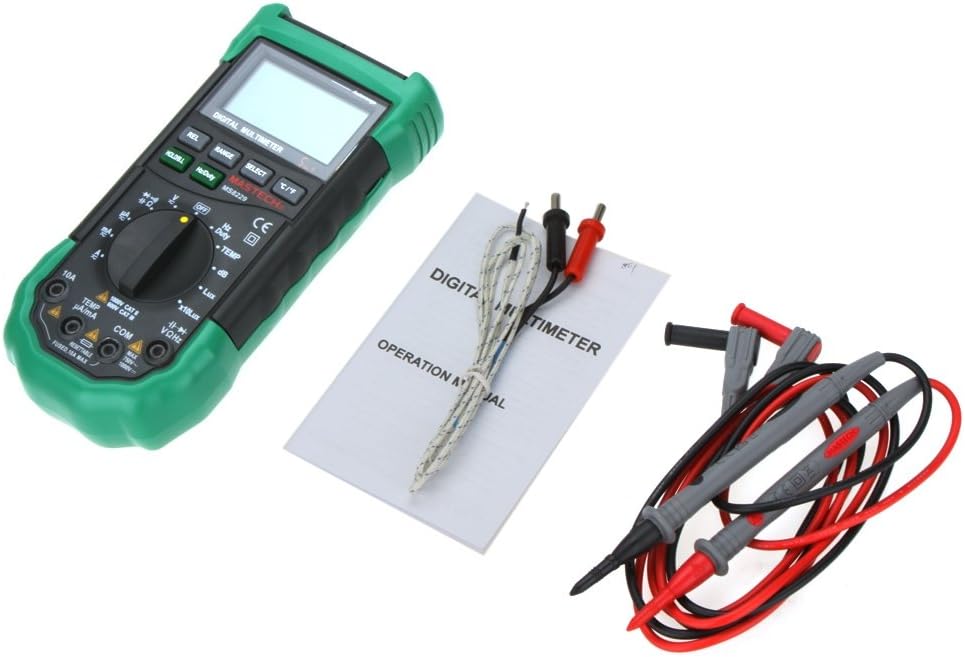
- 1 x MASTECH MS8229 Digital Multimeter
- 1 x Test Clip (Test Leads)
- 1 x Temperature Probe (Type K Thermocouple)
- 1 x Engelse handleiding

Figure 3.1: The MS8229 Multimeter shown with its included test leads, temperature probe, and user manual.
4. Veiligheidsinligting
To ensure safe operation and service of the meter, follow these safety precautions:
- Always ensure the meter is in the correct function and range for the measurement being taken.
- Moenie toepas voltage or current that exceeds the maximum rated input for the selected range.
- Wees versigtig wanneer u met voltagbo 30V AC RMS, 42V piek, of 60V DC. Hierdie volumestagdit hou 'n skokgevaar in.
- Before changing functions or ranges, disconnect the test leads from the circuit under test.
- Inspekteer toetsdrade vir beskadigde isolasie of blootgestelde metaal voor gebruik. Vervang indien beskadig.
- Moenie die meter gebruik as dit beskadig lyk of as die kas oop is nie.
- Vervang die batterye sodra die lae battery-aanwyser verskyn om akkurate lesings te verseker.
- Volg alle plaaslike en nasionale veiligheidskodes.
5. Opstelling
5.1 Battery installasie
The MS8229 requires three (3) 1.5V AAA batteries (not included) for operation.
- Maak seker dat die meter AFGESKAKEL is.
- Vind die batteryklepdeksel aan die agterkant van die meter.
- Gebruik 'n skroewedraaier om die skroef los te maak wat die batteryklep vasmaak.
- Verwyder die deksel.
- Insert three AAA batteries, observing the correct polarity (+ and -) as indicated inside the compartment.
- Plaas die batterydeksel terug en maak dit met die skroef vas.
Figuur 5.1: View of the battery compartment, showing the slots for three AAA batteries and the fuse location.
5.2 Verbinding van toetsdrade
Die korrekte verbinding van toetsdrade is noodsaaklik vir akkurate en veilige metings.
- Vir die meeste volumestage, resistance, frequency, capacitance, diode, and continuity measurements, insert the red test lead into the VΩHz jack and the black test lead into the COM domkrag.
- Vir stroommetings (mA/µA), steek die rooi toetsdraad in die TEMP µA/mA jack and the black test lead into the COM domkrag.
- For high current measurements (10A), insert the red test lead into the 10A jack and the black test lead into the COM domkrag.
- For temperature measurements, connect the Type K thermocouple probe to the TEMP µA/mA en COM jacks, observing polarity if applicable.

Figure 5.2: The MS8229 Multimeter with red and black test leads properly inserted into the input jacks.
6. Bedryfsinstruksies
The MS8229 features a rotary switch for function selection and several buttons for additional features.

Figure 6.1: The MS8229 Multimeter display showing typical readings for humidity and temperature, along with a main measurement.
6.1 Rotary Switch Functions
Turn the rotary switch to select the desired measurement function:
- AF: Turns the meter off.
- V ~: AC Voltage meting.
- V-: DC Voltage meting.
- Ω: Weerstandmeting.
- Diode/Kontinuïteit: Diode test and Continuity test.
- Hz/Plig: Frequency and Duty Cycle measurement.
- TEMP: Temperature measurement using the Type K thermocouple.
- dB: Sound Level measurement.
- Lux / x10Lux: Light (Illumination) measurement.
- HR: Relative Humidity measurement.
- A~: AC Current measurement (400µA to 10A).
- AAN-: DC Current measurement (400µA to 10A).
6.2 Knoppie Funksies
- HOLD/B.L: Press once to hold the current display reading. Press and hold to activate/deactivate the backlight.
- Hz/Plig: In Frequency/Duty Cycle mode, press to toggle between Hz and Duty Cycle display.
- REL: Activates relative measurement mode, displaying the difference between the current reading and a stored reference value.
- RANGE: Manually selects the measurement range (overrides auto-ranging).
- KIES: Toggles between different functions within a single rotary switch position (e.g., AC/DC in voltage/current modes, Diode/Continuity).
- °C/°F: In Temperature mode, toggles between Celsius and Fahrenheit units.
6.3 Performing Measurements (Examphulle)
6.3.1 DC Voltage Meting
- Stel die draaiskakelaar op V-.
- Plaas die rooi toetsdraad in die VΩHz jack and the black test lead into the COM domkrag.
- Verbind die toetsdrade parallel met die GS-volumetagdie bron of komponent wat gemeet moet word.
- Lees die voltage waarde op die skerm.
6.3.2 Weerstandmeting
- Maak seker dat die stroombaan of komponent gedeaktiveer is voordat weerstand gemeet word.
- Stel die draaiskakelaar op Ω.
- Plaas die rooi toetsdraad in die VΩHz jack and the black test lead into the COM domkrag.
- Connect the test leads across the component whose resistance is to be measured.
- Lees die weerstandswaarde op die skerm.
6.3.3 Temperatuurmeting
- Stel die draaiskakelaar op TEMP.
- Connect the Type K thermocouple probe to the TEMP µA/mA en COM domkragte.
- Place the tip of the thermocouple probe on or near the object/area whose temperature is to be measured.
- Druk die ° C / ° F. knoppie om tussen Celsius en Fahrenheit te wissel.
- Lees die temperatuurwaarde op die skerm.
7. Onderhoud
7.1 Skoonmaak
Vee die omhulsel af met advertensieamp cloth and mild detergent. Do not use abrasives or solvents. Keep the input terminals free of dirt or debris.
7.2 Batteryvervanging
When the low battery indicator appears on the display, replace the batteries as described in Section 5.1. Prompt battery replacement ensures continued accuracy and proper operation.
7.3 Sekeringvervanging
The 10A input jack is protected by a resettable fuse. If the 10A current measurement function stops working, it indicates the fuse has tripped. Disconnect the meter from the circuit, turn it off, and wait a few moments for the fuse to reset. If the fuse continues to trip, check for short circuits or excessive current draw in your application.
7.4 Berging
If the meter is not to be used for an extended period, remove the batteries to prevent leakage and damage to the meter.
8. Probleemoplossing
Indien die meter nie korrek funksioneer nie, kontroleer die volgende:
- Geen vertoon of dowwe vertoon: Gaan battery-installasie na en vervang batterye indien nodig.
- Verkeerde lesings: Ensure the correct function and range are selected. Verify test lead connections. Check for damaged test leads.
- "OL" of Oorlading Aanduiding: The measured value exceeds the selected range. Switch to a higher range or ensure the input is within the meter's maximum specifications.
- Huidige meting werk nie: Check if the 10A fuse has tripped (see Section 7.3). Ensure test leads are connected to the correct current input jacks.
- Kontinuïteits-gonser klink nie: Ensure the resistance is below 40 ohms for the buzzer to activate.
As probleme voortduur, kontak kliëntediens.
9. Spesifikasies
| Tipe meting | Omvang / Waarde | Akkuraatheid |
|---|---|---|
| DC Voltage (DCV) | 400m/4/40/400/1000V | 0.7% + 2 |
| AC Voltage (ACV) | 400m/4/40/400V; 750V | 0.8%+3; 1%+3 |
| DC-stroom (DCA) | 400/4000µ/40m/400mA; 4/10A | 1.2%+3; 2.0%+10 |
| AC Current (ACA) | 400/4000µ/40m/400mA; 4/10A | 1.5%+5; 3.0%+10 |
| Weerstand | 400/4K/40K/400K/4MΩ; 40MΩ | 1.2%+5; 2%+5 |
| Kapasitansie | 40n/400n/4µ/40µ/100µF | 3.0% + 3 |
| Frekwensie | 10/100/1K/10K/100KHz | 2.0% + 5 |
| Temperatuur | -20 ~ 1000°C; 4 ~ 1832°F | 2.0% |
| Relatiewe humiditeit (RH) | 20 tot 95% | 5.0% |
| Lig (Lux) | 4,000/40,000 Lux | 5.0% |
| Klankvlak (dB) | 40 ~ 100dB | 3.5% |
| Diodetoets | Ja | |
| Kontinuïteitstoetser | Buzzer if resistance < 40 ohms | |
| Pligsiklus | 0.1% - 99.9% | 3.0% |
| Kragtoevoer | 3 * 1.5V AAA-batterye (nie ingesluit nie) | |
| Dimensie | 195 * 92 * 55 mm | |
| Produk Gewig | 390g |
10. Waarborg en Ondersteuning
This product is designed for reliability and performance. For any issues or inquiries not covered in this manual, please refer to your purchase documentation for warranty details or contact the retailer/manufacturer's customer support. Keep your purchase receipt as proof of purchase.